
Are you looking to transfer your domain from Namecheap to Google? You’ve come to the right place.
Navigating the world of domain transfers can seem daunting, but it doesn’t have to be. In this guide, we’ll break down the process into simple, easy-to-follow steps. Imagine the peace of mind you’ll feel knowing your domain is securely managed by Google, one of the most trusted names in the industry.
Plus, you’ll gain access to a suite of powerful tools that can enhance your online presence. Ready to make the switch and unlock these benefits? Let’s dive in and ensure your domain transition is smooth and stress-free.
Preparation Steps
Begin by unlocking your domain from Namecheap. Obtain the authorization code needed for the transfer. Then, sign in to Google Domains and initiate the transfer process using the code. Follow the on-screen prompts to complete the transfer and update your domain settings.
Transferring a domain from Namecheap to Google might seem daunting, but with proper preparation, it can be a smooth process. Before diving into the actual transfer, it’s crucial to ensure everything is in order. This preparation step not only saves time but also prevents potential hiccups. Let’s explore the essential steps you need to take before initiating the transfer. ###Check Domain Eligibility
Before you start, confirm that your domain is eligible for transfer. Domains must be registered for at least 60 days and cannot be involved in any ongoing disputes. Log into your Namecheap account and check the domain’s registration date. If it’s over 60 days, you’re good to go. This rule is in place to prevent fraudulent activities and ensure you have rightful ownership of the domain. ###Unlock Domain
A locked domain is like a secured asset; it can’t be moved. You’ll need to unlock it to initiate the transfer process. Go to the domain list in your Namecheap account and find the domain you want to transfer. Click on the manage button and look for the lock status. Toggle it to unlock. Unlocking your domain is essential, as it allows the transfer to proceed without any barriers. It’s a quick step, but missing it can delay the whole process. ###Disable Whoisguard
WhoisGuard protects your personal information, but it can interfere with domain transfers. Disabling it temporarily ensures that Google can verify domain ownership. In the domain management section, find the WhoisGuard toggle. Switch it off to reveal your contact details temporarily. Once the transfer is complete, you can enable it again if needed. Disabling WhoisGuard might feel like exposing your privacy, but it’s a necessary step to smoothly transition your domain. Are you ready to take control and move forward with your transfer? These preparation steps are not just formalities; they streamline your transfer process and put you in control. Have you considered what other preparations might be necessary for a hassle-free domain transfer?Initiate Transfer At Google
Start by unlocking your domain management dashboard on Namecheap. Locate the transfer option and initiate domain transfer. Follow Google’s instructions to seamlessly transfer your domain, ensuring proper configuration and verification for a smooth transition.
Transferring your domain from Namecheap to Google might seem daunting, but it’s actually quite straightforward. Google Domains provides a seamless process to ensure your domain transfer is smooth and hassle-free. Before you dive in, it’s essential to understand the steps involved in initiating the transfer. You’ll need to access Google Domains and start the transfer process. Let’s break it down and make it easy for you.Access Google Domains
First things first, you’ll want to head over to Google Domains. Log into your Google account, where you can manage all your Google services. Once there, navigate to the Google Domains page. Have you ever wondered how you can consolidate all your digital assets under one roof? Google Domains offers a user-friendly interface, making it easy to manage your domains alongside other Google services.Start Transfer Process
Once you’re in Google Domains, look for the option to transfer a domain. It’s usually prominently displayed on the dashboard. Click on it to start the process. Make sure you have your domain authorization code ready—this is essential for the transfer. You’ll get this code from Namecheap. Think of it as your domain’s passport, allowing it to travel from Namecheap to Google. Now, follow the prompts to enter your domain details and authorization code. Google Domains will guide you through each step, ensuring clarity and simplicity. Have you ever transferred a domain before? If not, this is a great opportunity to learn how to manage your online presence more effectively. Once you initiate the transfer, Google Domains takes care of the rest, keeping you informed throughout the process. Transferring domains can seem technical, but with Google Domains, the process is designed to be straightforward. What would you do with the extra time saved from a smooth transfer process?Enter Authorization Code
To transfer a domain from Namecheap to Google, enter the authorization code in Google’s transfer section. This code, also known as an EPP code, ensures the security of your domain transfer. Make sure to unlock your domain at Namecheap first before proceeding with the transfer.
Transferring your domain from Namecheap to Google may seem like a daunting task, but with a clear understanding of the steps involved, it becomes straightforward. One of the crucial steps in this process is entering the authorization code. This code is like a key that ensures the secure transfer of your domain from one registrar to another. Without it, your transfer cannot proceed. Let’s break down how you can retrieve and submit this code effectively. ###Retrieve Code From Namecheap
To get started, log into your Namecheap account. Navigate to the “Domain List” section, where you’ll find a list of all your domains. Identify the domain you wish to transfer and click on “Manage” next to it. Once you’re on the domain settings page, look for the “Sharing & Transfer” tab. Here, you’ll find the “Transfer Out” option. Click on it, and you should see the option to get your authorization code. Namecheap will either display it directly or send it to your registered email address. Make sure you have access to this email. While waiting for the code, think about the benefits of transferring your domain. Is it better pricing, easier management, or enhanced features? Understanding your goals can make the process more meaningful. ###Submit Code On Google
Now that you have your authorization code, head over to Google Domains. Sign in with your Google account, and navigate to the “Transfer” section. Here, you’ll be prompted to enter the domain name you’re transferring. After confirming the domain details, you will be asked to enter the authorization code. Carefully enter the code you retrieved from Namecheap. Submitting the code is like flipping the switch. Your domain transfer will officially be in motion. Google will guide you through the remaining steps, which typically include verifying your contact information and confirming the transfer. Have you ever wondered why these steps are necessary? They ensure that only the rightful owner can transfer the domain, protecting you from unauthorized changes. Following these simple steps will help you smoothly transition your domain from Namecheap to Google. Remember, each step is designed to ensure security and maintain control over your valuable online asset.
Credit: www.youtube.com
Confirm Transfer Details
Transferring a domain from Namecheap to Google involves confirming transfer details accurately. First, unlock your domain and obtain the authorization code from Namecheap. Then, initiate the transfer on Google Domains by entering the code.
Transferring your domain from Namecheap to Google can seem daunting, but confirming the transfer details is crucial to ensure a smooth transition. This step involves verifying that all the information tied to your domain is accurate and up-to-date. Missing out on these details can delay your transfer or cause issues down the line. Let’s dive into the critical points you need to check during this stage. ###Verify Domain Information
First, make sure your domain name is spelled correctly. A small typo can lead to transferring a completely different domain. Check the expiration date. If your domain is close to expiring, renew it to avoid disruptions. Look into the domain’s lock status. Your domain must be unlocked to initiate the transfer, so ensure it’s set correctly. ###Check Contact Details
Contact details are essential for both verification and communication. Ensure that your email address is current and one you frequently check. Have you updated your phone number recently? Make sure your contact number is correct to avoid any verification issues. Review your administrative contact details. These are often overlooked but are crucial for transfer-related communications. By confirming these details, you minimize the risk of errors and ensure a smoother process. Have you ever missed an important email because your contact information was outdated? It’s a hassle you definitely want to avoid during a domain transfer. So take a moment to double-check everything before proceeding.Approve Transfer Request
Transferring a domain from Namecheap to Google involves a few straightforward steps. First, unlock the domain in Namecheap. Then, obtain the transfer authorization code. Finally, initiate the transfer through Google Domains using the code provided.
Transferring a domain from Namecheap to Google can feel like navigating through a maze, but the ‘Approve Transfer Request’ step is where you start seeing the light at the end of the tunnel. This stage is crucial because it confirms your intention to move your domain. Without approval, your domain remains stuck in digital limbo. So, let’s dive into how you can successfully approve your domain transfer and move forward with confidence.Authorize Via Email
Once you initiate the transfer, Namecheap will send you an email to confirm your request. This email is your key to the kingdom. Open it, and follow the instructions carefully. Clicking the authorization link is your way of saying, “Yes, I want this transfer to happen.” Don’t let it linger in your inbox. If you’ve ever missed an important email, you know the frustration it can cause. Act promptly to keep the process moving.Monitor Transfer Status
After authorizing the transfer, you might wonder, “What happens next?” Google provides a transfer status dashboard where you can track your domain’s journey. It’s like watching your package travel across the country. Check it regularly. You’ll feel more in control when you know where your domain stands in the transfer process. Have you ever experienced the anxiety of waiting for something important to arrive? Monitoring the status helps alleviate that. It’s reassuring to know that things are on track, or if there’s a hiccup, you can address it quickly. Approving your transfer request is just one step in the process, but it’s a pivotal one. By authorizing via email and keeping an eye on the transfer status, you’re actively participating in ensuring your domain’s seamless transition. Have you ever thought about how a small action can have a big impact? Approving that transfer request is exactly that—small but mighty.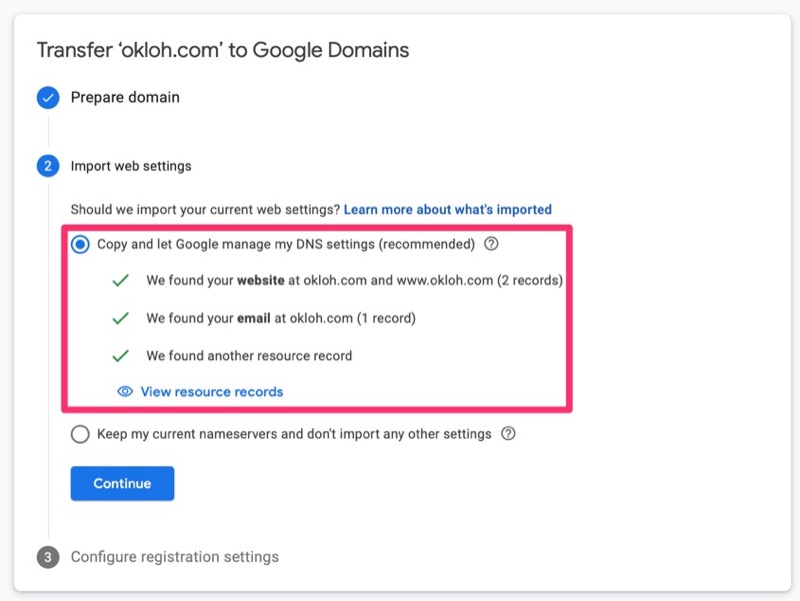
Credit: samwize.com
Finalize Domain Transfer
Transferring a domain from Namecheap to Google involves a few simple steps. First, unlock your domain at Namecheap. Then, obtain the authorization code and initiate the transfer in your Google Domains account. Finally, confirm the transfer and wait for the process to complete.
Finalizing a domain transfer from Namecheap to Google can feel like reaching the finish line of a marathon. After navigating through the initial steps, you’re almost there. But before you celebrate, a few crucial tasks remain to ensure a seamless transition. ###Access New Domain Settings
Once your domain is successfully transferred to Google, your first task is to access the new domain settings. Think of it as setting up a new home; you need to personalize it to your liking. Log into your Google Domains account and locate the newly transferred domain under “My Domains.” Click on it to explore the settings. Familiarize yourself with the interface, which might be different from Namecheap’s. This is an opportunity to make sure everything is in place and functioning as expected. ###Configure Google Domain Options
Now, it’s time to configure your domain options. Google Domains offers a range of features that you should take advantage of. Check the DNS settings and make sure they align with your website’s requirements. You might want to set up email forwarding if you were using Namecheap’s email services. With Google, you can also integrate G Suite for professional email services. Consider enabling privacy protection if it’s not already active. Google provides free WHOIS privacy, which helps keep your personal information safe. Take a moment to explore the website forwarding option if you have multiple domains pointing to a single site. It’s straightforward and can boost your SEO efforts by consolidating traffic. Finally, don’t forget to save any changes you make. It might seem trivial, but forgetting to save can cause unnecessary hiccups. Have you ever transferred a domain before? What challenges did you face? Engaging with these final steps ensures your domain is ready to go with Google.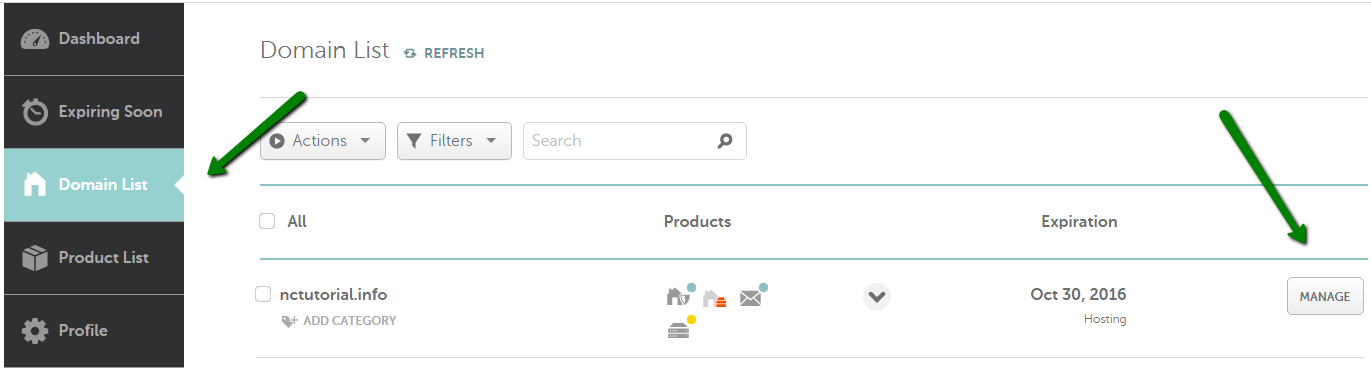
Credit: www.namecheap.com
Frequently Asked Questions
How Do I Transfer Domains Out Of Namecheap?
Log in to your Namecheap account and unlock your domain. Obtain the transfer authorization code. Initiate the transfer process with your new registrar using the code. Confirm the transfer via email. Ensure your domain is eligible for transfer and check for any pending fees.
How Do I Transfer My Domain To Google?
To transfer your domain to Google, unlock it with your current registrar. Obtain the authorization code. Go to Google Domains, click “Transfer”, and enter your domain name. Provide the authorization code, review details, and complete the payment. Confirm the transfer to finalize the process.
Can I Use A Namecheap Domain With Google Workspace?
Yes, you can use a Namecheap domain with Google Workspace. Configure DNS settings and verify domain ownership. Integration enhances email and collaboration tools for your domain.
How Do I Get My Domain To Show Up On Google?
Submit your site to Google Search Console. Use relevant keywords and optimize your content. Ensure mobile-friendliness and fast loading speed. Acquire quality backlinks and regularly update your content.
Conclusion
Transferring a domain from Namecheap to Google is simple. Just follow the steps outlined. Double-check each step to avoid mistakes. Ensure your domain is unlocked and ready. Keep your authorization code handy. Patience is key during the transfer process. It might take a few days.
Once complete, enjoy managing your domain with Google. Their interface is user-friendly and efficient. Always reach out to support if issues arise. Now, confidently transfer your domain. You’re equipped with the knowledge needed. Happy transferring!


