
Do you ever feel overwhelmed by the endless stream of emails flooding your inbox? Managing your digital communication can be a real headache, especially when you’re juggling multiple accounts.
Imagine having one reliable and private email service that streamlines your messages and safeguards your information. That’s where Namecheap’s Private Email comes into play. You’re about to discover how this service can simplify your email management while keeping your data secure.
Stick around to learn how easy it is to set up and make the most of your Private Email with Namecheap. It’s time to reclaim control over your inbox!
Setting Up Your Private Email Account
Discover how to use Private Email Namecheap for a secure and personalized email experience. Follow simple steps to create your account and manage your emails efficiently. Protect your communication with enhanced security features and user-friendly tools.
Setting up your private email account with Namecheap is a straightforward process that can enhance both your personal and professional communications. Whether you’re new to this service or just looking to streamline your email setup, understanding each step is crucial. I’ll guide you through the journey from choosing the right plan to accessing your dashboard.Choosing The Right Plan
Selecting the best plan for your needs is the first step. Namecheap offers various plans to suit different requirements and budgets. Are you managing a small team or just need a single mailbox? Evaluate how many email addresses you need and the storage space required. A small business might benefit from a plan with multiple mailboxes and more storage. Consider future growth to avoid switching plans later.Registering Your Domain
A unique domain name is vital for creating a professional email address. If you don’t have one yet, you can register your domain directly through Namecheap. A catchy domain can make your email stand out and be easily remembered. Ensure your domain name is concise and relevant to your brand or personal identity. If your desired domain is taken, explore creative alternatives that maintain brand integrity.Accessing The Dashboard
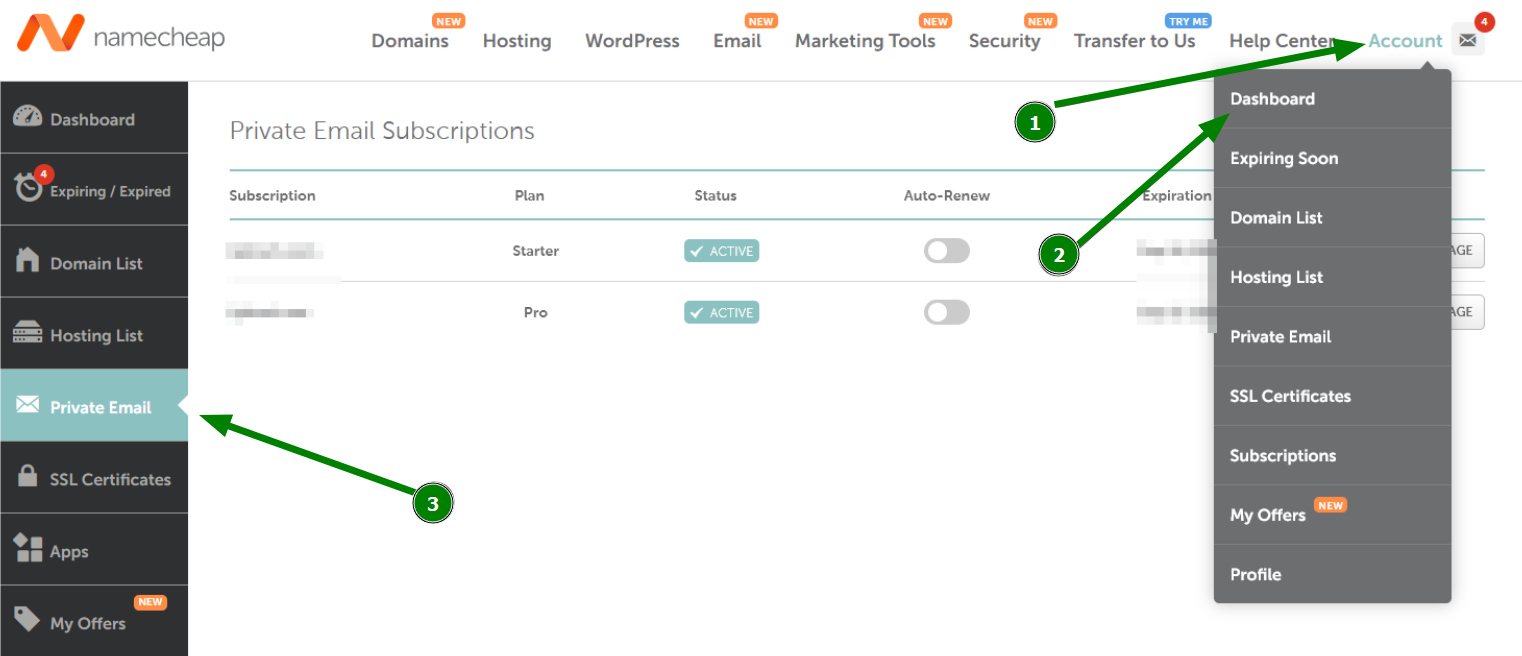
Once your domain is set up, accessing your private email dashboard is your next task. The dashboard is your control center, where you manage email settings, create new mailboxes, and more. Log into your Namecheap account and navigate to the Email section. Familiarize yourself with the dashboard features. Are there any specific settings you need to configure immediately, like adding aliases or setting up forwarding? By taking these steps, you can efficiently set up your private email account and start using it to its full potential. What challenges have you faced in setting up email accounts in the past, and how did you overcome them? Share your insights!
Credit: www.youtube.com
Configuring Email Settings
Configuring email settings with Namecheap’s Private Email enhances your communication efficiency. Explore the straightforward setup process to ensure seamless email management. Enjoy a user-friendly interface designed for easy navigation and optimal functionality.
Configuring email settings is an essential step to make the most out of your Private Email from Namecheap. It’s not just about setting up your inbox; it’s about customizing your email experience to fit your unique needs. Whether you’re a small business owner looking to streamline communication or an individual wanting to keep things organized, configuring your email properly can make a big difference. Let’s dive into some key areas you should focus on.Customizing Email Addresses
Creating custom email addresses is a great way to present a professional image. Imagine having emails like ‘info@yourdomain.com’ or ‘support@yourdomain.com’ rather than a generic email provider. It’s a simple setup in Namecheap’s dashboard. Namecheap lets you create multiple addresses under your domain. Use these to categorize your communication channels effectively. Think of it as setting up different inboxes for different roles without the chaos of mixing personal emails with work emails.Forwarding And Aliases
Email forwarding and aliases can simplify how you manage incoming messages. Forwarding lets you redirect emails from one address to another. This is particularly useful if you want to view all your emails in one inbox. Aliases, on the other hand, allow you to create alternate names for a single email account. If you have a team, setting up aliases like ‘sales@yourdomain.com’ for multiple addresses can keep things tidy. You handle all correspondence from one main account without confusion.Spf And Dkim Setup
Have you ever wondered how to ensure your emails don’t end up in the spam folder? Setting up SPF (Sender Policy Framework) and DKIM (DomainKeys Identified Mail) can help with that. These email authentication protocols prove that your messages are genuine and not spoofed. With Namecheap, you can easily configure SPF and DKIM in your DNS settings. It’s a technical task, but the peace of mind is worth it. Once set up, your emails are less likely to be flagged as spam, enhancing your credibility. Are you ready to transform your email communication? Dive into these configurations and witness a streamlined, professional experience. What adjustments will you make first to boost your email efficiency?Integrating With Email Clients
Setting up Private Email with Namecheap allows seamless integration with popular email clients. Follow straightforward steps to configure your email account for efficient communication. Enhance productivity by connecting your email with clients like Outlook or Thunderbird.
Integrating your Private Email from Namecheap with your favorite email clients can make your communication seamless. Whether you’re managing work emails or staying in touch with friends, having everything in one place can save you time and effort. Let’s dive into how you can connect your Namecheap private email with different platforms for a streamlined experience.Connecting With Outlook
Setting up your Namecheap email with Outlook is straightforward. Start by opening Outlook and navigating to the ‘File’ tab. From there, click on ‘Add Account’ and enter your Namecheap email credentials. Outlook typically auto-configures most settings, but double-check the incoming and outgoing server settings to ensure they align with Namecheap’s recommendations. You might wonder why Outlook? It’s known for its user-friendly interface and robust features, making email management a breeze. Once set up, you’ll have all your emails, calendars, and contacts synced, keeping you organized and on top of your tasks.Syncing With Gmail
Gmail’s integration with Namecheap private email allows you to access your emails on a familiar platform. Start by heading to your Gmail settings and selecting ‘Accounts and Import’. Next, click on ‘Add a mail account’ and enter your Namecheap email address. Gmail will guide you through a few steps, where you’ll need to input your server details. Ensure that the settings are correct to avoid any errors in syncing. Once completed, you can send and receive Namecheap emails directly through your Gmail account, giving you a unified inbox experience.Mobile Device Setup
Accessing your Namecheap email on the go is crucial in today’s fast-paced world. Whether you use an iPhone or Android, setting up your email is quick. Go to your device’s email app, choose to add a new account, and select ‘Other’ if you don’t see Namecheap as an option. Enter your email details, and ensure you input the correct server settings as provided by Namecheap. Once set up, you can check and respond to emails anytime, anywhere. This flexibility means you’re always connected, whether you’re at a café or traveling. Have you considered the benefits of integrating your email across all devices? It not only saves time but also ensures you never miss an important email, no matter where you are. This setup can be a game-changer for your productivity and efficiency.
Credit: privateemail.com
Managing Security Features
Managing security features in your Private Email Namecheap account is essential. Your email security should be strong and reliable. This ensures your data remains safe from threats. Let’s explore how you can optimize the security settings of your account. This section will guide you through enabling two-factor authentication, adjusting spam protection settings, and setting up backup and recovery options.
Enabling Two-factor Authentication
Two-factor authentication adds an extra layer of security. It requires two forms of identification. Start by accessing your account settings. Select the security tab. Here, you will find the two-factor authentication option. Choose a method that suits you. You can use an app or receive a text message. Follow the instructions to enable this feature. This makes unauthorized access harder.
Spam Protection Settings
Spam protection keeps your inbox clean. Go to your email settings. Find the spam protection section. Adjust the filters to suit your needs. Choose what types of emails to block. You can block specific email addresses. You can also filter suspicious content. Regularly update these settings. This helps minimize unwanted emails. It also protects against phishing attempts.
Backup And Recovery Options
Backing up your emails is crucial. It helps prevent data loss. Check your account settings for backup options. You can schedule regular backups. Choose the frequency that fits your needs. Ensure your backups are stored safely. Recovery options allow you to restore lost emails. If something goes wrong, you can recover your data. This feature is vital for maintaining email integrity.
Troubleshooting Common Issues
Setting up Private Email with Namecheap can sometimes lead to common issues. Check your email settings for correct server details. Ensure internet connection is stable for seamless access.
Troubleshooting common issues with your Private Email on Namecheap can sometimes feel like deciphering a puzzle. But don’t worry, you’re not alone. It’s essential to tackle these problems efficiently to ensure seamless communication. Whether you’re facing login problems, email delivery delays, or sync errors, understanding the root cause can help you find quick solutions. Let’s dive into these common hiccups and see how you can overcome them easily.Login Problems
Login issues can be frustrating, especially when you’re trying to access important emails. If you find yourself locked out, the first step is to verify your credentials. Double-check your email address and password for any typos or capitalization errors. Still can’t get in? Resetting your password might be the key. Use the “Forgot Password” option and follow the prompts to regain access. Ensure your browser is up-to-date, as outdated versions can sometimes cause login issues.Email Delivery Delays
Are your emails taking forever to reach their destination? Email delivery delays can disrupt your workflow. Start by checking your internet connection; a slow network can contribute to delays. Examine your email settings to ensure they are correctly configured. Sometimes, overly aggressive spam filters or antivirus software can hold up emails. Adjusting these settings can help expedite the process.Resolving Sync Errors
Sync errors can lead to missing or outdated information across your devices. To resolve these, ensure that your email app is updated to the latest version. Outdated apps can often have bugs that affect syncing. If your emails aren’t syncing, check the settings on both your device and the email server. Ensure that IMAP or POP3 settings are correctly configured. Sometimes, simply removing and re-adding your email account can solve the problem. Have you ever noticed that small tweaks can make a big difference? By tackling these issues head-on, you can keep your communication flowing smoothly. What other strategies have you found effective for troubleshooting email issues? Share your experiences and let’s help each other out!Maximizing Productivity With Private Email
Maximizing productivity with Private Email from Namecheap can transform the way you manage your digital communications. With a suite of powerful features, this service offers more than just sending and receiving emails. It provides tools to streamline your daily tasks and enhance collaboration, making your work life not only more efficient but also more enjoyable.
Organizing With Folders And Labels
Are your emails a chaotic mess? Private Email helps you bring order with folders and labels. You can create customized folders to categorize your emails—whether by project, client, or urgency. This way, you can swiftly locate important messages without wading through clutter.
Labels work like tags, adding another layer of organization. Assign multiple labels to a single email for versatile sorting. Imagine the time saved when you can easily pull up all emails related to a specific task or person. How much more could you accomplish in a day with this kind of efficiency?
Using Calendars And Tasks
Calendars and tasks are essential for staying on top of your schedule. Private Email’s calendar feature lets you set appointments, reminders, and deadlines, all accessible from your inbox. This integration keeps everything you need in one place.
Tasks can be created directly from your emails, allowing you to prioritize and plan your workload effectively. Set due dates and get reminders to ensure nothing falls through the cracks. Picture a day where you know exactly what needs to be done and when—how stress-free would that be?
Collaboration Tools
Working with others is seamless with Private Email’s collaboration tools. Share documents and notes directly through your email, reducing the back-and-forth often required in team settings. You can also manage shared calendars, making it easier to coordinate meetings and deadlines.
How often have you struggled to get everyone on the same page? With these tools, you can simplify communication and enhance teamwork. Think about how much more you could achieve with a team that communicates effortlessly.
By leveraging these features, Private Email from Namecheap doesn’t just organize your inbox—it transforms it into a productivity powerhouse. What are you waiting for to optimize your daily workflow?
Credit: www.namecheap.com
Frequently Asked Questions
How To Access Private Emails On Namecheap?
Log into your Namecheap account. Navigate to “Private Email” under “Hosting List. ” Select your domain and click “Manage. ” Access emails via the webmail interface or set up with email clients using provided server settings. Ensure you have active email hosting with Namecheap.
How Does Private Email Work?
Private email services offer secure, encrypted communication. They protect your data and privacy from unauthorized access. These services often include features like spam filtering and two-factor authentication. Users can send and receive emails knowing their information is safe and private.
Popular providers include ProtonMail and Tutanota.
How Do I Log Into Private Email?
Visit the private email login page. Enter your email address and password. Click “Login” to access your account securely. Ensure your browser is updated for optimal performance. If you face issues, check your internet connection or contact support for assistance.
How Much Is Private Email On Namecheap?
Private email on Namecheap starts at $0. 91 per month for the Starter plan. Prices vary based on selected features and storage. You can choose from different plans that fit your needs. Visit Namecheap’s website for the latest pricing details and plan options.
Conclusion
Setting up your Private Email with Namecheap is straightforward and beneficial. It enhances your communication security and keeps your data safe. Simple steps guide you through the setup process. Remember to use strong passwords for added protection. Regularly check for updates to maintain security.
With Namecheap, managing your email becomes easier. A secure and efficient email system is essential for personal and business needs. Happy emailing!


