Your website’s logo is more than just a picture—it’s the face of your brand. Adding your logo to your WordPress site helps build trust, makes your site look professional, and keeps visitors coming back.
If you’ve been wondering how to do this quickly and without hassle, you’re in the right place. This guide will walk you through simple steps to add your logo, even if you’re not tech-savvy. Keep reading, and by the end, your site will have that polished, memorable look you want.

Credit: learn.wordpress.org
Choose The Right Logo
Choosing the right logo is key for your WordPress site. It creates the first impression visitors see. A good logo shows your brand’s personality. It builds trust and makes your site look professional. Take time to pick a logo that fits your business style and goals.
Logo Design Tips
Keep your logo simple. Too many details confuse visitors. Use clear shapes and easy-to-read fonts. Choose colors that match your brand’s mood. Make sure the logo looks good in black and white. Test the logo at different sizes. It should be clear on both small and large screens.
File Formats To Use
Use PNG for a logo with a transparent background. This works well on any website color. SVG files are great for logos too. They keep the image sharp on all screen sizes. Avoid using JPG logos. They do not support transparency and can blur. Keep your logo file size small. This helps your site load faster.
Credit: www.gavick.com
Prepare Your Logo For Upload
Preparing your logo before uploading it to your WordPress site is important. A well-prepared logo looks professional and loads quickly. This step saves time and avoids problems during the upload process.
Resize And Optimize
Make sure your logo is the right size. Large images slow down your website. Resize your logo to fit the space where it will appear.
Use image editing tools like Photoshop or free options like GIMP. Save the logo in web-friendly formats like PNG or JPEG. Compress the file to reduce its size without losing quality. Smaller files improve website speed and user experience.
Transparent Backgrounds
A logo with a transparent background fits any website design. It looks clean and professional on different backgrounds.
Create your logo with a transparent background using PNG format. Avoid white or colored boxes around the logo. This makes your site look polished and neat.
Add Logo Via WordPress Customizer
Adding a logo to your WordPress site helps build your brand. The WordPress Customizer offers a simple way to upload and adjust your logo. This tool lets you see changes in real time. No need for extra plugins or coding skills.
The process is quick and user-friendly. It suits beginners and those with little tech knowledge. Follow the steps below to add your logo using the WordPress Customizer.
Navigate To Site Identity
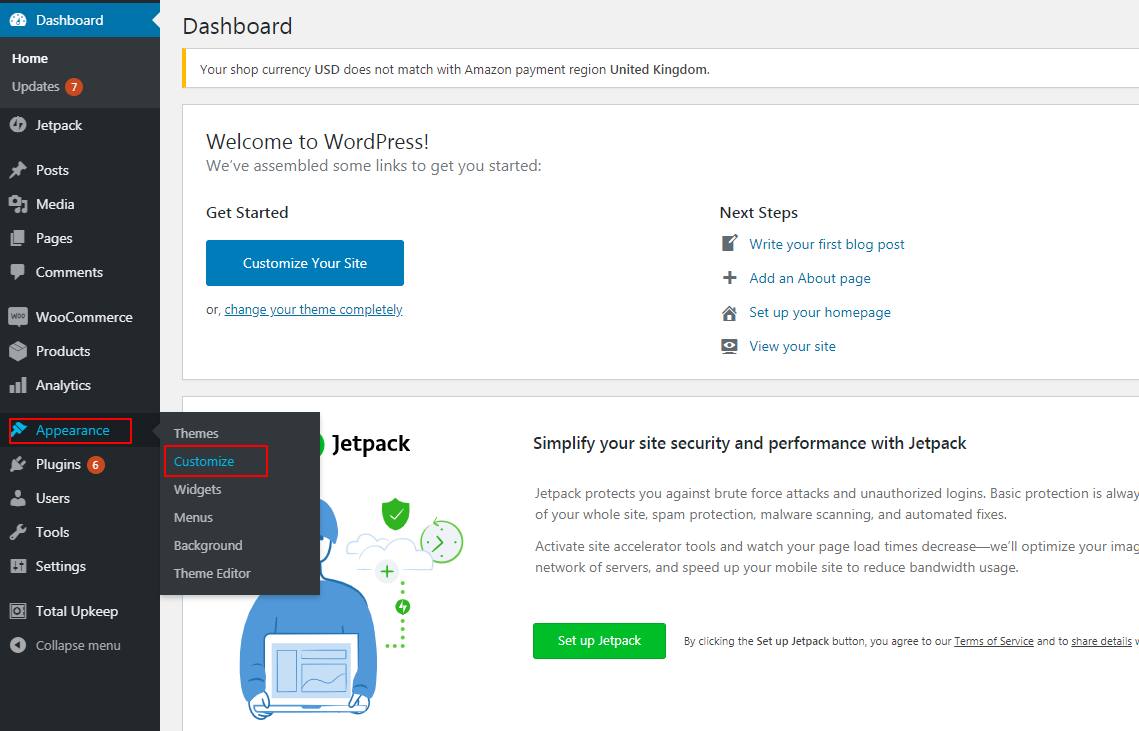
Log into your WordPress dashboard. Find the “Appearance” menu on the left side. Click on “Customize” to open the Customizer panel.
Inside the Customizer, locate the “Site Identity” section. This area controls your site’s title, tagline, and logo. Click on “Site Identity” to start adding your logo.
Upload And Adjust Logo
Click the “Select Logo” button to upload your logo file. Choose an image from your computer or media library. Pick a clear, high-quality logo for best display.
After uploading, you can crop the logo. Adjust the size to fit your site’s header perfectly. Preview the changes on the right side of the screen.
When satisfied, click “Publish” to save your new logo. Your site now displays your brand clearly and professionally.
Use Theme Options For Logo Placement
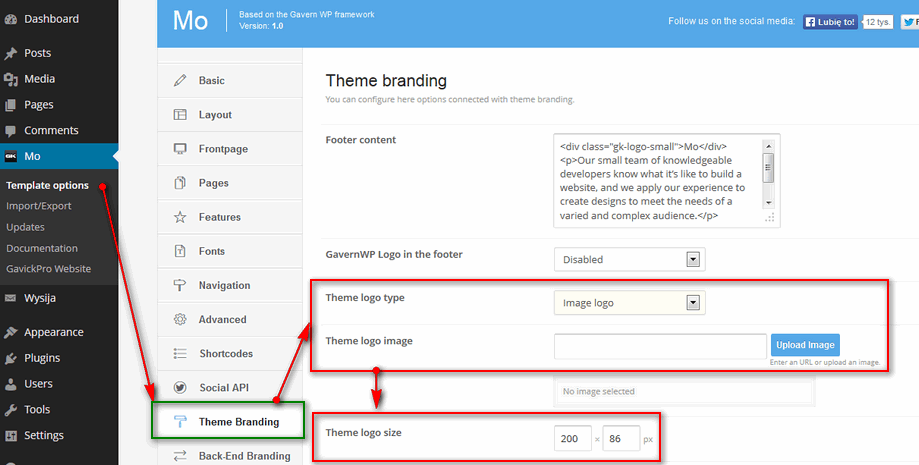
Using theme options is a simple way to place your logo on a WordPress site. Themes often have built-in settings for logos. These settings control where and how your logo appears. You do not need extra plugins or coding.
Theme options give you control over logo size and position. This helps keep your site design clean and professional. Adjustments are easy and fast. Changes show up right away in the preview.
Check Theme Settings
Start by opening your WordPress dashboard. Go to Appearance > Customize. Find the section labeled “Site Identity” or “Logo.” This area holds the logo upload tool and placement options. Some themes have special tabs for header settings. Explore these to see all logo controls.
Look for logo size, alignment, and padding options. These settings let you fit the logo perfectly in the header. Your theme might support different logos for mobile and desktop views. Upload separate files if needed for best display.
Customize Logo Position
Choose where your logo sits on the page. Common places are top left, center, or right in the header. Some themes allow logo placement above or below the menu. Select the option that matches your site’s style.
Adjust margins or spacing to avoid crowding other elements. Preview changes on different screen sizes. This ensures your logo looks good on phones and tablets. Save your settings once you are happy with the position.
Add Logo With Plugins
Adding a logo to your WordPress site can boost your brand’s identity. Plugins make this task simple and flexible. They allow you to place your logo in different parts of your website. You can also customize the size, position, and style easily. Using plugins helps avoid coding and saves time.
Popular Logo Plugins
Several plugins help you add logos effortlessly. “WP Logo Showcase” lets you display logos in a grid or carousel. “Logo Carousel” offers smooth scrolling logo sliders. “Site Logo” plugin integrates logos with your theme settings. These plugins work well with most WordPress themes. They are user-friendly and lightweight.
Step-by-step Plugin Setup
First, go to your WordPress dashboard. Click on “Plugins” and then “Add New.” Search for your chosen logo plugin. Click “Install Now” and then “Activate.”
Next, find the plugin settings in the dashboard menu. Upload your logo file, usually a PNG or JPG. Adjust the logo size and placement options. Save your changes and preview your site. Your logo should now appear as you set it.
Credit: www.inmotionhosting.com
Optimize Logo For Mobile Devices
Optimizing your logo for mobile devices is essential for a WordPress site. Mobile users have smaller screens and slower connections. A clear, fast-loading logo improves the user experience. It helps your brand look professional and trustworthy on any device.
Responsive Logo Techniques
Use a logo that adjusts size based on screen width. SVG format works well because it stays sharp on all sizes. Set CSS rules to resize the logo for phones and tablets. Consider using a simplified version of your logo for smaller screens. This keeps the logo clear and recognizable.
Test On Various Screens
Check how your logo looks on multiple devices. Use phones, tablets, and desktop computers for testing. Make sure the logo is not too big or too small. Test in different browsers for consistency. Fix any issues with alignment or pixelation before going live.
Troubleshoot Common Logo Issues
Adding a logo to your WordPress site is simple. But sometimes, issues can occur. These problems can stop your logo from showing correctly. This section helps you fix common logo issues fast. Clear steps make your logo look perfect on your site.
Logo Not Displaying
Check if the logo file is uploaded. Sometimes, the logo does not show because it is missing. Also, verify the file path in your theme settings. Incorrect paths stop the logo from appearing. Clear your site cache to see recent changes. Disable plugins that may block images. Use the WordPress customizer to add the logo again. This method often solves display problems quickly.
Blurry Or Pixelated Logo
Use a high-quality image for your logo. Low resolution images appear blurry on screens. Upload logos in PNG or SVG format for better clarity. Resize your logo to fit the recommended dimensions. Large images shrink and lose sharpness. Avoid stretching small images to fill space. Check your theme’s recommended logo size and follow it. Proper size keeps your logo clear and sharp.
Enhance Branding Beyond The Logo
Adding a logo to your WordPress site is just the first step in building your brand. True branding goes beyond the logo itself. It involves a consistent look and feel that visitors recognize instantly. This creates trust and a professional image. Use colors, fonts, and style that match your brand’s personality. Keep these elements uniform across your website for the best effect.
Consistent Color Schemes
Choose a set of colors that match your brand identity. Use these colors on your background, buttons, and links. Consistent colors make your site easy to recognize. They also improve user experience and keep visitors engaged. Avoid using too many colors; stick to two or three main shades. This keeps your website clean and focused.
Typography And Visual Style
Select fonts that match your brand’s tone. Use one or two fonts for headings and body text. Keep font sizes readable and consistent. Visual style includes images, icons, and layout. Use similar styles for all graphics. This helps visitors feel comfortable and familiar with your site. A clear, simple style supports your brand message well.
Frequently Asked Questions
How Do I Upload A Logo To My WordPress Site?
To upload a logo, go to your WordPress dashboard. Navigate to Appearance > Customize > Site Identity. Click “Select logo,” upload your image, and save changes. Your logo will appear on your site header immediately.
What Image Size Is Best For WordPress Logos?
The ideal logo size varies by theme but generally 250×100 pixels works well. Use a transparent PNG for best quality and faster loading. Always check your theme’s recommended dimensions for optimal display.
Can I Add A Logo Without Using A Plugin?
Yes, you can add a logo without plugins via the WordPress Customizer or by editing your theme’s header. php file. The Customizer is easier and safer for most users to upload and manage logos.
How Do I Make My Logo Mobile-friendly In WordPress?
Use a responsive logo by uploading a high-resolution image. Check your theme settings for mobile logo options. Test your site on different devices to ensure your logo scales and displays correctly.
Conclusion
Adding a logo to your WordPress site helps build your brand identity. It makes your website look more professional and trustworthy. The steps are simple and quick to follow. You can change or update the logo anytime you want. A clear logo improves visitors’ experience and site recognition.
Try to choose the right size and style for your logo. Keep your site looking clean and easy to use. Now, your WordPress site feels more complete and personal.