
If you want to track your website’s performance and understand your visitors better, adding Google Tag code to your WordPress site is a must. But you might be wondering how to do it without messing up your site or spending hours on complicated steps.
This guide will walk you through the simplest way to add Google Tag code, even if you’re not a tech expert. By the end, you’ll have the tools to unlock powerful insights that can boost your website’s success. Ready to get started?
Let’s dive in!
Why Add Google Tag To WordPress
Adding Google Tag to WordPress helps track your website’s traffic and user actions. It gives clear data about visitors and their behavior. This data helps improve your site and marketing strategies.
Google Tag Manager makes it easier to manage multiple tracking codes. It keeps your website clean and fast. Also, it saves time by allowing code updates without editing site files.
What Is Google Tag Manager?
Google Tag Manager is a tool for managing tracking codes. It lets you add and update tags from one place. No need to touch your website’s code every time.
Benefits Of Using Google Tag On WordPress
Tracking user actions helps you understand your audience better. You can see which pages get the most visits. Also, it shows what users click and how they move.
Improved Marketing With Data
Google Tag provides data to improve your ads and campaigns. You can target the right people at the right time. This leads to better results and less wasted budget.
Easy Management And Updates
Google Tag Manager lets you change or add tags quickly. No need to hire a developer every time. This keeps your site up to date and running smoothly.
Credit: wplook.com
Different Types Of Google Tags
Google tags help track website activity and user behavior. Different tags serve different purposes. Knowing the types helps choose the right one for your site.
Google Analytics
Google Analytics tracks visitor data on your site. It shows how users find and use your pages. You get reports on traffic, user actions, and site performance. Adding this tag helps improve your website’s content and design.
Google Ads
Google Ads tags track ad campaign results. They measure clicks, conversions, and sales from ads. This tag helps see which ads bring visitors and customers. Use it to optimize ad spending and improve campaigns.
Google Tag Manager
Google Tag Manager manages many tags in one place. It simplifies adding and updating tags without changing code. You can add Google Analytics, Ads, and other tags easily. It saves time and reduces errors on your website.
Preparing Your Google Tag Code
Before adding Google Tag code to your WordPress site, you need to prepare it correctly. This preparation helps track your website traffic and user actions. The process starts with creating a Google Tag account. Then, you generate the specific code to insert into your website. Each step is simple and important for accurate data collection.
Create A Google Tag Account
Go to the Google Tag Manager website and sign in with your Google account. Click on “Create Account” and enter a name for your account. Choose your country and click “Continue.” Next, add your website name and URL. Select “Web” as the platform. Finally, click “Create” to finish setting up your account.
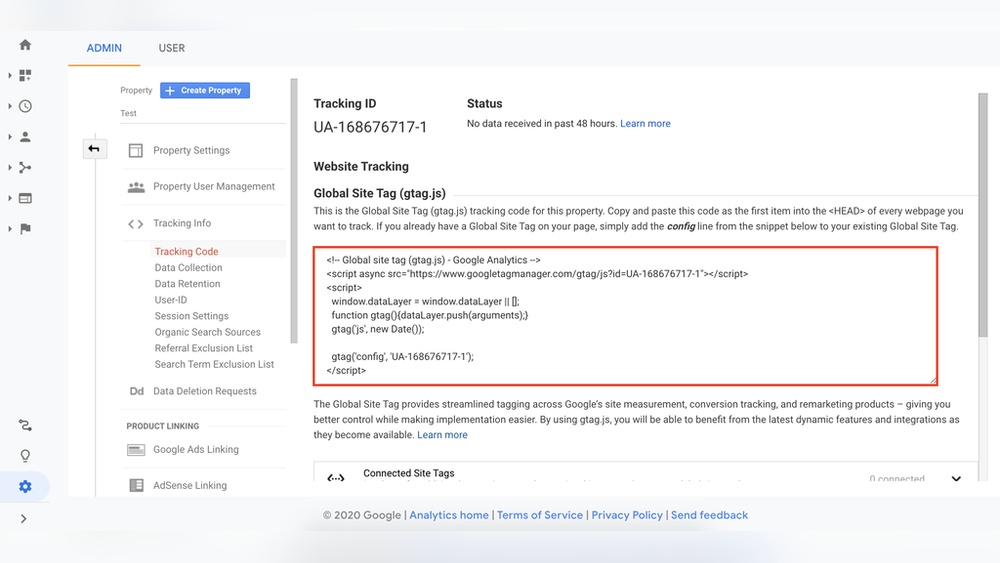
Generate The Tag Code
Once the account is ready, Google Tag Manager gives you a code snippet. This code connects your website to Google Tag Manager. Copy the two parts of the code shown on the screen. One goes inside the
section of your WordPress site. The other part goes just after the opening tag. Keep this code safe for the next step.Adding Google Tag Without A Plugin
Adding the Google Tag code to your WordPress site without a plugin is simple. You can place the code directly in your theme files or use the WordPress Customizer. Both methods help you track visitors and gather data fast. No need to install extra tools or slow down your site.
Editing Theme Header File
One way to add the Google Tag code is by editing the header file of your WordPress theme. This file controls what appears in the head section of your website.
First, go to your WordPress dashboard. Next, find “Appearance” and click on “Theme Editor.” Look for the file called “header.php.” Open it carefully.
Paste the Google Tag code right before the closing tag. Save the changes. Your site will now load the Google Tag code on every page.
Be careful. Editing theme files directly can cause errors if done wrong. Always back up your site before making changes.
Using WordPress Customizer
You can also add the Google Tag code using the WordPress Customizer. This method works well for simple code snippets.
Go to “Appearance” and select “Customize.” Then find the “Additional CSS/JS” or “Header Scripts” section. Not all themes have this, so check yours first.
Paste the Google Tag code in the header script box. Save and publish your changes. This adds the code safely without touching theme files.
This method is easier and safer for beginners. No risk of breaking your site. Your Google Tag will now run on all pages.
Adding Google Tag Using Plugins
Adding Google Tag to WordPress using plugins is an easy way to manage tracking codes. Plugins handle the code for you. This method reduces errors and saves time. You do not need to edit theme files or touch code.
Many plugins are designed to add Google Tag Manager or Google Analytics tags. They simplify the process with user-friendly interfaces. This approach suits beginners and those who prefer a guided setup.
Installing A Tag Manager Plugin
First, log in to your WordPress dashboard. Go to the “Plugins” menu and click “Add New.” Use the search bar to find a tag manager plugin. Popular choices include “Google Tag Manager for WordPress” and “DuracellTomi’s Google Tag Manager.”
Click the “Install Now” button next to your chosen plugin. After installation, activate the plugin. Activation enables the plugin’s features on your site.
Configuring The Plugin Settings
Access the plugin settings through the WordPress dashboard menu. Enter your Google Tag Manager ID or Google Analytics tracking ID. This ID links your website with your Google account.
Adjust additional settings as needed. Some plugins allow you to control where the tag appears. Save your changes to apply the tag to your website. Check your site’s source code or Google Tag Assistant to confirm the tag is active.

Credit: www.hostinger.com
Verifying Tag Installation
Verifying your Google Tag installation is important after adding the code to WordPress. This step ensures that your tag is working correctly. Proper verification helps you avoid data loss and tracking errors. You can use simple tools and methods to check the tag’s status. These checks give confidence that your website data flows to Google Analytics or other platforms.
Using Google Tag Assistant
Google Tag Assistant is a free browser extension. It helps check if tags are installed properly on your website. After installing the extension, visit your WordPress site. The extension shows all detected tags and their status. Look for green check marks to confirm proper setup. Red or yellow warnings mean there is an issue to fix. This tool gives clear guidance to troubleshoot problems fast.
Checking Real-time Data
Google Analytics offers a real-time report to verify tag activity. Open the Analytics dashboard and go to the Real-Time section. Then, visit your website in a new tab or device. Watch the real-time report to see if your visit shows up. If you see your activity, the tag works well. No data means the tag might be missing or misconfigured. This method confirms tracking without waiting for daily reports.
Troubleshooting Common Issues
Troubleshooting common issues with Google Tag code in WordPress helps keep your tracking accurate. Problems may stop data collection or cause errors. Fixing these quickly ensures your website analytics work well.
Tag Not Firing
Sometimes the Google Tag does not fire on your pages. This can happen if the code is placed incorrectly. Check if the tag code is inside the
or just before the tag.Clear your browser cache and try again. Use Google Tag Assistant or similar tools to test the tag. Make sure no errors show in the console. Errors can block the tag from working.
Also, review any plugins that might block scripts. Some security plugins stop tags from loading. Disable these plugins briefly to see if the tag fires.
Multiple Tags Conflict
Multiple Google Tags on one site can cause conflicts. This happens when the same tag is added twice or more. Duplicate tags create incorrect or doubled data in reports.
Check your WordPress theme and plugins for built-in tag code. Remove extra codes so only one tag runs. Use tag management plugins for better control.
Test your site after changes. Confirm the tag fires once per page load. Clear cache to ensure changes take effect. This keeps your analytics clean and reliable.

Credit: www.optimizesmart.com
Best Practices For Tag Management
Managing tags properly in WordPress is crucial for accurate data and smooth website performance. Tags help track visitor actions and improve marketing efforts. Mismanagement can cause errors and slow down the site. Following best practices keeps your tags organized and effective.
Regular Updates
Update your Google Tag code regularly to keep it working well. Google often changes its tools and features. Using outdated tags can cause data loss or tracking errors. Check for updates every few months. Replace old tags with new versions as needed. This keeps your site accurate and reliable.
Avoiding Duplicate Tags
Duplicate tags create false data and confuse reports. Check your WordPress site to ensure each tag appears only once. Use tag management plugins to control tag placement. Avoid adding the same code in multiple plugins or themes. Clean and organized tags improve tracking accuracy and site speed.
Frequently Asked Questions
How Do I Find My Google Tag Code?
You can find your Google Tag code in your Google Tag Manager account. Go to “Admin” and select “Install Google Tag Manager. ” Copy the code snippet shown for your website.
Where Should I Paste Google Tag Code In WordPress?
Paste the Google Tag code in your WordPress theme’s header.php file. Insert it before the closing tag for proper tracking.
Can I Add Google Tag Code Without Plugins?
Yes, you can add the code manually by editing your theme’s header. php file or using the WordPress Customizer’s header section.
How To Verify Google Tag Code Is Working?
Use Google Tag Assistant or the preview mode in Google Tag Manager to check if the tag fires correctly on your WordPress site.
Conclusion
Adding Google Tag code to WordPress helps track your website’s performance. It lets you see visitor behavior and improve your site. The process is simple and quick with the right steps. Always double-check the code placement for accuracy. Use Google Tag Manager for easier management if needed.
Start tracking today to make better decisions for your site. Your website will benefit from clear, useful data. Keep your site updated and monitor results regularly.


