
Are you looking to make your WordPress website easier to navigate? Adding a new menu item can help your visitors find exactly what they need—and keep them coming back.
If you’ve ever felt stuck or unsure about how to update your site’s menu, this guide is made just for you. By the end, you’ll know exactly how to add new menu items quickly and confidently, making your site more user-friendly and professional.
Ready to take control of your WordPress menu? Let’s dive in!

Credit: docs.themeisle.com
Accessing WordPress Menus
Accessing WordPress menus is the first step to customize your website’s navigation. Menus help visitors find important pages quickly. WordPress offers a simple way to manage these menus from its dashboard. This section explains how to reach the menu settings easily.
Navigating To Appearance Settings
Start by logging into your WordPress dashboard. Look at the left-hand side for the main menu. Find the option labeled “Appearance.” Click on it to open a list of design settings. This area controls how your site looks and feels.
Locating The Menus Section
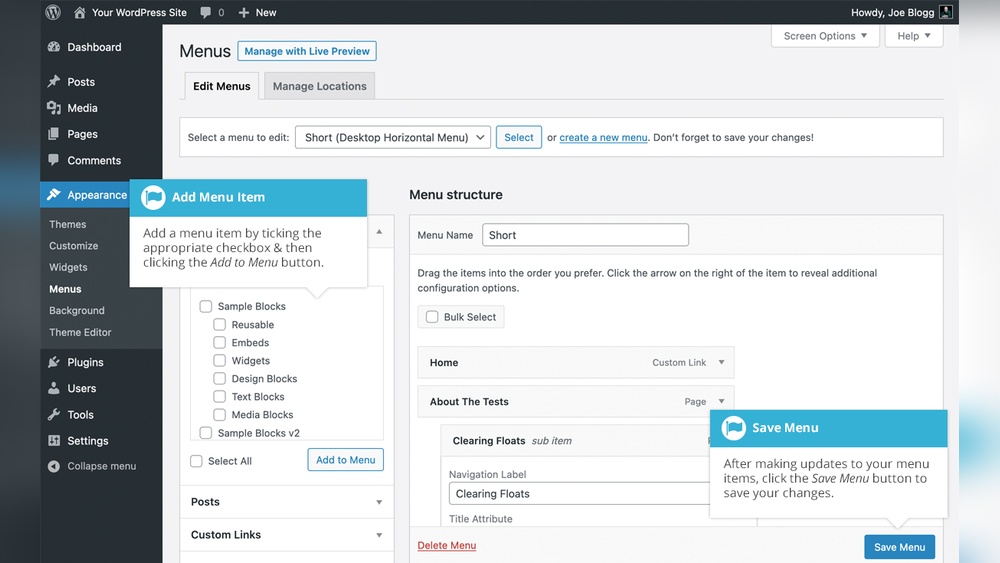
Under the Appearance menu, find and select “Menus.” This section lets you create and edit navigation menus. You will see options to add new menu items or rearrange existing ones. It’s the place to organize your site’s links easily.

Credit: make.wordpress.org
Creating A New Menu Item
Creating a new menu item in WordPress is simple and helps visitors find important pages. You can add different types of items to your menu. This section explains how to create a new menu item step-by-step.
Choosing Menu Type
First, pick the menu where you want to add the item. WordPress lets you create multiple menus. You can select the main menu, footer menu, or a custom menu. Choose the right menu for your site’s structure.
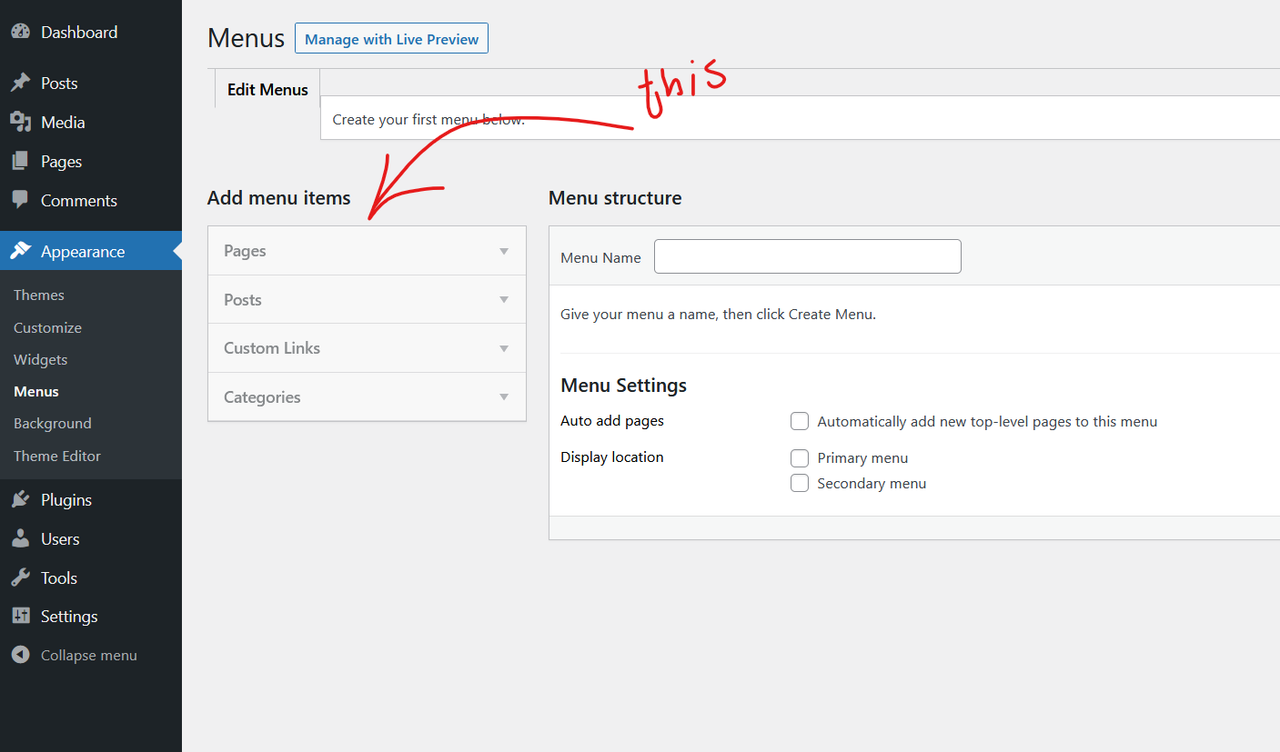
Go to the Appearance > Menus section. Select an existing menu or create a new one. This choice affects where your new menu item will appear.
Adding Pages And Links
Adding pages is easy. WordPress shows a list of your published pages. Check the pages you want to add. Click “Add to Menu” to include them.
After adding, drag the items to arrange their order. You can create sub-menus by moving items slightly to the right under a parent item. This creates a dropdown effect on your site.
Using Custom Links
Custom links let you add any URL to your menu. Enter the web address in the URL field. Type the name of the menu item in the Link Text box.
This option helps you link to external sites or specific pages not in your WordPress. Click “Add to Menu” to save the custom link. Arrange it like other menu items.
Organizing Menu Items
Organizing menu items makes your website easier to use. A well-structured menu helps visitors find pages quickly. WordPress allows simple ways to arrange menu items. You can change their order or create groups. These steps improve the look and feel of your menu.
Dragging And Dropping Items
Drag and drop lets you move menu items easily. Click a menu item and hold it. Drag it to the new spot in the list. Release the mouse button to drop it there. This changes the order of items instantly. Your menu updates automatically after saving.
Creating Submenus
Submenus show additional options under a main item. Drag a menu item slightly to the right under another item. This indents it and creates a submenu. Visitors see this submenu when they hover over the main item. Submenus help keep menus clean and organized.
Saving And Displaying The Menu
After creating a new menu item in WordPress, saving and displaying it correctly is essential. This step ensures visitors see the menu on your website. Proper settings help the menu appear in the right place on your site.
WordPress allows you to choose where your menu shows. You can place it in the header, footer, or a custom location depending on your theme. This flexibility helps you organize your site navigation clearly and attractively.
Assigning Menu Location
To display your menu, assign it to a location. Go to the Menu Settings area in WordPress. Here, you will find options like Primary, Footer, or Social menus. Select the location that fits your website design.
Choosing the correct location makes your menu visible to visitors. Each theme has different menu locations. Pick the one that suits your layout best.
Saving Changes
After assigning the menu location, save your changes. Click the “Save Menu” button at the bottom right. This action stores your menu settings and ensures the menu appears on your site.
Always save your menu after editing. Unsaved changes will not show on your website. Double-check to confirm your new menu item is visible online.
Troubleshooting Common Issues
Adding a new menu item in WordPress is usually simple. Sometimes, small issues can stop your menu from working properly. This section helps you fix common problems fast. Clear steps make the process easy for everyone.
Menu Not Showing
Menu items may not appear due to theme settings. Check if the menu is assigned to the correct location. Go to Appearance > Menus and confirm the menu location box is checked.
Clear your browser cache. Old data can hide updates. Try refreshing the page or open it in a new browser.
Deactivate plugins one by one. Some plugins conflict with menus. After disabling, check if the menu shows up.
Link Errors
Menu links may lead to wrong pages or show errors. Verify the URL is correct and complete. Include “http://” or “https://” for external links.
Internal links should use the correct page or post. Edit the menu item and select the right page from the list.
Broken links can happen if pages are deleted or moved. Update the menu with new links to fix this.
Using Plugins For Advanced Menus
Using plugins can enhance your WordPress menu beyond the basic settings. Plugins offer more design options and features. They let you create unique menus that fit your website style. Plugins help you manage large menus easily.
Popular Menu Plugins
Many plugins help build advanced menus in WordPress. Max Mega Menu is a top choice for creating large, customizable menus. WP Mega Menu offers drag-and-drop design and icon support. UberMenu is popular for its responsive layouts and easy integration. These plugins add styles, animations, and dropdown features.
Benefits Of Plugins
Plugins save time and effort in menu creation. They provide flexible options like icons, images, and columns. Plugins improve navigation with smooth dropdowns and sticky menus. You can control menu visibility based on user roles. They also work well with mobile devices. Plugins reduce the need for coding skills.
Credit: stackoverflow.com
Frequently Asked Questions
How Do I Add A New Menu Item In WordPress?
To add a new menu item, go to Appearance > Menus in your dashboard. Select a menu, then choose pages, posts, or custom links. Click “Add to Menu,” arrange items, and hit “Save Menu” to update your site navigation.
Can I Add Custom Links As Menu Items In WordPress?
Yes, WordPress allows adding custom links in menus. Use the “Custom Links” option under Menus. Enter your URL and link text, then click “Add to Menu. ” This feature helps you link to external sites or specific pages.
How Do I Organize Menu Items In WordPress?
In the Menus section, drag and drop menu items to rearrange. You can create sub-menus by dragging items slightly to the right. This helps organize your site’s navigation clearly and improves user experience.
Is It Possible To Add Categories To WordPress Menus?
Yes, categories can be added as menu items. In the Menus area, find “Categories,” select relevant ones, then click “Add to Menu. ” This allows visitors to browse posts by category directly from your menu.
Conclusion
Adding a new menu item in WordPress is simple and quick. Follow the steps carefully to avoid mistakes. This helps visitors find what they need easily. A clear menu improves your website’s navigation and user experience. Try adding different items to see what works best.
Keep your menu organized and updated regularly. This small change can make your site look more professional. Practice often to get comfortable with the process. Your website will feel fresh and easier to use. Keep exploring WordPress features to improve your site further.


