
Are you looking to understand your website visitors better and boost your online success? Adding a Google Analytics tracking code to your WordPress site is the key.
With this simple step, you’ll unlock powerful insights about who visits your site, what they like, and how they interact with your content. This guide will walk you through the process quickly and easily—no technical jargon, just clear instructions you can follow right now.
Keep reading to discover how to set up Google Analytics on your WordPress site and start making smarter decisions that grow your audience and business.

Credit: www.hostinger.com
Why Add Google Analytics To WordPress
Adding Google Analytics to your WordPress site helps you understand your visitors. It shows how people find your site and what they do there. This knowledge helps you improve your website and grow your audience.
Benefits Of Tracking Website Data
Google Analytics tracks visitor numbers and behavior. You learn which pages are popular and which are not. It shows how long visitors stay on your site. You see where visitors come from, like search engines or social media. This data helps you make smart decisions for your site.
Insights For Content And Marketing
Google Analytics reveals which content your visitors like best. You can create more posts that match their interests. It helps you spot trends and seasonal changes in visitor behavior. You learn which marketing efforts bring the most traffic. This way, you spend your time and money wisely.
Credit: www.monsterinsights.com
Prepare Your Google Analytics Account
Preparing your Google Analytics account is the first step to track your WordPress site. This setup lets you collect important data about your visitors. It helps you understand who visits your site and what they do there. Starting right ensures smooth tracking later.
Follow the steps below to create your account and find your tracking ID. These are essential before adding code to WordPress.
Create A Google Analytics Account
Go to the Google Analytics website. Click on the “Start for free” button. Sign in with your Google account or create one if needed. Then, click on “Set up for free” to begin. Enter your account name. Choose the settings you want to share with Google. Next, click “Next” to continue.
Fill in details about your website. Select the platform as “Web” for your WordPress site. Provide your website name and URL. Choose your industry category and time zone. Click “Create” to finish the setup.
Get Your Tracking Id
After creating your account, Google Analytics shows your tracking ID. It looks like “UA-XXXXXXXXX-X” or a code starting with “G-“. This ID is unique for your website. Copy this code carefully. You will need it to connect your WordPress site with Google Analytics.
Keep the tracking ID handy. You will paste it into your WordPress settings or plugin. This step activates tracking on your site. Now, your account is ready to link with WordPress.
Add Tracking Code Manually
Adding the Google Analytics tracking code manually to WordPress gives full control over your website’s data tracking. This method works well for those who want to avoid plugins. It involves editing your theme files directly.
Be careful. Always back up your site before making changes. A small mistake in the code can break your site. Follow the steps below to add the tracking code safely.
Access WordPress Theme Editor
Log into your WordPress dashboard. In the left menu, find “Appearance” and click on “Theme Editor.”
The Theme Editor opens your active theme files. On the right side, you will see a list of files. Look for the “header.php” file. This file controls the header part of your website.
Click on “header.php” to open it in the editor. Be ready to add the tracking code here.
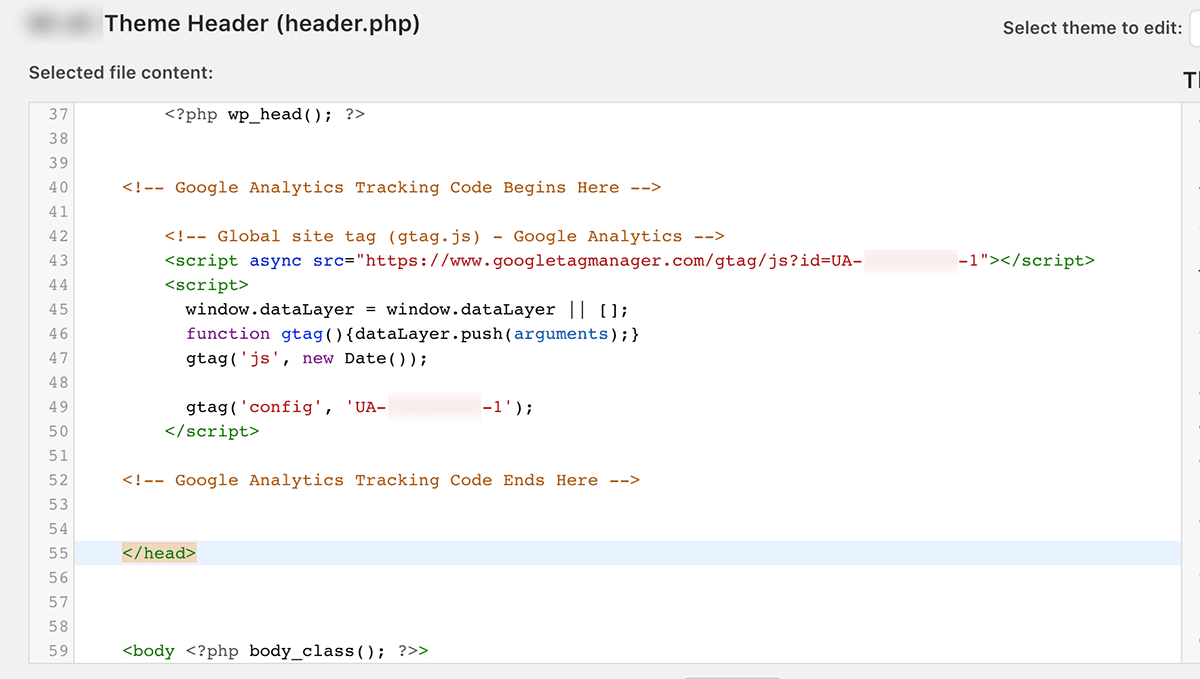
Insert Tracking Code In Header
Copy your Google Analytics tracking code from the Google Analytics dashboard.
Paste the code just before the closing tag in the “header.php” file. This placement ensures the tracking code loads on every page.
After pasting, click “Update File” to save your changes.
Clear your website cache if you use a caching plugin. This step makes sure the new code runs immediately.
Credit: deeperlook.com.au
Use Plugins To Add Tracking Code
Using plugins to add the Google Analytics tracking code is an easy way for WordPress users. Plugins handle the code placement automatically. This saves time and avoids errors in the website’s code. Plugins also offer extra features to manage and view analytics.
Most plugins require minimal setup. Just install, enter your tracking ID, and they do the rest. This method suits beginners and those who want a quick solution without editing files.
Choose A Suitable Plugin
Start by searching for Google Analytics plugins in the WordPress plugin directory. Look for plugins with high ratings and many active installations. Popular options include “MonsterInsights,” “GA Google Analytics,” and “Site Kit by Google.”
Check if the plugin updates regularly. Ensure it is compatible with your WordPress version. Read user reviews to find any issues. Choose a plugin that fits your needs and is easy to use.
Configure Plugin Settings
After installing the plugin, find its settings page in the WordPress dashboard. Enter your Google Analytics tracking ID. This ID starts with “UA-” or “G-.”
Some plugins offer options like tracking user roles or excluding admin visits. Adjust these settings to get accurate data. Save your changes and verify the tracking works using Google Analytics real-time reports.
Verify Tracking Code Installation
After adding the Google Analytics tracking code to your WordPress site, it is important to confirm it works correctly. Verification ensures your data will be accurate and reliable. This step helps catch any mistakes early. It also gives peace of mind that your site is ready to track visitors.
Use Google Tag Assistant
Google Tag Assistant is a free Chrome extension. It checks if the tracking code is installed properly on your website. To use it, open your site in Chrome and click the Tag Assistant icon. The tool will show which tags are found. Green means the tag works well. Yellow or red signals an issue.
This tool also suggests fixes for common problems. It can spot duplicate tags or missing code. Tag Assistant saves time by finding errors fast. It works well for beginners and experts alike.
Check Real-time Analytics
Real-Time Analytics shows live visitor data on Google Analytics. Open your Analytics account and go to the Real-Time report. Then, visit your WordPress site in another browser tab. Watch the report to see your visit appear.
If you see your activity immediately, the tracking code is active. No data means the code might not be installed right. Real-Time reports give quick feedback. This method is simple and very effective.
Troubleshoot Common Issues
Troubleshooting is a key step after adding Google Analytics tracking code to WordPress. Issues can stop your data from showing correctly. Fixing these problems fast keeps your website analytics accurate.
This section covers common problems and clear ways to solve them. Simple steps help ensure your tracking works well.
Fix Tracking Code Errors
Check if the tracking code is copied exactly. Even one missing character causes errors. Place the code in the header or use a plugin designed for this task.
Use the Google Tag Assistant Chrome extension. It shows if your code works or has mistakes. Clear your browser cache after adding the code. Old files may block updates.
Address Plugin Conflicts
Plugins sometimes clash with each other or with the tracking code. Disable other plugins one by one to find the problem. Look for plugins that also manage scripts or analytics.
Update all plugins regularly to avoid compatibility issues. If conflicts continue, use a dedicated plugin just for Google Analytics tracking. This reduces risks and improves site speed.
Frequently Asked Questions
How Do I Find My Google Analytics Tracking Code?
Log in to Google Analytics, select your property, and go to Admin. Under Property, click Tracking Info > Tracking Code. Your tracking ID starts with “UA-” or “G-” and is displayed at the top of the page. Copy this code to add it to WordPress.
Where Should I Place The Tracking Code In WordPress?
Place the tracking code in the header section of your WordPress site. You can add it via the theme’s header. php file or use a plugin like “Insert Headers and Footers” for easy integration without coding.
Can I Add Google Analytics Without Editing Theme Files?
Yes, use plugins like “MonsterInsights” or “Insert Headers and Footers. ” These plugins let you add the tracking code easily and safely without modifying your theme files, which helps prevent issues during theme updates.
How Long Does Google Analytics Take To Show Data?
Google Analytics typically starts showing data within 24 to 48 hours after adding the tracking code. Initial reports may take some time to populate, so check back later for detailed visitor insights.
Conclusion
Adding Google Analytics to WordPress helps track your website visitors. You learn what pages they like and how they behave. This data guides you to improve your site and grow traffic. The process is simple and quick once you follow the steps.
Keep checking your analytics regularly to understand your audience better. Good tracking leads to smart decisions and better results. Start today and watch your website progress with useful insights.


