
Are you ready to unleash your creativity and design a WordPress theme that stands out? Imagine crafting a unique digital experience for your visitors, tailored precisely to your vision.
You don’t need to be a coding wizard to start this exciting project. With Photoshop, you can design a stunning WordPress theme that reflects your style and caters to your audience. This guide will walk you through the process of transforming your design ideas into a functional WordPress theme.
You’ll discover how to leverage Photoshop’s powerful tools to create a visually appealing layout, choose the right color schemes, and incorporate elements that captivate your audience. By the end of this article, you’ll be equipped with the knowledge and confidence to bring your dream theme to life. So, are you ready to dive in and get creative with WordPress and Photoshop? Let’s get started!
Getting Started With Photoshop
Begin by opening Photoshop. Ensure you have a clean workspace. This helps you focus. Remove unnecessary tools. Use the Window menu to arrange panels. Keep essential tools close. It saves time and effort.
Use the Rectangular Marquee Tool. It helps in creating shapes. The Type Tool adds text. Use layers to organize your work. Layers are like sheets of paper. You can move them around. They keep your design neat. Try the Eyedropper Tool to pick colors. It ensures color consistency.
Design Principles For WordPress Themes
Colors make a website come alive. They must be attractive and easy on the eyes. Stick to three colors. Choose a main color, a secondary color, and an accent color. Use tools to find colors that match. Make sure text is readable on your background color.
Fonts should be clear and easy to read. Use two fonts. One for headings, another for body text. Headings need to be bold and attention-grabbing. Body text should be simple and clean. Choose fonts that match your theme’s style.
Structure is like the skeleton of a website. Keep it organized and logical. Place important items at the top. Use a grid system to align content. Make sure the layout is responsive. It must look good on all devices.
Creating A Theme Mockup
Start with the header. Choose colors that match your style. Add a logo on the left. Place the navigation menu on the right. Use simple fonts. Make sure the text is clear. Add a background image if needed. Keep it simple and neat.
Design the homepage with care. Place a big banner at the top. Highlight important sections. Use columns for better layout. Add images to make it lively. Choose a color scheme that matches your brand. Keep text short and clear. Make sure it looks inviting.
Inner pages need a simple layout. Use the same colors and fonts. Keep text easy to read. Add images to break the text. Ensure links are visible. Keep sections organized. Make sure it’s easy to navigate. Follow the same style as the homepage.
Credit: blog.sagipl.com
Exporting From Photoshop
Designing a WordPress theme in Photoshop involves creating visual elements and layouts. Export designs as image files for web use. This step helps in converting the visual design into a functional WordPress theme.
Preparing Graphics For Web Use
Photoshop is a great tool for creating web graphics. Images need to be optimized for the web. Use the “Save for Web” feature. It reduces file size. Smaller files load faster on websites. Choose the right file format. JPEG is good for photos. PNG works for images with transparency. Keep file size small but ensure quality.
Exporting Images And Assets
Export assets using the Photoshop Export function. It helps save time. Use slices to divide images. Each slice can be saved separately. This makes it easy to manage web images. Name files properly. It helps in organizing assets. Choose appropriate resolutions. High-resolution images look better. But they take longer to load.
Converting Design To WordPress
HTML and CSS Basics help in building web pages. HTML is the backbone. It structures the content. CSS styles it. Together, they make pages look good. Start with simple elements. Use tags like
Integrating with WordPress requires some steps. First, convert your HTML to PHP. WordPress uses PHP language. Save your file as index.php. Then, add WordPress functions. Use the loop for posts. Include header and footer files. This makes your theme dynamic. Always test your theme. Fix any errors you find. Practice will make you better.
Testing Your WordPress Theme
Make sure your theme looks good on all devices. Use a phone and a tablet to check. Look at your theme on different screens. Adjust things if they do not fit well. This is called responsiveness. It helps users have a good experience. A responsive theme is easy to use on any device. This helps keep visitors happy.
Check your theme on different browsers. This ensures it works for everyone. Use popular browsers like Chrome, Firefox, and Safari. Some parts may look different on each. Fix any problems you find. This is called browser compatibility. It is important for your theme to work everywhere. Good compatibility helps your site reach more people.
Optimizing For Performance
Crafting a WordPress theme in Photoshop boosts site performance by optimizing visuals and layout. Convert designs into responsive, fast-loading themes that enhance user experience and SEO.
Minimizing Load Times
Fast websites keep users happy. Slow sites lose visitors. Optimize images for speed. Use JPEG or PNG formats. Make image files small. Use tools to compress images. Reduce HTTP requests. Fewer requests mean faster load times. Use caching to save time. Cached pages load quicker. Choose a good server. A fast server improves speed.
Enhancing User Experience
User experience matters a lot. Easy navigation is key. Make menus simple. Users find what they need fast. Clear fonts are important. Readable text helps users. Use colors wisely. Bright colors can be distracting. Keep design clean and simple. Avoid clutter. Clutter confuses users. Fast loading pages improve experience. Nobody likes waiting. Happy users return often.
Credit: nicepage.com
Launching Your Theme
Crafting a WordPress theme begins with designing in Photoshop. Use layers to build a visually appealing layout. Convert the design to a responsive theme with HTML and CSS.
Uploading To WordPress
First, make sure your theme files are ready. Compress them into a ZIP file. Next, log into your WordPress dashboard. Find the Appearance tab on the left. Click on it. Then, select Themes. At the top, you’ll see the Add New button. Click it, and then select Upload Theme. Choose your ZIP file and click Install Now. Wait a moment. Once done, you’ll see a success message. Now, click Activate to use your theme.
Final Tweaks And Adjustments
Your theme might need some changes. Go to the Customizer under Appearance. Here, you can adjust settings. Change colors, fonts, and layouts as needed. Check your site on different devices. Make sure everything looks good. If some parts don’t fit, adjust them. Save your changes. Now, your theme is ready for the world.
Credit: www.csschopper.com
Frequently Asked Questions
How To Convert Psd To WordPress?
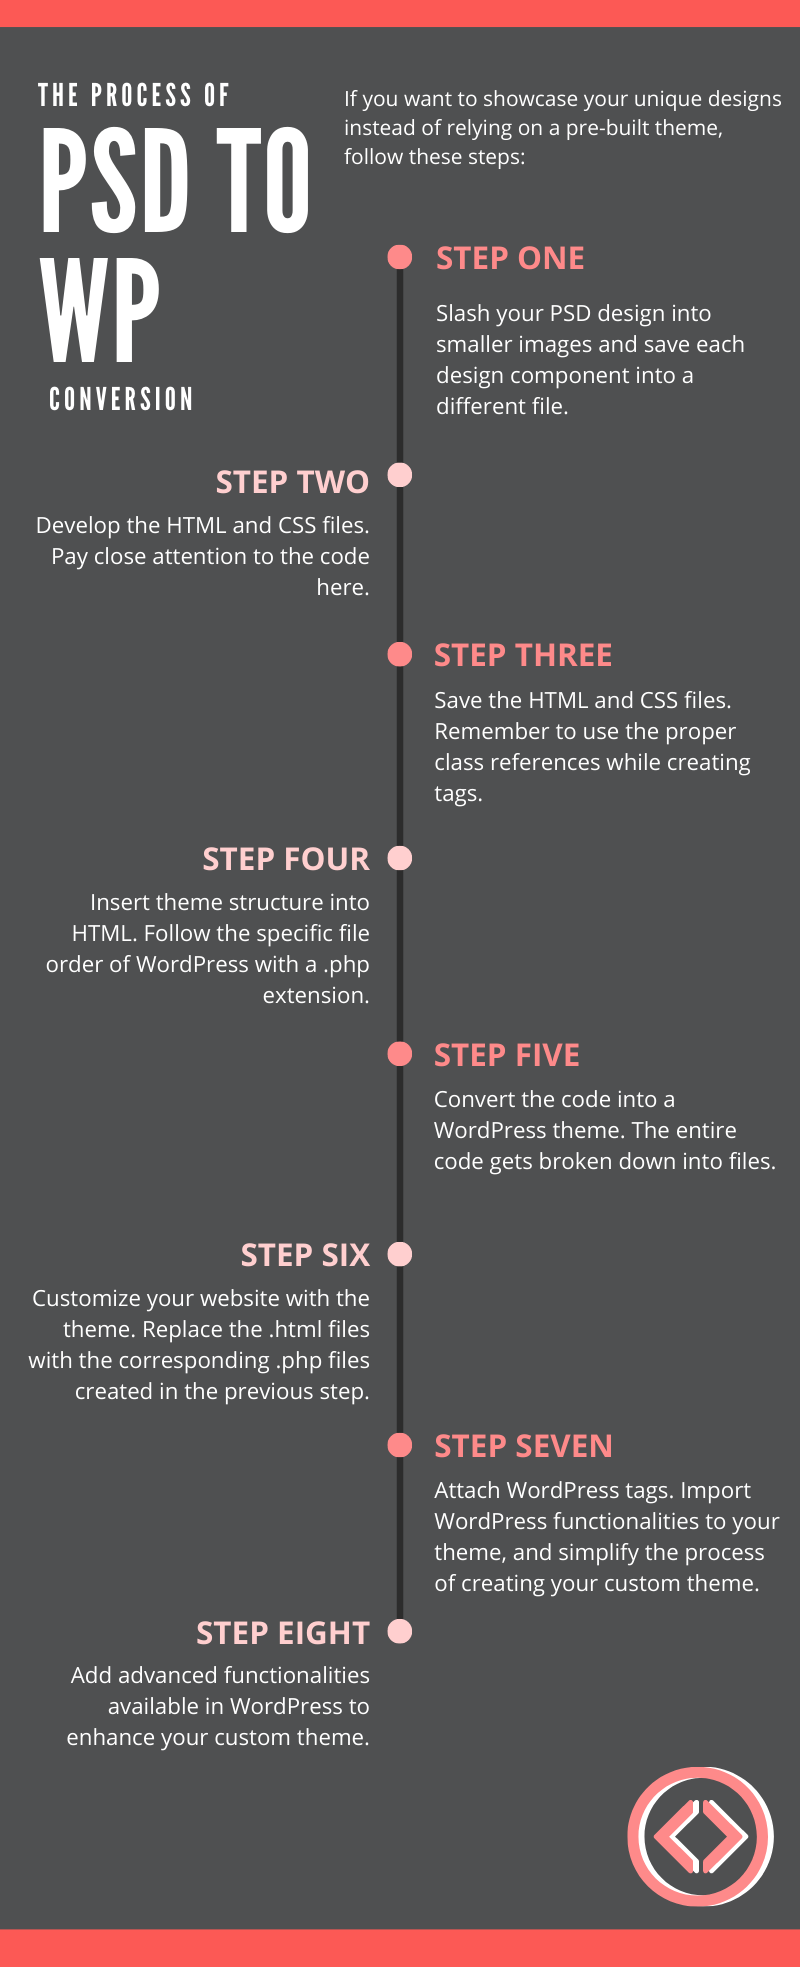
Convert PSD to WordPress by slicing the PSD, coding HTML/CSS, and integrating it into WordPress themes. Use tools like Elementor or WPBakery for easier integration. Ensure responsive design and test functionality across devices.
How Do I Create A WordPress Template?
To create a WordPress template, start by setting up a local development environment. Create a new theme folder in the “wp-content/themes” directory. Design your HTML structure and convert it to PHP. Use WordPress template tags and functions. Test your theme thoroughly.
Can You Convert Psd To Html Or Elementor?
Yes, I can convert PSD to HTML or Elementor. This service ensures responsive and SEO-friendly designs. My process guarantees clean, efficient code, improving user experience and search engine ranking. Contact me for a seamless conversion that enhances your website’s performance and visibility.
What Are The 7 Steps To Create A WordPress Site?
1. Choose a domain name and hosting provider. 2. Install WordPress via your hosting dashboard. 3. Select and install a theme. 4. Add essential plugins for functionality. 5. Customize your site’s appearance and settings. 6. Create pages and posts. 7.
Launch your site and promote it.
Conclusion
Creating a WordPress theme in Photoshop is simple and fun. Follow the steps carefully, and your design will shine. Start with a clear plan. Use layers to organize your design. Remember to export your design for web use. This process helps in building a unique website.
Practice often to improve your skills. Soon, you’ll make themes easily. Share your creations with others and gather feedback. Keep exploring new design ideas. Stay updated with WordPress trends. Happy designing!


