
Imagine being able to manage your emails effortlessly, without any hiccups or confusion. If you’re using Namecheap as your domain provider, you’re already on the right track to simplifying your digital life.
Setting up email on Namecheap doesn’t have to be a daunting task. In fact, it can be quick and straightforward, giving you more time to focus on what truly matters. You might wonder why it’s important to set up your email correctly.
A seamless email setup ensures you never miss important messages and can communicate efficiently. Whether you’re running a business or just need a reliable personal email, the right setup can make all the difference. By following this guide, you’ll gain confidence and control over your email operations. Picture the satisfaction of knowing your communication platform is rock-solid and tailored just for you. Keep reading, and you’ll discover step-by-step instructions that will empower you to master your email setup on Namecheap with ease.
Credit: tobu.ai
Choosing The Right Email Hosting Plan
Setting up email on Namecheap can be a game-changer for your business communication. But, before you dive in, it’s crucial to choose the right email hosting plan that fits your needs and budget. This decision can significantly impact your productivity and how efficiently you manage your emails. Let’s explore what you need to consider when picking the perfect email hosting plan.
Comparing Plans
When choosing an email hosting plan, it’s essential to compare the options available to you. Namecheap offers various plans tailored for different needs, ranging from personal use to business requirements. Consider the number of email accounts you need. If you’re running a small business, you might need more accounts to cater to different team members.
Look at storage space. You don’t want to constantly delete old emails because you’ve run out of room. Some plans offer more storage, which can be useful if you deal with large attachments or keep extensive email archives. Also, check for features like spam protection and email forwarding. These can enhance your email experience.
Identifying Needs
Understanding your specific needs is crucial. Ask yourself: What is the primary purpose of your email account? If it’s for personal use, a basic plan might suffice. But, if you’re using it for business, consider plans that offer collaboration tools. These can help you share calendars and documents with your team seamlessly.
Think about your future needs too. If your business is growing, you might require more advanced features or additional accounts down the line. Selecting a scalable plan can save you from switching plans frequently. It’s also wise to consider your budget. Choose a plan that offers the best value for your money without compromising on essential features.
Choosing the right plan is not just about features and price. It’s about envisioning how the plan will serve you in the long term. This decision can affect how smoothly your business operates, so take the time to weigh your options carefully.
Have you ever picked a plan that seemed perfect, only to realize it lacked something vital? Share your experiences and thoughts in the comments below. Engaging with others can provide new insights and make your decision-making process much easier.
Creating Your Namecheap Account
Creating your Namecheap account is the first step in managing your email. This process is simple and user-friendly. Follow these steps to get started with Namecheap.
Registration Process
Visit the Namecheap website. Click on the “Sign Up” button at the top. Fill out the registration form. Enter your name, email, and password. Double-check your details for accuracy. Submit the form by clicking “Create Account.”
Account Verification
After registering, check your email inbox. Namecheap sends a verification email. Open the email and click the verification link. This confirms your email address. Once verified, your account is active. You can now explore Namecheap services.
Accessing The Email Section
Discover the steps to set up email on Namecheap effortlessly. Navigate to the Email Section from your account dashboard. Follow simple instructions to configure your email settings and start sending messages quickly.
Accessing the email section on Namecheap is a simple process. It allows you to manage your email settings efficiently. Understanding this section is crucial for setting up your email correctly. Follow these steps to navigate through the dashboard and locate the email settings with ease.Navigating The Dashboard
Start by logging into your Namecheap account. Use your username and password. Once logged in, you’ll see the dashboard. It’s your control center. Here, you can manage domains, hosting, and email. Look for the “Dashboard” option in the top menu. Click on it to proceed. This will take you to a comprehensive view of your account.Locating Email Settings
After accessing the dashboard, find the “Domain List” section. It’s usually on the left sidebar. Click on it to view your domains. Next, identify the domain you want to manage. Beside it, there’s a “Manage” button. Click on “Manage” to access domain settings. Within the domain settings, look for the “Advanced DNS” tab. Here, you’ll find the “Email” section. It’s crucial for configuring your email. Click on it to explore available options. This section lets you set up and manage email easily.Configuring Email Settings
Setting up email on Namecheap involves accessing your account and navigating to the email settings section. Follow the easy steps provided to configure your email for smooth communication. Ensure proper setup for efficient email management.
Configuring email settings on Namecheap can seem daunting, but breaking it down into manageable steps makes it achievable. Whether you’re a small business owner, a freelancer, or someone managing a personal project, setting up your email correctly is crucial. It ensures your messages reach the intended recipients and keeps your communication secure. ### `Setting Up Email Accounts
Adjusting Security Settings
Integrating With Email Clients
Setting up email on Namecheap involves straightforward steps. Start by logging into your Namecheap account and accessing the Email section. Follow the prompts to configure your email client settings, ensuring proper synchronization.
Setting up your Namecheap email and integrating it with your preferred email clients can enhance your productivity. It allows you to manage your communications seamlessly across different platforms. Whether you use Outlook, Gmail, or another service, connecting your Namecheap email account is straightforward. ###Connecting To Outlook
Outlook is a popular choice for many professionals due to its robust features. To connect your Namecheap email with Outlook, you need to have your email settings handy. – Open Outlook and navigate to the File tab. – Select Add Account and choose Manual setup. – Enter your Namecheap email credentials, including your incoming and outgoing server details. Ensure you select the correct server type, typically POP3 or IMAP. IMAP is usually recommended for syncing across multiple devices. Once done, you can send and receive emails directly from Outlook, streamlining your workflow. ###Syncing With Gmail
Gmail’s clean interface and powerful search capabilities make it an attractive option for many users. To sync your Namecheap email with Gmail, you’ll need to tweak a few settings. – In Gmail, go to Settings and then select Accounts and Import. – Click on Add a mail account under the “Check mail from other accounts” section. – Enter your Namecheap email address and follow the prompts to input your server details. Ensure you enable the option to Label incoming messages. This helps you easily identify emails that come from your Namecheap account. Syncing your email with Gmail allows you to leverage Google’s powerful tools while managing your Namecheap communications. Have you ever experienced the convenience of managing multiple email accounts from one place? By integrating your Namecheap email with these clients, you simplify your digital life. Plus, you’ll never miss an important message again.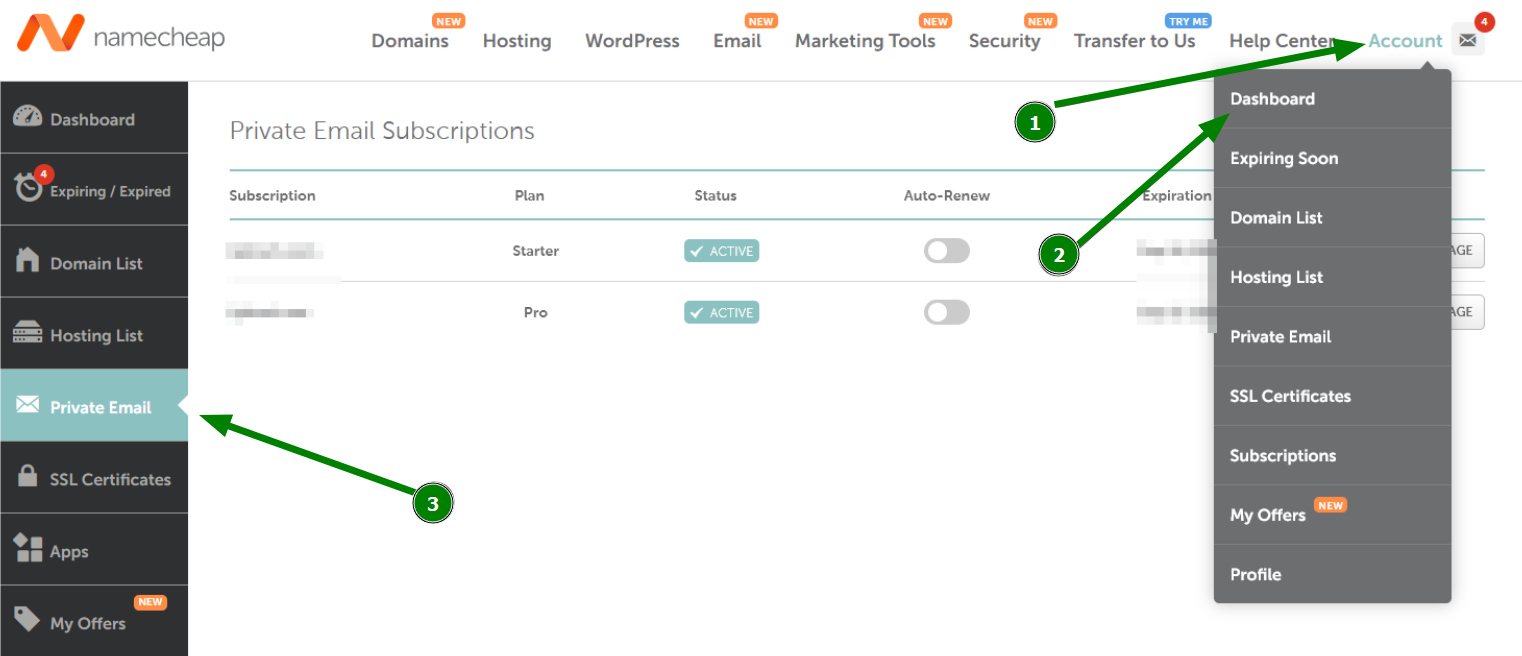
Credit: www.namecheap.com
Troubleshooting Common Issues
Setting up email on Namecheap often involves troubleshooting common issues like incorrect server settings or authentication errors. Ensure you have accurate incoming and outgoing server details to avoid connectivity problems. Regularly check for updates or changes in email configuration to maintain seamless email communication.
Setting up your email on Namecheap can be a smooth process, but sometimes things don’t go as planned. Encountering issues is normal, and knowing how to troubleshoot them is crucial. Let’s dive into some common problems you might face and how to fix them.Login Problems
Are you having trouble logging into your email account? First, double-check your username and password. It’s easy to make a typo, especially when you’re in a hurry. Make sure your Caps Lock key isn’t on, as passwords are case-sensitive. If you’re sure the credentials are correct, try resetting your password. Namecheap provides a straightforward password recovery process. Simply follow the instructions sent to your recovery email. Still no luck? Consider if your browser might be the problem. Clear your cache and cookies, or try logging in from a different browser. Sometimes, updates or extensions can interfere with login processes.Email Delivery Issues
Are your emails not reaching their intended recipients? Start by checking your spam or junk folder. Emails can sometimes mistakenly end up there, especially if they contain attachments or links. Next, ensure your DNS settings are correctly configured. Incorrect settings can lead to delivery failures. Namecheap offers guides on how to set these up; a quick review might highlight any errors. Think about the content of your emails. Certain words or phrases can trigger spam filters. Try sending a simpler message to see if it gets through. If it does, gradually add more content to identify what’s causing the issue. Have you ever wondered if your email server is down? Check Namecheap’s status page for any outages. A server issue on their end might be the root of the problem. Remember, troubleshooting can be a trial-and-error process. Stay patient and methodical. Each step brings you closer to resolving the issue and getting your email back on track.Maximizing Email Features
Setting up email on Namecheap can be simple and efficient. Begin by logging into your Namecheap account. Navigate to the email section and follow the easy steps to configure your email. This enables better communication and professional interactions.
Maximizing email features can significantly enhance your communication efficiency and organization. When using Namecheap, you have access to a robust set of tools that can make your email experience seamless and effective. Let’s dive into how you can leverage some of these features to get the most out of your email setup.Utilizing Filters
Filters are like your personal email assistant. They help you automatically sort and organize incoming messages. You can set rules to direct emails from specific senders straight into designated folders. This keeps your inbox clutter-free and ensures important emails are always easy to find. Think about your daily routine. Wouldn’t it be great if your emails could be sorted just like that? For example, you can create a filter that automatically labels emails from your boss, so they’re always prioritized. Filters can also be used to automatically delete spam or sort newsletters into a separate folder, so you can read them at your convenience.Customizing Email Templates
Email templates save you time and ensure consistency in your communication. Do you often send similar emails, like meeting requests or follow-ups? Creating a template can streamline this process. With Namecheap, you can customize your templates to reflect your personal or business style. Add your logo, change the font, and include any standard text you frequently use. This way, every time you send an email, it carries a professional touch without the extra effort. Templates are especially useful for businesses that need to maintain brand consistency across all communications. By maximizing these features, you can transform your email experience from a daily chore into a streamlined, efficient process. What features do you think would most improve your email management?
Credit: www.youtube.com
Frequently Asked Questions
How To Set Up Emails In Namecheap?
Log into your Namecheap account. Navigate to “Domain List” and select “Manage. ” Click on “Advanced DNS. ” Add MX records under “Mail Settings. ” Save changes. Access your email through Namecheap’s webmail or configure it with your email client using provided settings.
Is Namecheap Email Pop Or Imap?
Namecheap email supports both POP and IMAP protocols. You can choose either for your email setup. IMAP is recommended for accessing emails from multiple devices. POP is ideal for single-device access.
Does Namecheap Provide Email?
Yes, Namecheap provides email services. You can choose from Private Email hosting plans or use free email forwarding. Their Private Email offers professional features, including collaboration tools and secure communication options. Namecheap ensures reliable and customizable email solutions to meet your needs efficiently.
How To Set Up Gmail In Namecheap?
To set up Gmail in Namecheap, access your domain dashboard. Navigate to “Advanced DNS” and add MX records provided by Google Workspace. Ensure TTL is set to automatic. Verify settings in Google Workspace and complete domain verification. Enjoy using Gmail with your Namecheap domain.
Conclusion
Setting up email on Namecheap is simple and straightforward. Follow the steps carefully. You’ll ensure smooth email communication. Start by accessing your Namecheap account. Configure the email settings as needed. Double-check your details to avoid errors. Test your email setup to confirm it works.
This process boosts your online presence. A well-configured email leads to better communication. Your business can thrive with effective email management. Have questions? Namecheap’s support is there to help. Enjoy the benefits of a reliable email system. Stay connected and professional with Namecheap email services.


