Are you looking to make your WordPress site easier to navigate? Adding a menu page can be the game-changer your website needs.
Imagine your visitors finding exactly what they want in seconds, without frustration. You’ll discover simple, step-by-step instructions to create a menu page that fits your site perfectly. Whether you’re a beginner or just want a quick refresher, you’ll learn how to organize your content so your visitors stay longer and explore more.
Ready to make your site more user-friendly? Let’s dive in!
Why Add A Menu Page
Adding a menu page in WordPress helps organize your site content clearly. Menus guide visitors to important sections quickly. A well-structured menu improves user experience and keeps people on your site longer.
Menus make your website look professional and easy to navigate. They help visitors find what they want without confusion. This simple feature can increase site traffic and engagement.
Improves Site Navigation
Menus act as a roadmap for your website. They show visitors where to go next. Clear navigation reduces frustration and helps users find information fast.
Enhances User Experience
A good menu makes your site enjoyable to use. Visitors can explore pages smoothly. This positive experience encourages them to return.
Supports Seo Efforts
Menus help search engines understand your site structure. Well-organized menus make content easier to index. This can improve your site’s ranking in search results.
Allows Easy Content Management
Adding a menu page simplifies updating your site. You can add or remove links with a few clicks. This saves time and keeps your site current.
Credit: wou.edu
Accessing WordPress Dashboard
Accessing the WordPress dashboard is the first step to adding a menu page. The dashboard is the control center of your website. Here, you can manage pages, posts, menus, and more. It shows all the options you need to build and customize your site.
Logging into the dashboard is easy. You need your website’s admin URL and login details. Once logged in, the dashboard will open, showing a sidebar with many options. This sidebar is where you will find the menu settings.
How To Login To WordPress Dashboard
Open your web browser and enter your website’s admin URL. The URL usually looks like this: yoursite.com/wp-admin. You will see a login screen. Enter your username and password. Click the “Log In” button to access the dashboard.
Understanding The WordPress Dashboard Layout
The dashboard has a left sidebar, main content area, and top bar. The sidebar contains links to posts, pages, menus, and settings. The main area shows an overview and quick links. The top bar offers shortcuts to your profile and site view.
Finding The Menu Page In The Dashboard
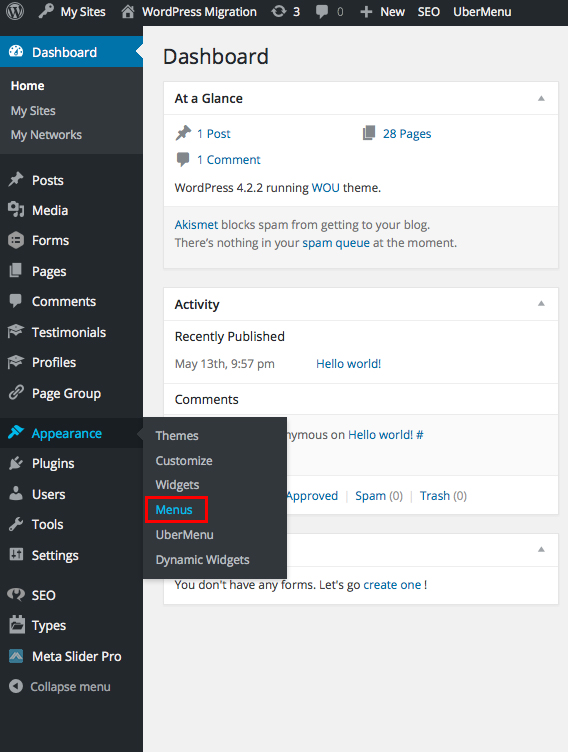
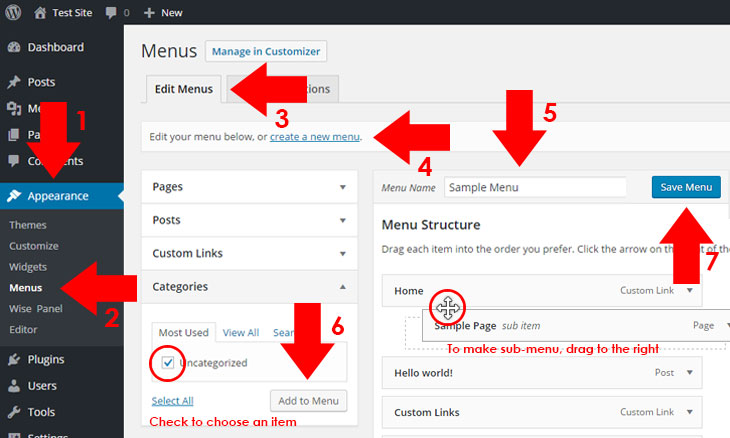
In the sidebar, look for “Appearance.” Click it to open a submenu. Find and click “Menus.” This opens the menu editor page. Here, you can add, remove, and organize menu items easily.
Creating A New Menu
Creating a new menu in WordPress is a simple way to organize your site’s navigation. Menus help visitors find pages and sections quickly. Setting up a menu lets you control what links appear in your header, footer, or sidebar.
This process takes just a few minutes and needs no coding skills. You can create menus for different parts of your website. Customize menus to match your site’s look and feel.
Create A Menu Name
Start by going to the WordPress dashboard. Find the Appearance tab and click on Menus. Enter a name for your new menu. Choose a clear name, like “Main Menu” or “Footer Menu”. Click the “Create Menu” button to save it.
Add Items To The Menu
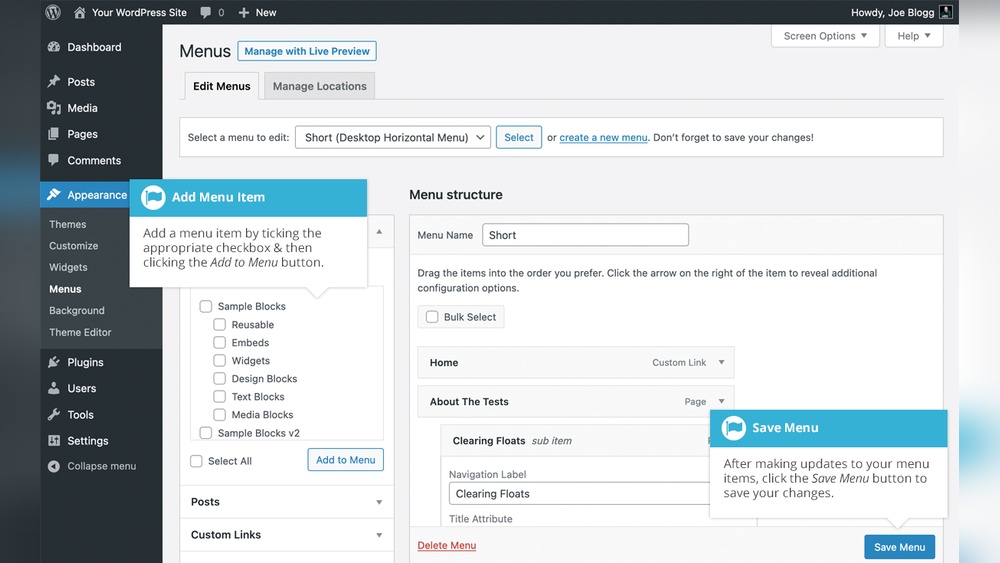
After creating the menu, add items to it. Use the left side to find pages, posts, or custom links. Check the boxes next to the items you want. Click “Add to Menu” to include them. Arrange the order by dragging items up or down.
Set The Menu Location
Choose where your menu appears on your site. Most themes have locations like primary, footer, or social menus. Check the box for your preferred location. Save your menu to apply the changes. Your menu will now show in that spot.
Adding Items To The Menu
Organizing your menu structure in WordPress helps visitors find content fast. A clear menu improves user experience and site navigation. You can arrange menu items to highlight important pages. Group related pages under submenus for a clean look. Let’s explore how to reorder items and create submenus easily.
Reordering Items
Drag and drop menu items to change their order. Click and hold an item, then move it up or down. Place your most important pages at the top. This helps visitors see key pages first. Reordering is simple and takes just a few seconds. Keep the menu logical and easy to follow.
Creating Submenus
Submenus group related pages under a main menu item. Drag a menu item slightly to the right below another item. This action nests it as a submenu. Submenus reduce clutter and organize content well. Visitors can explore topics step-by-step without feeling lost. Use submenus to keep your menu tidy and user-friendly.
Organizing Menu Structure
Assigning a menu location is an important step in setting up your WordPress menu. This step tells your website where to show the menu on your pages. Each WordPress theme has specific spots for menus. These spots are called menu locations.
Choosing the right menu location helps visitors find your menu easily. It also keeps your site organized and clean. This part is simple but key to good navigation.
Understanding Menu Locations In Your Theme
Every WordPress theme has different menu locations. Common spots include the header, footer, and sidebar. Some themes offer multiple header menus or social menus. Check your theme’s documentation or menu settings to see available locations.
How To Assign A Menu Location
Go to the WordPress dashboard and open the Appearance menu. Click on Menus. Select the menu you want to assign. Look for the Menu Settings section at the bottom. Check the box next to the location where the menu should appear. Save your changes.
Tips For Choosing The Right Menu Location
Think about your site layout and user experience. Use the header location for main navigation. Place secondary menus in the footer or sidebar. Make sure the menu is easy to find on all devices. Test your site after assigning the menu to see how it looks.
Credit: www.probewise.com
Assigning Menu Location
Saving and previewing your menu is a key step in managing your WordPress site. It ensures that all changes you make appear exactly as you want. This process helps avoid errors and keeps your site looking professional.
Each time you add or remove menu items, save your progress. This protects your work and prevents data loss. Previewing the menu lets you see how visitors will experience it on your site.
Saving Your Menu In WordPress
After creating or editing a menu, locate the “Save Menu” button at the bottom right. Click it to store your changes safely. WordPress updates your site with the new menu structure immediately.
Always save before leaving the menu editor. This prevents losing your latest work. If you do not save, your changes will be lost.
Previewing The Menu On Your Site
To check how your menu looks, go to the front end of your website. Refresh the page to see the updated menu. This shows you the exact layout visitors will see.
Previewing helps spot layout issues or missing links. It also ensures the menu works well on different devices like phones and tablets.
Saving And Previewing Menu
Plugins make adding advanced menus in WordPress simple. They offer more options than the default menu settings. These tools help create menus with unique designs and extra features. You can build mega menus, sticky menus, or even mobile-friendly menus easily. Plugins save time and avoid coding.
Choosing the right plugin depends on your needs. Some focus on design, others on functionality. Most plugins have drag-and-drop builders, making menu creation fast and intuitive. They also support icons, images, and custom styles. This enhances the user experience on your site.
What Are Menu Plugins?
Menu plugins are tools that extend WordPress menu capabilities. They allow you to add complex structures and styles. You can include columns, widgets, and custom links. Many plugins offer animation effects to make menus more engaging. These plugins work well with any WordPress theme.
Popular Plugins For Advanced Menus
Some popular plugins include Max Mega Menu, WP Mega Menu, and UberMenu. These have easy-to-use interfaces and good support. They let you create large menus with multiple levels. Each plugin offers different templates and customization options. They also improve menu navigation on mobile devices.
How To Install And Use Menu Plugins
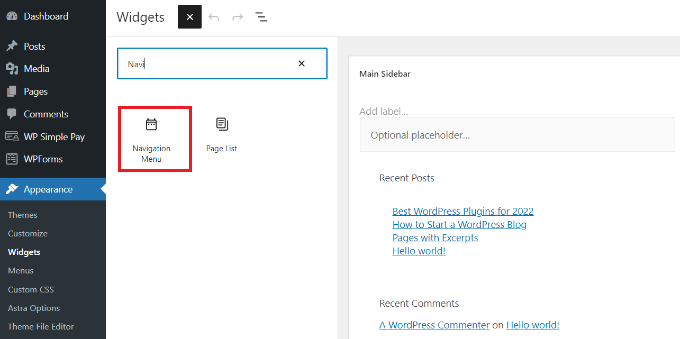
Go to your WordPress dashboard and click on Plugins > Add New. Search for the menu plugin by name. Click Install, then Activate. After activation, a new menu option appears in your dashboard. Use the plugin’s settings to create and customize your menu. You can add items, change styles, and set display rules easily.
Credit: www.wpbeginner.com
Using Plugins For Advanced Menus
Adding a menu page in WordPress should be simple. Sometimes, issues arise. These problems can stop your menu from showing or working right. This section helps you fix those common problems fast.
Follow clear steps to solve errors and avoid frustration. Fixing these issues makes your site easier to use and more professional.
Incorrect Hook Usage
Menus often fail to appear due to wrong hooks. Use admin_menu hook to add menu pages. Adding menus outside this hook stops them from showing. Check your code to ensure you use the right hook.
Missing Capability
WordPress menus need user permissions. If the capability is too high, some users cannot see the menu. Choose a capability like manage_options for admins only. Lower it carefully to allow more users.
Conflicts With Plugins Or Themes
Some plugins or themes block menus. Turn off other plugins to test conflicts. Switch to a default theme like Twenty Twenty-One. If the menu shows, a conflict exists. Fix or remove the problem plugin or theme.
Code Syntax Errors
Even small errors in code stop menus. Check for missing brackets or typos. Use a code editor to find mistakes. Validate your PHP code before uploading to WordPress.
Missing Callback Function
Every menu page needs a callback function. This function shows the page content. If missing or misspelled, the menu will not load. Confirm your callback function exists and is correct.
Frequently Asked Questions
How Do I Create A New Menu Page In WordPress?
To create a new menu page, go to WordPress dashboard, navigate to Appearance > Menus, and click “create a new menu. ” Add pages or custom links, then save the menu. Finally, assign it to a theme location to display on your site.
Can I Add Custom Links To WordPress Menu Pages?
Yes, you can add custom links by going to Appearance > Menus, then selecting “Custom Links. ” Enter the URL and link text, click “Add to Menu,” and save. This lets you link to external pages or specific site sections easily.
How Do I Organize Menu Items In WordPress?
Drag and drop menu items within the menu editor under Appearance > Menus. You can reorder or create nested submenus by slightly indenting items. Save changes to update the menu structure on your site instantly.
Is It Possible To Add Icons To WordPress Menu Items?
Yes, adding icons requires plugins or custom code. Plugins like “Menu Icons” let you select icons for menu items easily. This enhances menu design and usability, making navigation more visually appealing.
Conclusion
Adding a menu page in WordPress is simple and quick. You can organize your site’s navigation easily. This helps visitors find information fast. Use the WordPress dashboard to create and customize menus. Try different menu styles to fit your site’s look.
Keep menus clear and easy to use. Regularly update your menu as your site grows. A good menu improves user experience and site flow. Now, you can confidently add and manage menus on your WordPress site.