
Are you looking to make your WordPress website easier to navigate? Adding menu items is one of the simplest ways to guide your visitors exactly where you want them to go.
Whether you want to highlight your latest blog posts, showcase important pages, or create a smooth user experience, mastering menus is key. You’ll discover clear, step-by-step instructions to add menu items quickly and confidently. By the end, you’ll have full control over your site’s navigation, helping your visitors find what they need—and keeping them coming back for more.
Let’s dive in!
Credit: www.wpbeginner.com
Accessing The WordPress Menu Settings
Accessing the WordPress menu settings is the first step to customize your site’s navigation. The menu controls what visitors see at the top or side of your website. It helps guide users to important pages and content.
Finding the menu settings is simple. You do not need technical skills to start. Just a few clicks inside your WordPress dashboard can take you there. Once open, you can add, remove, or reorder menu items easily.
Logging Into Your WordPress Dashboard
Start by logging into your WordPress dashboard. Use your username and password. The dashboard is the control center of your website. Here, you manage all content and settings.
Locating The Appearance Menu
On the left side of the dashboard, find the “Appearance” option. This area controls how your website looks. Click on “Appearance” to open a submenu with design options.
Opening The Menus Section
Inside the “Appearance” submenu, click on “Menus.” This section allows you to create and edit navigation menus. It shows your current menus and lets you make changes.
Creating A New Menu
Creating a new menu in WordPress is simple and fast. Menus help visitors navigate your website easily. A clear menu improves user experience and keeps visitors on your site longer.
Start by opening the WordPress dashboard. The menu settings are easy to find and use. Follow these steps to create a menu that fits your site perfectly.
Create A Menu Name
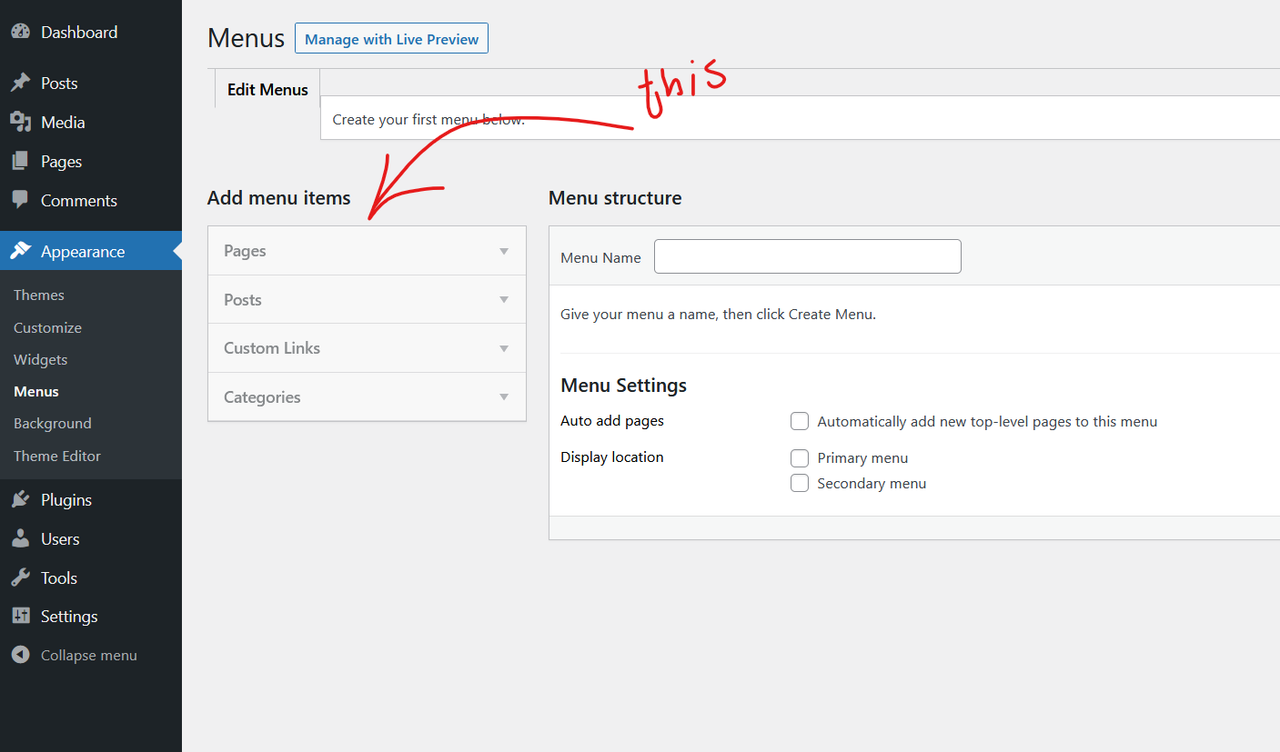
First, give your menu a clear, simple name. Use words that describe its purpose. For example, “Main Menu” or “Footer Links.” This helps you find and edit the menu later.
Select Menu Items
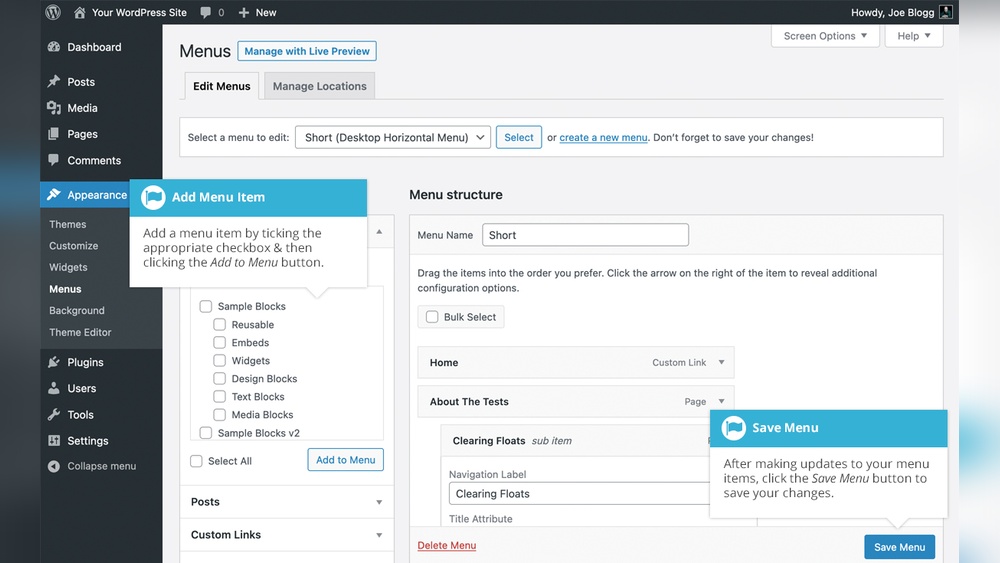
Choose pages, posts, or custom links to add. WordPress shows your content on the left side. Click the checkboxes for items you want in the menu. Then press “Add to Menu.”
Arrange Menu Order
Drag and drop menu items to change their order. Put the most important links at the top. You can also create sub-menus by moving items slightly to the right.
Assign Menu Location
Pick where the menu appears on your website. Common locations are header, footer, or sidebar. Check the box for your preferred spot. This shows the menu to your visitors.
Save Your Menu
Click the “Save Menu” button to keep your changes. Your new menu is now live on your site. Check your website to see how it looks and works.
Adding Pages To The Menu
Adding pages to your WordPress menu helps visitors find important parts of your website. Menus guide users through your site. They make navigation simple and clear. You can control what pages show in the menu. This improves the user experience and site structure.
WordPress lets you add pages quickly. You can choose which pages appear and where. This process does not require coding skills. Anyone can do it by following a few steps.
Accessing The Menu Editor
Go to your WordPress dashboard. Find the “Appearance” tab on the left side. Click on “Menus” to open the menu editor. This screen shows your current menus and options.
Selecting A Menu To Edit
Pick the menu you want to change from the dropdown list. If no menu exists, create a new one by clicking “Create Menu.” Name your menu clearly so you recognize it later.
Choosing Pages To Add
Look at the left side for the “Pages” box. It lists your site’s pages. Check the boxes of the pages you want to include. You can select multiple pages at once.
Adding Selected Pages To The Menu
Click the “Add to Menu” button below the pages list. Your chosen pages appear on the right side as menu items. You can drag and drop them to reorder.
Saving Your Menu Changes
Once pages are in the menu and arranged well, click “Save Menu.” This updates your site’s navigation. Visitors will now see the new pages in your menu.

Credit: docs.themeisle.com
Including Custom Links
Including custom links in your WordPress menu helps you connect visitors to any webpage. Custom links can point to external sites, internal pages, or specific files. This feature gives your menu flexibility beyond just pages and posts.
You can add custom links for social media, partner sites, or special promotions. They let you guide users exactly where you want them to go. The process is simple and requires no coding skills.
Accessing The Menu Editor
Start by logging into your WordPress dashboard. Navigate to Appearance, then select Menus. This opens the menu editor where you manage all menu items.
Adding A Custom Link
Look for the Custom Links panel on the left side of the menu editor. Enter the full URL of the link you want to add. Next, type the link text that will appear in the menu.
Saving And Arranging Custom Links
Click the Add to Menu button to include the custom link in your menu. Drag and drop the new item to reorder it. Finish by clicking Save Menu to apply changes to your site.
Adding Categories To The Menu
Adding categories to your WordPress menu helps visitors find content quickly. Categories group similar posts, making navigation simple. Including them in the menu organizes your site well. This makes your site user-friendly and improves SEO.
Accessing The Menus Section
Go to your WordPress dashboard. Find the “Appearance” tab on the left. Click on “Menus” to open the menu editor. This is where you manage all menu items.
Selecting Categories To Add
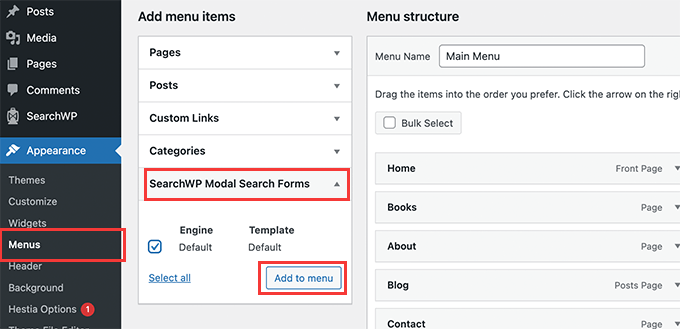
Look for the “Categories” box on the left side. You may need to click “View All” to see all categories. Check the boxes next to categories you want. Select only the ones important for your menu.
After selecting categories, click the “Add to Menu” button. The categories will appear in the menu structure on the right. Drag and drop to arrange their order. You can nest categories under other items if needed.
Saving Your Menu
Once your categories are in place, click “Save Menu.” This updates your website’s navigation immediately. Check your site to confirm the categories show correctly in the menu.
Credit: stackoverflow.com
Organizing Menu Items
Organizing menu items in WordPress helps visitors find what they need quickly. A clear menu improves user experience and site navigation. You can easily arrange your menu by reordering items or creating submenus. These steps make your site look clean and professional.
Reordering Items
To reorder menu items, drag and drop them inside the menu editor. Click and hold the item you want to move. Then, drag it up or down to change its position. This way, you can put the most important pages first. Organizing items logically makes your menu easy to use.
Creating Submenus
Submenus show hidden items under a main menu item. To create a submenu, drag a menu item slightly to the right below another item. This nests the item under the main one. Submenus help keep your menu tidy. They also group related pages together for better navigation.
Assigning Menu Locations
Assigning menu locations in WordPress lets you control where your menus appear on your website. Each WordPress theme supports different menu spots. These spots are called menu locations. Assigning menus to these locations helps visitors find your site’s pages easily.
Without assigning a menu location, your menu might not show up on your site. This step is quick and simple. It ensures your menu looks good and works well across your site.
Accessing The Menu Settings
Start by going to your WordPress dashboard. Click on “Appearance” in the left sidebar. Then select “Menus.” Here, you create and edit your menus. This is also where you assign menu locations.
Understanding Available Menu Locations
Your theme controls the menu locations you can use. Common locations include the header, footer, and sidebar. Each location has a different spot on your site. Check your theme’s documentation to know your options.
Assigning Menus To Locations
In the “Menus” screen, find the “Menu Settings” area. You will see boxes for each menu location. Tick the box next to the location where you want your menu to appear. Then click “Save Menu.”
Verifying Your Menu Placement
Visit your website and refresh the page. Look at the menu locations you assigned. Make sure the menu shows correctly and links work. Adjust if needed by returning to the menu settings.
Saving And Previewing The Menu
Saving and previewing the menu is an important step in managing your WordPress site. It ensures that the changes you make appear correctly on your website. Always save your menu after adding or removing items. This prevents losing any work you have done.
Previewing lets you see how the menu looks to visitors. It helps spot mistakes early. You can check the order, labels, and links. Making sure everything works well improves user experience.
Saving Your Menu
Click the “Save Menu” button at the bottom or top of the menu editor. WordPress will store all your changes safely. Do this each time you update your menu. Forgetting to save can erase your edits.
After saving, WordPress may show a confirmation message. This confirms your menu is updated. You can then continue editing or move to preview.
Previewing The Menu
To preview, visit your website’s front end. Refresh the page to see the latest menu version. The new items should appear in the order you set.
Check that all links work. Click each menu item and confirm it directs to the correct page. Testing links avoids broken navigation.
Editing After Preview
If the menu does not look right, go back to the menu editor. Make necessary changes, then save again. Repeat preview to confirm improvements.
Editing and previewing is a simple cycle. It helps create a clear and easy-to-use menu for visitors.
Troubleshooting Common Issues
Adding menu items in WordPress usually works smoothly. Sometimes, small issues block the process. Troubleshooting helps fix these problems fast. This section shows common issues and easy solutions.
Incorrect Menu Location
Menus must be assigned to a theme location. Without this, the menu will not show. Check the “Menu Settings” at the bottom of the menu page. Select the correct display location for your menu.
Cache Problems
Cache can stop new menu items from appearing. Clear your browser cache and WordPress cache plugins. Then refresh the page to see changes. This step often solves invisible menu updates.
Plugin Conflicts
Some plugins may block menu changes. Deactivate all plugins and try adding menu items again. If it works, reactivate plugins one by one. This helps find the conflicting plugin.
Theme Restrictions
Certain themes limit menu features or locations. Switch to a default theme like Twenty Twenty-One. Check if menu items add properly there. If yes, the issue is with your theme.
Exceeding Menu Item Limits
Too many menu items can cause errors. WordPress has a limit of about 50 items per menu. Remove old or unused menu items. Keep menus simple for better performance.
Frequently Asked Questions
How Do I Add A New Menu Item In WordPress?
To add a new menu item, go to Appearance > Menus in your dashboard. Select a menu, choose pages or custom links, then click “Add to Menu. ” Finally, save the menu to display the new item on your site.
Can I Add Custom Links To WordPress Menus?
Yes, WordPress allows custom links. Use the “Custom Links” option in the menu editor. Enter the URL and link text, then add it to your menu. This feature lets you link to external sites or specific pages.
How Do I Reorder Menu Items In WordPress?
Reordering menu items is simple. In the menu editor, drag and drop items into the desired order. Changes update automatically when you save the menu, reflecting the new sequence on your website.
What Menu Locations Are Available In WordPress?
Menu locations depend on your theme. Common spots include header, footer, and sidebar menus. Check Appearance > Menus > Manage Locations to assign menus to these areas easily.
Conclusion
Adding menu items in WordPress is simple and quick. You just need to follow a few easy steps. Menus help visitors find pages and content fast. You can change and update menus anytime. This keeps your site organized and user-friendly.
Try adding different types of items, like links or categories. Practice will make the process easier. Your website will look better and work well. Keep menus clear and simple for all users. Start creating your menus today and improve your site’s navigation.


