If you want to improve your website’s visibility and track its performance on Google, adding Google Search Console to your WordPress site is a must. But if you’re unsure how to do it, don’t worry—this guide will walk you through the simple steps to get your site connected quickly.
By the end, you’ll have the tools you need to see exactly how Google views your site and make smart decisions to boost your traffic. Ready to take control of your website’s success? Let’s dive in.
Why Add Google Search Console To WordPress
Adding Google Search Console to WordPress helps you understand your website’s performance. It shows how Google views your site. This insight improves your site’s visibility in search results.
Search Console gives you useful data about your visitors. You can see which keywords bring people to your site. This helps you create content that matches what users want.
You also get alerts about problems on your site. Fixing these issues keeps your site healthy and easy to use. Search Console helps you track your site’s growth over time.
What Is Google Search Console?
Google Search Console is a free tool by Google. It helps website owners check how their site appears in search results. The tool shows clicks, impressions, and ranking positions.
It also alerts you about errors like broken links or security issues. This information helps you keep your site in good shape.
How Search Console Helps Your WordPress Site
Search Console shows which pages get the most traffic. It tells you what search terms people use to find your content. This data helps you improve your site’s SEO.
You can submit your sitemap to Google. This helps Google find and index your pages faster. It also lets you check if Google has trouble reading your site.
Benefits Of Using Search Console With WordPress
Using Search Console gives you control over how Google sees your site. It helps you find and fix errors quickly. This keeps your site running smoothly.
You get reports on mobile usability and page speed. These factors affect your search ranking and user experience. Search Console helps you improve both.
Credit: yoast.com
Get Your Google Search Console Code
Getting your Google Search Console code is the first step to connecting your WordPress site. This code helps Google confirm your site ownership. Once verified, you can track your website’s performance in search results.
The process is simple. You need to create an account, prove your ownership, and find the HTML code. Follow these steps carefully for a smooth setup.
Create A Google Search Console Account
Go to the Google Search Console website. Use your Google account to sign in or create one. After logging in, click on the “Add Property” button. Enter your website’s URL exactly as it appears in the browser. Choose the URL prefix method for easier verification with WordPress.
Verify Your Website Ownership
Google needs to confirm that you own the website. Several methods appear for verification. The easiest is the HTML tag method. This method involves adding a small code to your WordPress site’s header. This tag proves you control the website.
Locate The Html Verification Code
After selecting the HTML tag method, Google will show you a code snippet. It looks like a small meta tag. Copy this entire code. Keep it safe, as you will paste it into your WordPress site soon. Do not close the Google Search Console page yet.
Add Code Using A WordPress Plugin
Adding Google Search Console code to your WordPress site is simple with a plugin. Plugins help you insert the code without touching your theme files. This method is safe and easy, especially for beginners. You only need to install a plugin and paste the code in the right place.
Install A Header And Footer Plugin
Start by logging into your WordPress dashboard. Go to the “Plugins” section and click “Add New.” Search for a plugin called “Insert Headers and Footers” or a similar one. Click “Install Now” and then “Activate.” This plugin allows you to add code snippets to your site header easily.
Insert The Verification Code
After activation, go to “Settings” and select “Insert Headers and Footers.” Find the text box labeled “Scripts in Header.” Paste your Google Search Console verification code there. Make sure to copy the exact code from your Google Search Console account.
Save And Verify
Click the “Save” button to store the changes. Next, return to your Google Search Console page. Click “Verify” to check if the code is correctly added. If successful, Google confirms your site ownership. Now you can use Google Search Console features on your WordPress site.

Credit: improveposition.co.uk
Add Code Manually To WordPress Theme
Adding the Google Search Console code manually to your WordPress theme helps verify your site with Google. This method places the verification code directly in your site’s header. It ensures Google can find the code quickly. This process suits those comfortable editing theme files. Follow the steps carefully to avoid errors.
Access Theme Editor
Log in to your WordPress dashboard. Go to Appearance, then select Theme Editor. You will see the list of theme files on the right side. Look for the file named header.php. This file controls the header section of your website. Be cautious while editing here to prevent site issues.
Insert Code In Header.php
Open the header.php file. Find the closing tag. Paste the Google Search Console verification code just before this tag. This code is provided by Google during the setup process. It usually looks like a meta tag. Save the changes after pasting the code.
Save Changes And Verify
Click the Update File button to save your edits. Now, return to Google Search Console. Click on the Verify button to confirm ownership. Google will check for the code in your header. If it finds the code, verification will succeed. Your site is now linked to Google Search Console.
Use Seo Plugins For Easy Integration
Using SEO plugins to add Google Search Console code is simple and quick. These tools help you connect your WordPress site with Google without editing any code. SEO plugins keep your website organized and boost your search engine visibility.
Many SEO plugins include a dedicated place to paste the Google verification code. The plugin does the rest, making sure Google can verify your site ownership. This method is safe and reduces the chance of errors.
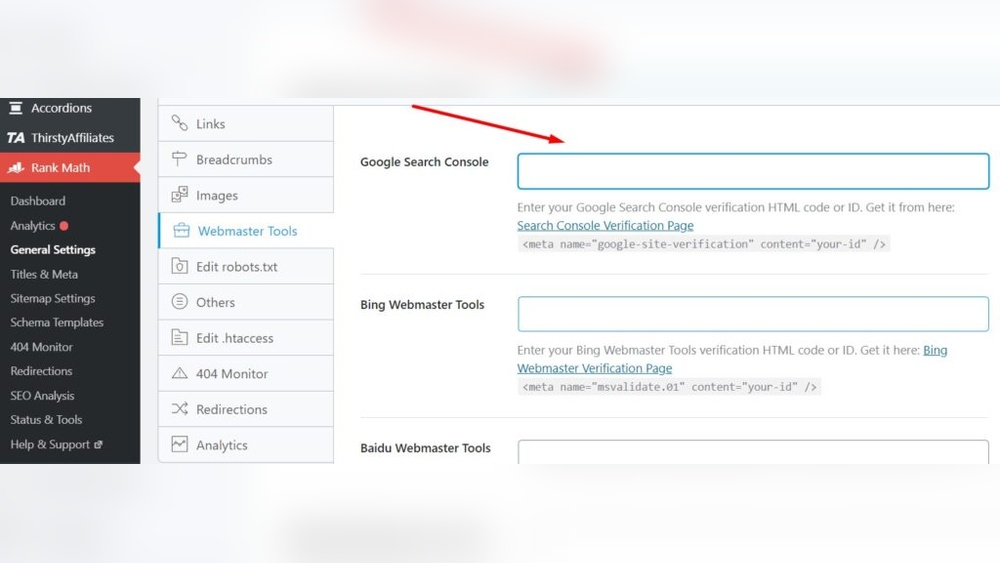
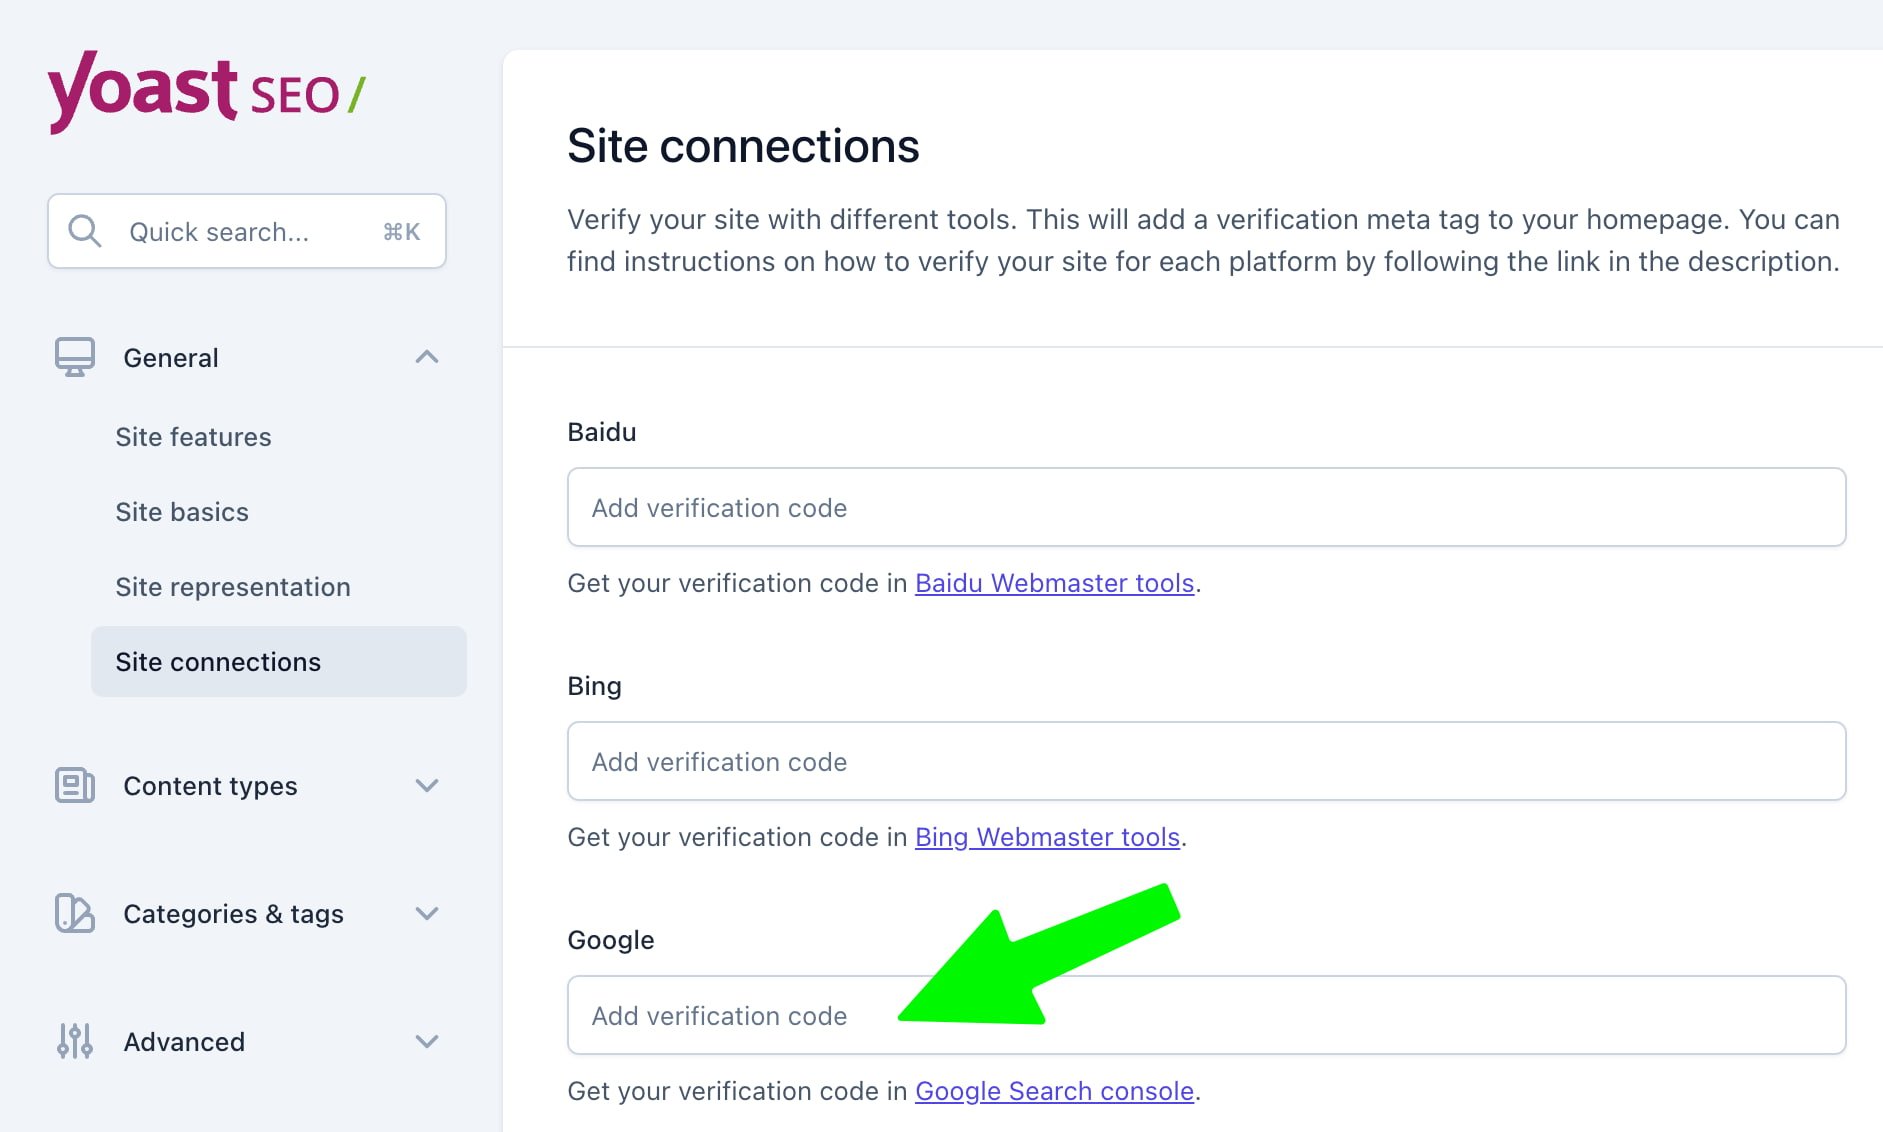
Add Code Through Yoast Seo
Open your WordPress dashboard and go to the Yoast SEO plugin settings. Click on the “Webmaster Tools” tab under the “General” section. Paste your Google Search Console verification code into the box labeled “Google verification code.”
Save the changes. Yoast SEO will add the code to your site header automatically. Return to Google Search Console and click “Verify” to confirm ownership. This process takes just a few minutes.
Add Code Through All In One Seo
Access your WordPress admin panel and open the All in One SEO plugin. Navigate to the “General Settings” and find the “Webmaster Verification” area. Paste your Google Search Console code in the Google box.
Save your settings. The plugin inserts the verification code correctly on your site. Head back to Google Search Console and hit “Verify” to complete the process. Your site is now connected and ready.
Credit: www.wpbeginner.com
Troubleshoot Verification Issues
Sometimes, Google Search Console does not verify your WordPress site immediately. This can cause frustration. Verification issues happen for many reasons. It is important to fix these problems quickly. Troubleshooting helps ensure your website connects properly with Google Search Console. This section explains simple steps to solve common verification problems.
Clear Cache And Retest
Cached files can stop Google from seeing your new code. Clear your browser cache first. This removes old data that may block verification. Also, clear your WordPress cache if you use a caching plugin. Some plugins store pages and hide recent changes. After clearing cache, try verifying your site again. This often solves the problem fast.
Check For Code Placement Errors
Incorrect code placement is a major cause of verification failure. The Google Search Console code must be in the right spot. Place it exactly as Google instructs, usually in the
section of your theme. Do not put the code in the body or footer. Even small mistakes like missing parts or extra spaces can cause errors. Use a code editor or plugin to add the code carefully.Confirm Successful Integration
After adding the Google Search Console code to your WordPress site, confirming successful integration is crucial. This step ensures Google can access your site data. You will know your site is verified and ready for monitoring. Follow the steps below to confirm everything works correctly.
Check Verification Status In Google Search Console
Log in to your Google Search Console account. Select your website from the dashboard. Look for a green checkmark or a message saying “Verified.” This confirms Google recognizes your site ownership. If you see an error, double-check the code placement on your WordPress site. Refresh the page after correcting any mistakes.
Start Using Search Console Features
Once verified, explore the tools available in Search Console. View reports on site performance and search traffic. Monitor your site’s indexing status and fix issues. Submit sitemaps to improve Google crawling. Use the features to improve your website’s search visibility. Regularly check the console for updates and alerts.
Frequently Asked Questions
How Do I Verify Google Search Console On WordPress?
To verify, add the Google Search Console code to your WordPress header or use a plugin. Then, confirm ownership in Google Search Console.
Can I Add Google Search Console Without A Plugin?
Yes, you can manually insert the verification code into your theme’s header. php file. Be careful to avoid breaking your site.
How Long Does Google Search Console Take To Verify?
Verification usually completes within a few minutes but can take up to 24 hours in some cases.
Will Adding Search Console Code Affect My WordPress Site?
No, adding the verification code is safe and does not impact your site’s performance or appearance.
Conclusion
Adding Google Search Console code to WordPress helps track your site’s performance. It lets you see how visitors find your pages. You can fix issues that slow down your site. The process is simple and takes only a few minutes.
Use the steps described to add the code correctly. Check your site regularly to improve its ranking. This small task can make a big difference for your website’s success. Start today and watch your site grow steadily.