
Imagine having an email that truly reflects your identity. One that’s private, secure, and uniquely yours.
That’s what setting up a private email with Namecheap can offer you. Whether you’re a business owner wanting to enhance professionalism or someone who craves privacy in communication, a personalized email is a powerful tool. But how do you create this perfect email setup?
Don’t worry; you’re about to discover a straightforward process that will empower you to take control of your digital communications. Picture this: no more generic email addresses that blend in with the crowd. Instead, you’ll have an email that stands out and serves you better. Ready to make your communication more personal and secure? Let’s dive in and uncover the secrets to setting up your private email with Namecheap. Your unique email identity is just a few steps away!
Choosing Your Domain
Choosing a domain is crucial for setting up a private email with Namecheap. Pick a domain that reflects your identity. Ensure it’s easy to spell and remember for effective communication.
Choosing the right domain is a crucial step in setting up your private email with Namecheap. It’s more than just a web address; it’s your digital identity. A well-chosen domain can make your email memorable and professional.Understand Your Purpose
Before picking a domain, ask yourself: what purpose will it serve? If it’s for personal use, you might want something unique and reflective of your personality. For business, consider a domain that aligns with your brand. Make it easy to recognize and remember.Keep It Simple And Relevant
A simple and relevant domain name is key. Avoid complex or lengthy names. Short and straightforward domains are easier to recall and less prone to typos. Think about what your audience would type in without overthinking it.Check Availability
Once you have a few ideas, check their availability. Namecheap offers a handy tool to see if your desired domain is taken. If it’s unavailable, don’t be discouraged. Try tweaking your name or consider different extensions like .net or .org.Consider Seo Impact
Choosing a domain with relevant keywords can boost your email’s visibility. While it’s not the primary factor for email, it does contribute to your overall brand presence online. If you’re setting up an email for a business, research popular keywords in your industry.Think Long-term
Your domain should stand the test of time. Trends change, but a well-thought-out domain remains relevant. Think about where you see your brand or personal image in five years. Will your domain still fit?Reflect On Personal Experience
When I first chose my domain, I underestimated its significance. I picked something trendy, but it quickly became outdated. That taught me the importance of considering longevity and simplicity. What would your domain say about you in a decade?Choosing the right domain is more than just a step in setting up your private email. It’s about creating a lasting impression. What do you want your domain to say about you or your business?
Credit: privateemail.com
Accessing Namecheap Account
Setting up a private email with Namecheap starts by accessing your account through their website. Navigate to the “Email” section, select “Private Email,” and follow the prompts to configure your domain’s email settings.
Accessing your Namecheap account is the crucial first step in setting up your private email. This might seem straightforward, but ensuring you have everything ready can save you time and headaches. Whether you’re a seasoned pro or a newcomer, logging into your Namecheap account should be smooth and efficient. ###Logging Into Namecheap
Begin by visiting the Namecheap website. Click on the “Sign In” button at the top right corner of the page. Enter your username and password, then press “Sign In”. If you’ve forgotten your password, use the “Forgot password?” link to reset it. ###Accessing Your Dashboard
Once logged in, you’ll land on your account dashboard. This is your control center where you can manage domains, hosting, and emails. Make sure your email address on file is current to receive important updates. ###Navigating To Email Management
From the dashboard, find the ‘Email’ tab on the left-hand menu. Click on it to access all your email services. If you have multiple domains, ensure you’re selecting the correct one for your private email setup. ###Ensuring Security
Security is paramount. Regularly update your password to keep your account safe. Consider enabling two-factor authentication for an additional layer of security. ###Checking Account Settings
Check your account settings to ensure everything is up to date. This includes your contact information and payment methods. Keeping these current prevents service disruptions and ensures seamless communication. ###What If You Face Issues?
Encountering a problem while accessing your account isn’t uncommon. Namecheap’s support team is available to assist you through live chat or email. Have you ever faced a login issue? How did you resolve it? By efficiently accessing your Namecheap account, you’re setting the stage for a successful private email setup. Each step you take here is a building block for smooth email management. Ready to move forward with confidence?Navigating To Email Services
Setting up a private email with Namecheap is straightforward. It begins with accessing the correct section in your account. Navigating to the Email Services page is the first step. This section guides you through finding this vital area.
Access Your Namecheap Account
Log into your Namecheap account. Use your credentials. Once in, locate the Dashboard. It’s your control center for all services.
Find The Domain List
On the left-hand menu, click on the “Domain List.” This section shows all your registered domains. Each domain has specific options and settings.
Select Your Domain
Choose the domain where you want the email setup. Click “Manage” next to your selected domain. This action opens a new set of options.
Navigate To The Email Tab
Within the domain’s management page, find the “Email” tab. It’s usually located in the top menu. Click on it to enter the Email Services section.
Explore Email Service Options
Here, explore available email services. Choose the one that suits your needs. This is crucial for setting up your private email correctly.
Selecting Private Email Option
Selecting the right private email option with Namecheap is crucial. It ensures your email communication remains secure and efficient. A private email offers you a personalized touch. It also enhances your professional image. Let’s explore how to choose the best private email option.
Understanding Your Needs
First, assess your email requirements. Do you need multiple accounts? Determine the storage space you need. Consider any additional features. Knowing your needs helps in selecting the right package. A well-chosen plan prevents unnecessary costs.
Exploring Namecheap’s Private Email Plans
Namecheap offers various private email plans. Each plan caters to different needs. Compare the features of each plan. Look at storage limits and the number of email accounts. Check for additional tools like calendars and contacts. Choose a plan that matches your needs and budget.
Evaluating Security Features
Security is vital for private emails. Namecheap provides robust security options. Look for features like spam protection and virus scanning. Encryption options are crucial for sensitive information. Ensure the plan offers these protections. Your privacy should be a top priority.
Considering Scalability
Think about future needs. Will your email needs grow? Choose a plan that can scale with you. Namecheap offers flexible plans. They can grow with your requirements. This ensures long-term satisfaction with your email service.
Checking Customer Support
Reliable customer support is essential. Namecheap provides 24/7 support for email services. Check reviews to understand their service quality. A good support team resolves issues quickly. Ensure your chosen plan includes this feature.
Configuring Email Settings
Configuring email settings is a crucial step in setting up your Namecheap email. It ensures your messages are received and organized effectively. Proper configuration can enhance security and streamline communication. Let’s delve into creating accounts, setting up forwarding, and adjusting spam filters.
Creating Email Accounts
Start by logging into your Namecheap account. Navigate to the email section. Click on ‘Create’ to add a new email account. Enter the desired username and password. Choose the domain you want to associate with this email. Confirm the creation to finalize your new email account.
Setting Up Forwarding
Email forwarding allows you to redirect emails to another address. Go to the email management panel. Select ‘Forwarding’ from the options. Enter the destination email address where messages should be sent. Save changes to activate forwarding. This keeps you organized by centralizing communication.
Adjusting Spam Filters
Spam filters help keep your inbox clean. Access the spam filter settings through your email dashboard. Set the filter level according to your preference. Add any specific addresses to the whitelist. This ensures important emails are not marked as spam. Regularly review these settings for optimal performance.

Credit: www.youtube.com
Integrating With Email Clients
Easily set up your Private Email with Namecheap for seamless integration. Follow simple steps to connect with popular email clients. Enjoy a smooth email experience with personalized settings that suit your needs.
Integrating your Namecheap private email with various email clients can greatly enhance your productivity and streamline communication. Whether you’re on a PC, using a Gmail account, or prefer Apple devices, connecting your Namecheap email is simple and convenient. Let’s dive into the specifics of setting up your email on popular platforms like Outlook, Gmail, and Apple Mail. ###Setting Up On Outlook
Outlook is a popular choice for managing emails, calendars, and tasks all in one place. To get started, open Outlook and navigate to the “File” menu. Select “Add Account” and enter your Namecheap email address. Follow the prompts to enter your password and server settings. Ensure that the incoming server is set to IMAP or POP3, and the outgoing server is SMTP. Double-check that you have the correct server names and ports from Namecheap’s email settings guide. Finally, click “Finish” to complete the setup. Your Namecheap email will now appear in Outlook, ready for you to manage your emails efficiently. Isn’t it satisfying when everything just clicks into place? ###Configuring For Gmail
Gmail users can integrate their Namecheap email seamlessly, allowing you to manage multiple accounts in one interface. Start by logging into your Gmail account and clicking on the gear icon to access “Settings”. Navigate to the “Accounts and Import” tab and click on “Add a mail account”. Enter your Namecheap email address and proceed to the next step, selecting either POP3 or IMAP as your preferred protocol. Enter the required server settings, ensuring accuracy with port numbers and server addresses. Once configured, your Namecheap emails will flow into your Gmail inbox, keeping everything organized in one place. How convenient is that? ###Using Apple Mail
For Apple enthusiasts, integrating your Namecheap email with Apple Mail is straightforward. Open Apple Mail and click on “Mail” in the top menu, then select “Add Account”. Choose “Other Mail Account” and enter your Namecheap email credentials. Make sure you input the correct incoming and outgoing mail server details, as provided by Namecheap. Once setup is complete, your emails will sync with Apple Mail, allowing you to access them effortlessly on your Mac or iOS devices. Have you ever wondered how much time you save with everything at your fingertips? Integrating your Namecheap email with these clients not only enhances your productivity but also offers the flexibility to manage your communication on your preferred platform. Which email client will you set up first?Testing Your Email Setup
Testing your email setup is essential. It ensures everything functions smoothly. After configuring your private email on Namecheap, it’s time to test. This step confirms your email sends and receives correctly. It also verifies that your settings are accurate. Follow these steps to ensure your email setup is perfect.
Send A Test Email
Begin by sending a test email. Use your newly configured address. Send it to another email account you own. Check if the email arrives in the inbox. Ensure it doesn’t end up in spam. A successful delivery indicates proper outgoing settings.
Receive A Test Email
Next, test receiving emails. Send an email to your Namecheap address. Use a different email account. Check if it arrives in your inbox. Confirm it appears promptly. This test verifies your incoming email settings.
Check Email Attachments
Attachments are crucial for many users. Send an email with a file attached. Ensure it reaches your inbox without issues. Open the attachment to verify its integrity. This checks your email’s capability to handle attachments.
Verify Spam Filters
Spam filters protect your inbox from unwanted emails. Test this feature by marking an email as spam. Check if it moves to the spam folder. Verify if the filter works as expected. It’s crucial for keeping your inbox clean.
Evaluate Email Forwarding
Some users forward emails to another account. Set up email forwarding in your Namecheap account. Send a test email to your Namecheap address. Verify it forwards to the designated email. This ensures your forwarding setup works correctly.
Managing Email Accounts
Managing your email accounts on Namecheap is straightforward and efficient. This section will guide you through the key processes. Adding new users, removing unnecessary accounts, and monitoring usage are all essential. Effective management ensures your email system runs smoothly and securely.
Adding New Users
To add new users, log into your Namecheap account. Navigate to the Email Management section. Click on ‘Add User’. Enter the new user’s details. Assign the appropriate permissions. Ensure you save changes to activate the account.
Deleting Accounts
Deleting accounts is simple. First, access the Email Management section. Locate the account you wish to delete. Click on ‘Delete’. Confirm the action to remove the account permanently. Always double-check before proceeding to avoid data loss.
Monitoring Usage
Monitoring usage helps maintain optimal performance. Check the usage statistics in your dashboard. Identify any unusual activity or excessive storage use. Adjust settings or manage accounts to ensure efficiency. Regular monitoring keeps your email system reliable.
Troubleshooting Common Issues
Setting up Private Email with Namecheap can encounter issues like incorrect DNS settings or authentication errors. Ensure proper server configurations and check for accurate login credentials. Regularly update settings to maintain optimal email functionality.
Setting up a private email with Namecheap can be a smooth experience, but sometimes you might encounter a few bumps along the way. Troubleshooting common issues is essential to ensure your email runs smoothly. Whether it’s connectivity problems, authentication errors, or spam concerns, having the right tools and knowledge can make all the difference. Let’s dive into these typical challenges and learn how to overcome them effectively.Resolving Connectivity Problems
Connectivity issues can be frustrating, especially when you’re expecting important emails. Check your internet connection first; it’s often the simplest fix. If your internet is stable, examine your email client settings to ensure they match the configurations provided by Namecheap. Sometimes, firewall settings can block email connectivity. Adjust your firewall settings to allow your email client access. Have you updated your email client recently? Outdated software can cause unexpected connectivity issues, so keep your applications up-to-date.Fixing Authentication Errors
Authentication errors often arise from incorrect login details. Double-check your username and password; even a small typo can lead to an error. Ensure that your email client is set to use the correct authentication method as specified by Namecheap. Have you recently changed your password? Update it in all your devices to prevent authentication mishaps. If errors persist, consider resetting your password. This can be a quick way to resolve stubborn authentication issues.Addressing Spam Concerns
Spam can clutter your inbox and distract you from important messages. Utilize Namecheap’s spam filters to automatically route unwanted emails away from your main inbox. Are you still receiving spam? Manually mark these emails as spam to train your filters better. Regularly review your spam folder. Sometimes legitimate emails might end up there by mistake. By marking them as “not spam,” you help improve the accuracy of your filters. How do you handle spam in your inbox? Share your tips and tricks in the comments below!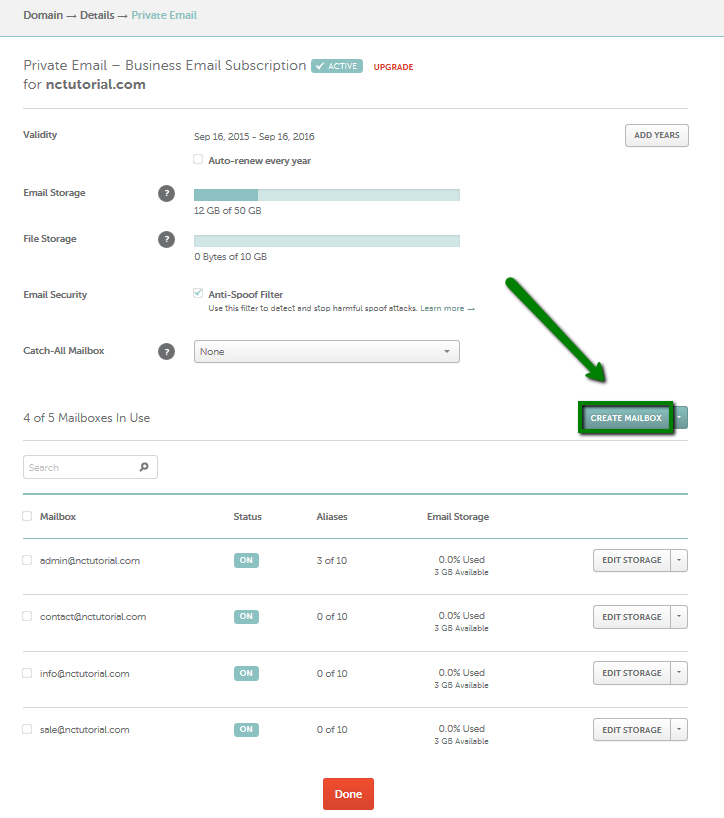
Credit: www.namecheap.com
Enhancing Email Security
Enhancing email security is crucial for protecting your personal information. Namecheap provides tools to secure your private email effectively. Boosting security involves simple steps. Each step ensures your email remains safe from threats.
Enabling Two-factor Authentication
Two-factor authentication adds an extra security layer. It requires a second verification step. Usually, it’s a code sent to your phone. This means even with a password, access isn’t easy. Hackers need your phone too. Enable this feature in your Namecheap account settings. It enhances safety by keeping unauthorized users out.
Setting Strong Passwords
Strong passwords are your first defense line. Use a mix of letters, numbers, and symbols. Avoid common words or predictable patterns. Longer passwords are harder to crack. Change them regularly to maintain security. A password manager can help you create and store these securely.
Regular Security Audits
Conduct security audits to identify vulnerabilities. Check for unusual activities in your email. Review login histories and alert settings. Make sure software is up-to-date. These audits help catch potential breaches early. Regular checks maintain your email’s integrity and security.
Frequently Asked Questions
How To Create A Private Email On Namecheap?
Sign in to Namecheap. Choose “Private Email” under the “Email” tab. Select a plan. Add your domain. Proceed to checkout. Follow on-screen instructions for setup.
How Much Is Private Email On Namecheap?
Private email on Namecheap starts at $0. 91 per month. Prices vary based on the plan and features. Namecheap offers various options to suit different needs, ensuring flexibility and affordability. Check their website for the latest pricing and promotions on private email services.
How To Setup Namecheap Private Email On Iphone?
Open Settings on your iPhone. Tap “Mail,” then “Accounts,” and select “Add Account. ” Choose “Other,” then “Add Mail Account. ” Enter your Namecheap email details. Tap “Next,” and input your server settings. Save changes. Your Namecheap email is now set up on your iPhone.
Is Private Email Pop3 Or Imap?
Private email supports both POP3 and IMAP. You can choose either based on your preference and needs.
Conclusion
Setting up Private Email with Namecheap is simple and efficient. Follow the steps outlined in this guide. You’ll enjoy a secure and personalized email experience. Secure communication is essential today. Namecheap provides a reliable platform for your email needs. Remember to configure your settings correctly.
This ensures smooth operation and ease of use. Troubleshooting is minimal once set up is complete. Your email will be ready in no time. Enjoy the benefits of a private email account. Stay connected, safely and privately. Take control of your email today.


