
Are you looking to transfer your domain name from GoDaddy to Namecheap but feeling a bit overwhelmed by the process? You’re not alone.
Many domain owners find themselves puzzled by the steps involved. But don’t worry, you’re in the right place! In this guide, we’ll break down the entire process into simple, easy-to-follow steps that anyone can understand. Imagine saving money on your domain renewals and enjoying better management tools.
Doesn’t that sound appealing? By the end of this article, you’ll feel confident and ready to make the switch without any hiccups. So, let’s dive in and discover how you can seamlessly move your domain to a new home with Namecheap!
Preparation Steps
Begin by unlocking your GoDaddy account. Disable privacy protection and retrieve your domain’s authorization code. Log into Namecheap and initiate the transfer process using the code. Follow the prompts to finalize the transfer. Ensure your contact information is current to avoid delays.
Transfer completion may take several days.
Transferring your domain from GoDaddy to Namecheap might seem daunting at first, but breaking it down into preparation steps can streamline the process. Preparation is crucial to ensure a smooth transition and avoid any hiccups that might jeopardize your website’s functionality. Let’s explore the essential steps you need to take before initiating the transfer.Check Domain Eligibility
Before you proceed, confirm that your domain is eligible for transfer. Domains must be at least 60 days old and not locked or involved in any legal disputes. Log into your GoDaddy account and check the domain’s status under “Domain Settings.” If your domain doesn’t meet these conditions, you’ll need to resolve any issues before moving forward. Is your domain about to expire? Renew it to avoid complications during the transfer. A domain that’s close to expiration might cause unexpected downtime or even loss of registration.Unlock Domain
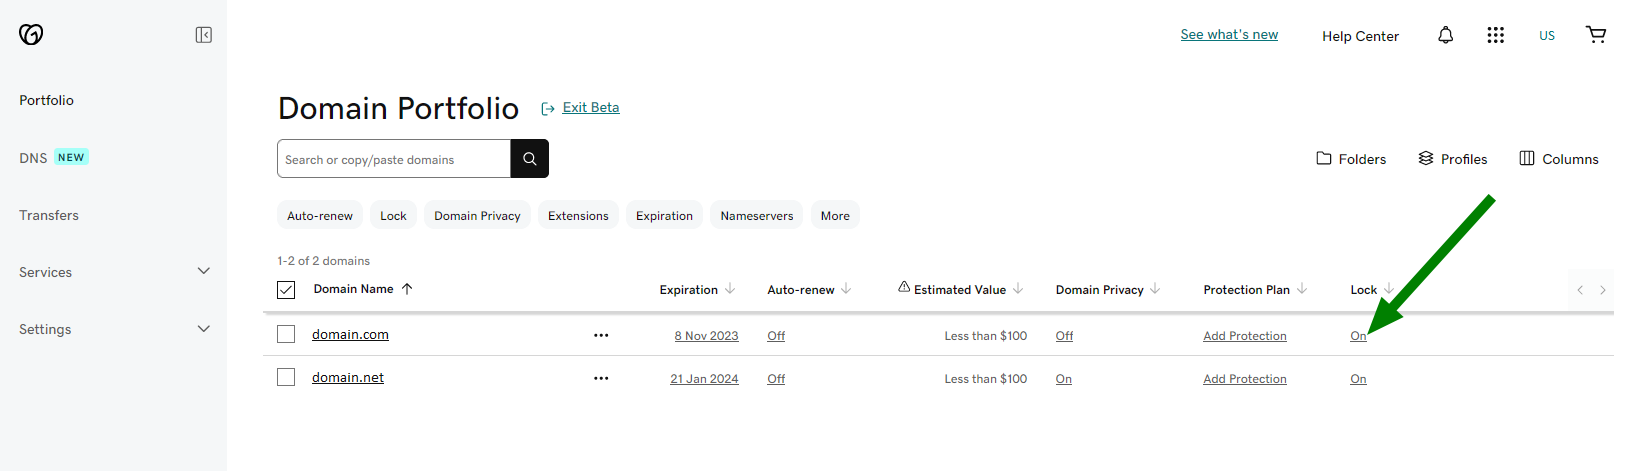
Once you’ve confirmed eligibility, the next step is to unlock your domain. This process is simple but crucial. In your GoDaddy dashboard, navigate to the domain management section and locate the lock settings. You’ll find an option to unlock your domain; switch it off to proceed. Don’t forget to save your changes. An unlocked domain is necessary for the transfer to proceed smoothly. Have you ever tried to transfer a domain while it was locked? It can lead to frustrating delays. Ensuring your domain is unlocked will save you time and hassle. In these preparation steps, attention to detail is key. Have you double-checked everything? Taking these initial actions will set you up for a successful transfer, paving the way for your domain’s new home at Namecheap.
Credit: blogaid.net
Gather Necessary Information
Transferring your domain from GoDaddy to Namecheap requires careful preparation. Gathering the necessary information is crucial for a smooth transfer. This step ensures you have all the details needed to avoid delays. With the right information, the transfer process becomes straightforward and stress-free.
Domain Authorization Code
The Domain Authorization Code is essential for your domain transfer. This code acts like a password for your domain. It verifies your ownership during the transfer. You can get this code from your GoDaddy account. Locate it under the domain settings section. Ensure you have this code ready before starting the transfer.
Current Domain Details
Knowing your current domain details is vital. Check the domain’s expiration date. It must be active to transfer. Verify your domain’s registration details. Ensure all information is accurate and up-to-date. Confirm the domain is not locked. If locked, unlock it in your GoDaddy settings. Keep these details handy for a seamless transition.
Initiate Transfer On Namecheap
Transferring a domain from GoDaddy to Namecheap can feel daunting. But it’s simpler than it seems. This guide will help you through the process. It will focus on how to initiate the transfer on Namecheap. Follow these steps to ensure a smooth transition. Let’s begin with logging into your Namecheap account.
Log Into Namecheap Account
First, access your Namecheap account. Use your registered email and password. Can’t remember your password? Use the ‘Forgot Password’ feature to reset it. Once logged in, find the ‘Domain Transfer’ section on the dashboard. It’s usually on the left-hand side. Click it to proceed with the transfer.
Enter Domain Details
After accessing the transfer section, enter your domain name. Ensure it’s spelled correctly. Double-check for any typos. Typos can delay the process. Enter your domain’s authorization code. This code is crucial. You should have received it from GoDaddy. If not, request it from their support. Once you’ve entered all details, click ‘Add to Cart.’ You’re one step closer to transferring your domain.
Confirm Transfer Process
Transferring a domain from GoDaddy to Namecheap involves a few simple steps. Unlock the domain on GoDaddy, get the transfer code, and initiate the transfer process on Namecheap. Ensure the domain is eligible for transfer and follow the instructions to complete the switch smoothly.
Transferring your domain from GoDaddy to Namecheap might seem daunting, but it’s a straightforward process that ensures your online presence is in the right hands. Once you’ve initiated the transfer, it’s crucial to confirm the process to ensure everything goes smoothly. This phase involves checking your transfer details and approving the transfer, which are both essential steps to successfully moving your domain.Review Transfer Details
Before you finalize the transfer, take a moment to review the transfer details carefully. Ensure that the domain name you want to transfer is correct. Double-check the authorization code you received from GoDaddy. This code is like a key to your domain, and any mistake here could delay your transfer. Have you checked your email for a confirmation from Namecheap? They usually send a summary of your transfer request. This is your chance to verify all the details one last time. Remember, accuracy is key.Approve Transfer
After reviewing the details, the next step is to approve the transfer. You might wonder, what’s the big deal about approval? Well, without it, your transfer is stuck in limbo. Log in to your GoDaddy account and look for the transfer request. You’ll typically find it under the domain management section. Approving it is like giving a green light to Namecheap to proceed. If you’re anything like me, you might have a slight hesitation at this stage. Letting go of your domain from one registrar to another feels like a leap. But trust the process—approving is just a click away, and it’s essential to move forward. Have you ever faced a situation where you had all the information but forgot to approve? It’s like packing for a trip but forgetting your passport. Don’t let that happen with your domain transfer. Approve it, and you’ll be one step closer to having your domain securely with Namecheap. Remember, each step you take is a step towards better management of your online identity. Are you ready to move your domain with confidence?Monitor Transfer Status
After initiating the domain transfer from GoDaddy to Namecheap, monitoring the transfer status is crucial. This step ensures the process completes smoothly. Keeping an eye on updates helps prevent unexpected delays.
Check Email Notifications
Email notifications are key during the transfer. GoDaddy and Namecheap send updates about the transfer progress. Regularly check your inbox for important messages. These emails often contain action items or confirmations. Respond promptly to any requests in these emails.
Verify Domain Transfer Completion
Confirm the domain transfer has finalized. Log in to your Namecheap account to check the domain status. The domain should appear in your account dashboard. If it’s not visible, contact Namecheap support immediately. Ensure all domain settings are correct after the transfer. Double-check DNS configurations and renewal options.
Credit: www.namecheap.com
Post-transfer Actions
Transferring a domain to Namecheap is just the start. After the transfer, a few tasks remain. These ensure your website functions smoothly. Follow these steps for a seamless experience.
Update Dns Settings
Once the domain transfer completes, check your DNS settings. Namecheap might not retain your old DNS records. Log into your Namecheap account. Navigate to the domain list. Select your newly transferred domain. Access the DNS settings section.
Update the records to match your previous settings. This ensures your site remains accessible. Incorrect settings can lead to downtime. Always double-check the DNS entries. This step is crucial for maintaining website functionality.
Renew Domain
Transferred domains may lose previous renewal settings. Verify the renewal date on Namecheap. Set up auto-renewal if necessary. This prevents your domain from expiring unexpectedly.
Auto-renewal ensures your domain remains active. You avoid manual renewal each year. Check your payment method. Ensure it’s up-to-date. This secures seamless renewals without interruption.

Credit: www.youtube.com
Frequently Asked Questions
Can I Transfer A Domain From Godaddy To Namecheap?
Yes, you can transfer a domain from GoDaddy to NameCheap. Unlock your domain, get the authorization code, and initiate the transfer on NameCheap. Ensure the domain is more than 60 days old and not under any lock or hold. Follow the steps provided by both registrars for a smooth transfer.
Can I Transfer My Domain Name From Godaddy To Another Host?
Yes, you can transfer your domain from GoDaddy to another host. Unlock your domain first. Obtain the authorization code. Initiate the transfer process with your new host. Ensure your domain meets transfer requirements. Confirm the transfer via email.
How Do I Transfer My Domain From Domain Com To Namecheap?
Unlock your domain at Domain. com and get an authorization code. Initiate the transfer at NameCheap using this code. Confirm the transfer via email.
How To Add Godaddy Domain To Namecheap Hosting?
To add a GoDaddy domain to NameCheap hosting, update the domain’s DNS settings in GoDaddy. Set NameCheap’s nameservers as the domain’s nameservers. Log into your NameCheap account and add the domain under “Domain List. ” Ensure propagation by checking the domain’s connectivity with your hosting.
Conclusion
Transferring a domain from GoDaddy to Namecheap is straightforward. Follow the steps carefully. Unlock your domain and obtain the EPP code. Both are essential. Initiate the transfer on Namecheap. Enter the EPP code when prompted. Confirm the transfer through your email.
Check your email regularly. It may take a few days to complete. Keep patience during this process. Once done, your domain is with Namecheap. Managing your domain becomes easier. You’ve successfully made the switch. Enjoy Namecheap’s user-friendly interface and features.
Your online presence is now secure.


