
You’ve got a domain name picked out and a web hosting plan ready to go. But how do you connect the two so your website actually shows up online?
Pointing your domain to your web hosting might sound tricky, but it’s easier than you think. You’ll learn simple, step-by-step instructions to make sure your website is live and ready for visitors. Keep reading, and by the end, you’ll have your site up and running smoothly—no confusion, no hassle.

Credit: www.youtube.com
Choose Your Web Hosting Provider
Start by finding the nameservers from your web hosting provider. Then, update your domain settings to point to these nameservers. This connects your domain to your hosting site quickly and easily.
Choosing the right web hosting provider is the first step to point your domain correctly. The host stores your website files and makes them available online. A good provider ensures your site loads fast and stays online without interruptions.
Consider what type of hosting fits your needs. Shared hosting is affordable and suits small sites. For bigger sites, VPS or dedicated hosting offers more power and control. Think about your website’s size and traffic before deciding.
Check Server Reliability And Speed
Server uptime matters a lot. Choose a provider with at least 99.9% uptime. Slow servers can hurt user experience and SEO rankings. Look for hosts with fast servers and data centers near your visitors.
Evaluate Customer Support
Good customer support helps solve problems quickly. Look for providers offering 24/7 support via chat, phone, or email. Helpful support saves time and reduces stress during technical issues.
Review Security Features
Your website needs protection from hackers and malware. Pick a host that offers free SSL certificates, firewalls, and regular backups. Secure hosting keeps your data and visitors safe.
Compare Pricing And Plans
Price matters but don’t choose only the cheapest option. Compare what each plan includes. Check for hidden fees and renewal costs. Choose a plan that fits your budget and needs.
Access Your Domain Registrar Account
Accessing your domain registrar account is the first step to point your domain to your web hosting. This account holds all the information about your domain name. It allows you to change settings, including where your domain points online.
Knowing how to log in and navigate your registrar account saves time. It ensures you can update your domain settings correctly. Keep your login details safe and ready before you start.
Locate Your Domain Registrar
Identify the company where you bought your domain name. Common registrars include GoDaddy, Namecheap, and Google Domains. Check your email for purchase confirmation if unsure.
Sign In To Your Account
Visit the registrar’s website. Enter your username and password. Use the “Forgot Password” option if you cannot log in. Keep your account secure with a strong password.
Find Your Domain Management Section
Look for sections like “My Domains” or “Domain Settings.” This area shows all domains you own. Select the domain you want to point to your hosting.
Locate Dns Management Settings
Locating the DNS management settings is the first step to point your domain to your web hosting. These settings control where your domain sends visitors. Finding them lets you change the domain’s address to your hosting server.
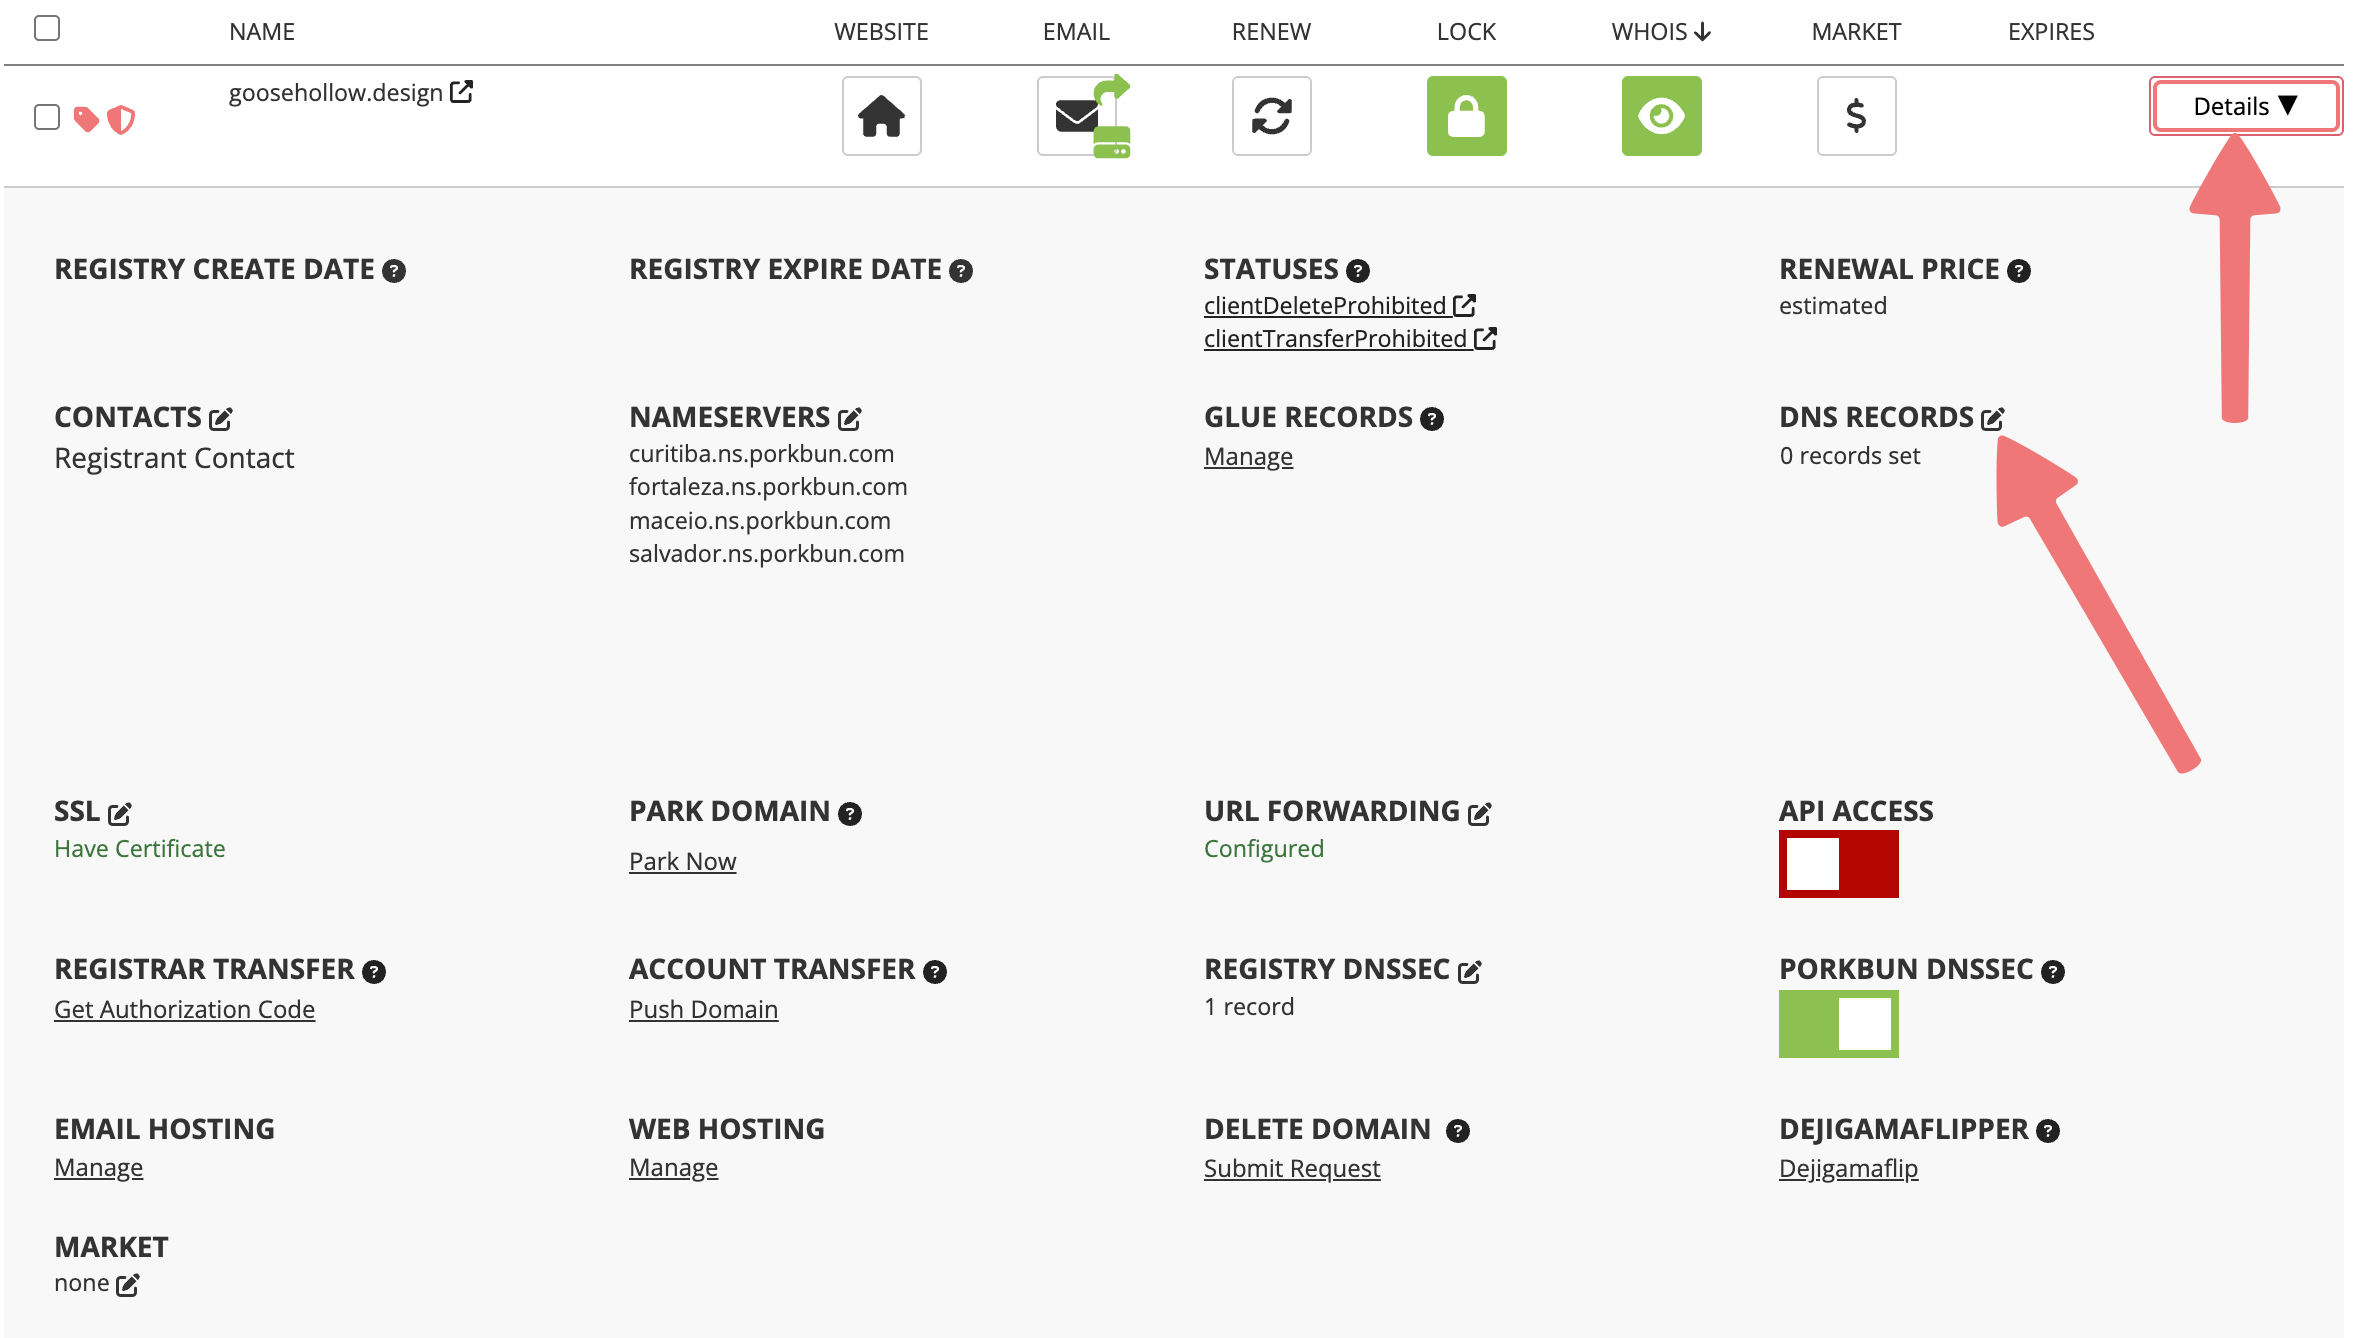
Accessing the DNS settings depends on where you bought your domain. Usually, domains come with a control panel or dashboard. This is where you manage your domain details and DNS records.
Log Into Your Domain Registrar Account
Start by logging into the website where you registered your domain. Use your username and password. This account holds all your domain information.
Navigate To Domain Management
Find the section named “Domains,” “My Domains,” or “Domain Management.” This page lists all domains you own. Click on the domain you want to point to your host.
Find The Dns Settings Or Dns Management Link
Look for a tab or link called “DNS Settings,” “DNS Management,” or “Name Server Settings.” This area controls your domain’s DNS records.
Open The Dns Editor
Once inside, you can view or edit DNS records like A, CNAME, and MX. This editor allows you to update your domain’s address to your hosting provider.
Credit: kb.porkbun.com
Update Nameservers
Updating nameservers is a key step to connect your domain with your web hosting. Nameservers tell the internet where to find your website. Without updating them, your domain will not show your new site. This process is simple and fast.
Find Hosting Nameserver Details
Start by logging into your hosting account. Look for the section called “DNS” or “Nameservers.” Your hosting provider usually gives two or more nameserver addresses. They look like ns1.example.com and ns2.example.com. Write these down or keep the tab open for easy access.
Replace Default Nameservers
Next, log into your domain registrar account. Find the domain management area. Look for “Nameservers” or “DNS Settings.” Delete the default nameservers there. Then, enter the new nameservers from your hosting provider. Save the changes. It may take a few hours to update worldwide.
Modify Dns Records
Modifying DNS records is a key step to connect your domain with your web hosting. DNS records tell the internet where to find your website. Changing these records points visitors to the right server. This process is simple with the right steps. Focus mainly on A records and CNAME records for most setups.
Edit A Record
The A record links your domain to an IP address. This address is where your website files live. To edit it, log into your domain control panel. Find the DNS settings or DNS management section. Look for the existing A record, usually named “@” or your domain name. Change the IP address to the one your hosting provides. Save the changes and wait for them to update across the web. This can take a few minutes to several hours.
Configure Cname Records
CNAME records point one domain name to another. Use CNAME to connect subdomains like “www” to your main domain. In DNS settings, find the CNAME section. Add or edit the record named “www” or your subdomain. Set the value to your main domain or hosting URL. Save your changes to link the subdomain correctly. This helps visitors reach your site easily using different addresses.
Verify Domain Propagation
Verifying domain propagation is a key step after pointing your domain to your web hosting. It confirms that the DNS changes have spread across the internet. This process ensures visitors reach your website without issues.
Propagation can take some time. It depends on many factors like TTL settings and DNS servers. Checking propagation helps avoid confusion about your site’s availability.
What Is Domain Propagation?
Domain propagation means the updating of DNS servers worldwide. These servers need to know where your website is hosted. Until all servers update, some visitors may see the old site or no site.
How To Check Domain Propagation
Use online tools to check your domain’s status. Tools like DNS Checker show results from multiple locations. Enter your domain name and see if the new IP appears everywhere.
When To Start Verifying Propagation
Begin checking a few hours after updating DNS records. Propagation can finish within minutes or take up to 48 hours. Regular checks help track progress clearly.
What To Do If Propagation Is Slow
Wait patiently and avoid making new changes quickly. Frequent updates can delay propagation further. Contact your hosting or domain provider if delays last too long.
Troubleshoot Common Issues
Troubleshooting common issues helps fix domain pointing problems fast. Many users face delays or errors after changing domain settings. Checking a few simple things can solve most problems. This saves time and avoids frustration. Follow these steps to identify and fix common mistakes.
Check For Typing Errors
Typing errors in domain or server details cause connection failures. Double-check nameservers and IP addresses for mistakes. Even one wrong character breaks the link. Use copy-paste carefully to avoid typos. Confirm all entries match exactly what your host provides.
Clear Dns Cache
DNS cache stores old domain info on your device or network. This can show outdated or wrong website versions. Clear your browser cache or restart your device. Use command line tools to flush DNS cache if needed. This forces your system to get fresh domain data.
Contact Support
Technical support teams help with issues beyond basic fixes. Contact your domain registrar or hosting provider for help. Provide them with details about your problem and settings. They can check server status and guide you through solutions. Support saves time when the problem is complex.
Maintain Domain And Hosting Settings
Maintaining your domain and hosting settings is key to keeping your website live and working well. These settings control where your website points and how it loads. You must check them often to avoid problems.
Small changes can cause big issues. Keeping your settings correct stops downtime and email failures. It also helps your site stay secure and fast.
Check Dns Records Regularly
DNS records tell the internet where your website lives. Keep these records updated with your hosting provider’s info. Use your domain registrar’s control panel to view and edit them. Confirm the A record and CNAME point to the right server.
Keep Nameservers Correct
Nameservers direct your domain traffic. Use the nameservers given by your web host. Do not mix them with other services. Changing nameservers wrongly can break your site and email. Double-check nameservers after any update.
Update Contact Information
Your domain registrar needs your current contact details. Update your email and phone number regularly. This helps you get important alerts about your domain. Missing these messages can cause domain suspension or loss.
Renew Domain And Hosting On Time
Set reminders to renew your domain and hosting. Expired domains or hosting lead to site downtime. Renew early to avoid service interruption. Some providers offer auto-renew, use it if available.
Backup Your Settings And Website
Keep backups of your DNS settings and website files. Backups help restore your site after mistakes or attacks. Store backups in a safe place outside your hosting account.

Credit: help.dreamhost.com
Frequently Asked Questions
What Is Domain Pointing In Web Hosting?
Domain pointing links your domain name to your web hosting server. It allows visitors to access your website using your domain.
How Do I Find My Web Hosting Dns Settings?
Log in to your hosting account dashboard. Look for DNS or nameserver settings, usually under domain or server management.
Can I Point My Domain Without Changing Dns?
Yes, using URL forwarding or domain redirection services, but changing DNS is preferred for better control and performance.
How Long Does Domain Pointing Take To Work?
Propagation usually completes within 24 to 48 hours. Sometimes it can be faster, but delays depend on DNS servers worldwide.
Conclusion
Pointing your domain to your web hosting is simple with clear steps. Check your DNS settings carefully to avoid mistakes. Allow time for changes to take effect across the internet. Stay patient and double-check each step you take. This process helps your website become accessible to visitors.
Keep learning and updating your settings as needed. Your website will be live and ready soon. Easy and effective.


