
Are you looking to make your WordPress site more effective? Adding a Call to Action (CTA) button can be a game-changer for your website.
It guides your visitors to take the exact steps you want—whether it’s signing up for a newsletter, making a purchase, or contacting you. But how do you add a CTA button that grabs attention and drives action? This article will show you simple, clear steps to create and place powerful CTA buttons on your WordPress site.
By the end, you’ll know exactly how to turn visitors into engaged customers or followers. Keep reading to unlock the secret to boosting your website’s performance!

Credit: verpex.com
Choosing The Right Cta Button
Choosing the right Call to Action (CTA) button is key to boosting clicks and conversions. A well-chosen CTA guides visitors to take the next step on your site. It should match your goal and attract attention without overwhelming the page. The button’s style, text, and placement all work together to drive user action.
Types Of Cta Buttons
There are several types of CTA buttons, each suited for different goals. Common types include “Buy Now,” “Sign Up,” “Learn More,” and “Download.” Choose a button that clearly states what you want users to do. Simple text works best to avoid confusion. Use action words that create a sense of urgency or benefit.
Design Tips For Cta
Make your CTA button stand out with contrast colors. Use colors that differ from the rest of your page but still fit your brand. Keep the shape simple, like rectangles with rounded edges. The button size should be large enough to tap easily on phones. Use readable fonts and keep text short and direct.
Placement Strategies
Place CTA buttons where visitors naturally look or scroll. Common spots include above the fold, at the end of content, or in a sticky header. Avoid cluttering the page with too many buttons. One or two clear CTAs per page work best. Test different positions to see which gets more clicks.
Using WordPress Block Editor
The WordPress Block Editor lets you build pages easily. It uses blocks for different content types. Adding a call to action button is simple here. The editor gives control over look and links. This section shows how to add and customize buttons.
Adding A Button Block
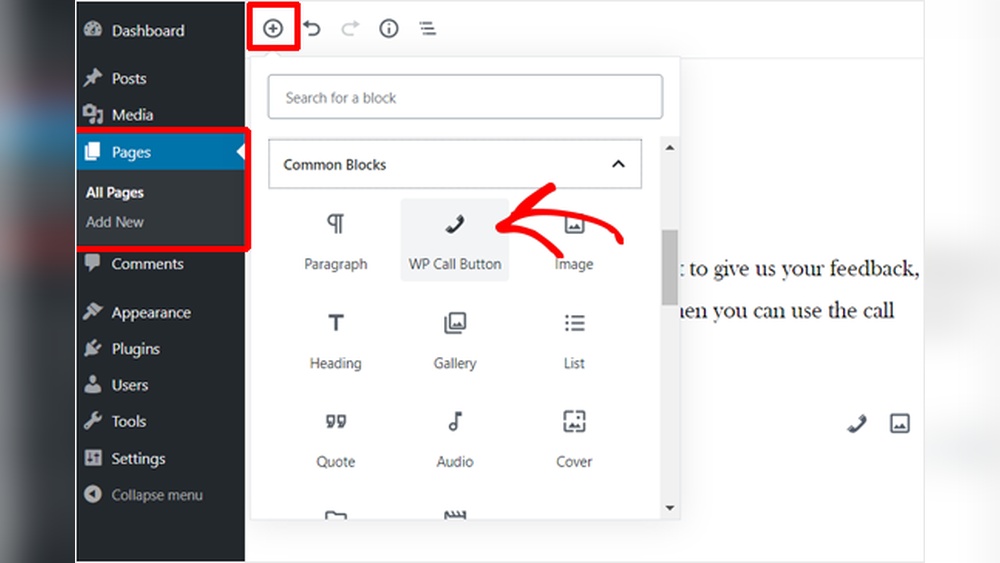
Open the page or post in the Block Editor. Click the plus (+) icon to add a new block. Search for “Button” in the block list. Select the Button block to insert it. The button will appear where your cursor is placed. You can type your call to action text inside it.
Customizing Button Style
Select the Button block to see style options. Choose from preset colors or pick your own. Adjust the button size using the toolbar above. You can also change the shape and border style. Use the block settings on the right for more options. Make the button stand out but keep it simple.
Linking The Button
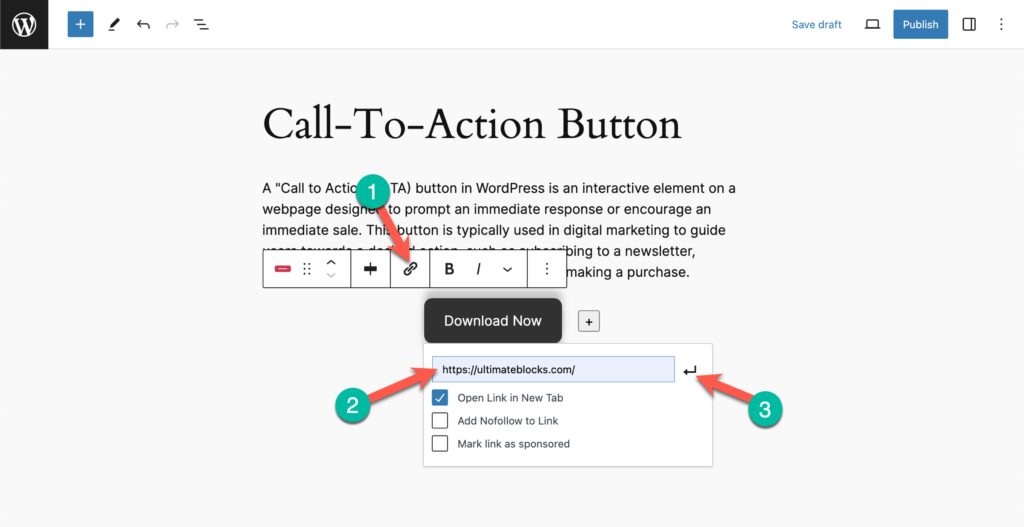
Click the button to select it. In the toolbar, click the link icon. Enter the URL you want the button to go to. You can link to a page, post, or external site. Press Enter or click Apply to save the link. Test the button by previewing your page. This ensures the link works correctly.
Adding Cta With Plugins
Adding a call to action (CTA) button on WordPress can boost user engagement. Plugins make this task simple and effective. They let you create buttons without coding skills. Choose a plugin that fits your site’s style and needs. Use the plugin’s features to design eye-catching CTAs. This helps guide visitors to important pages or offers.
Top Cta Plugins For WordPress
Several plugins help add CTA buttons easily. Elementor offers drag-and-drop button creation. WPForms includes CTA buttons in forms. Thrive Leads focuses on lead generation with CTAs. MaxButtons allows custom button designs. Pick one based on your site’s goals and ease of use.
Installing And Activating Plugins
Go to your WordPress dashboard. Click on Plugins then Add New. Search for the chosen CTA plugin by name. Click Install Now. Wait for the installation to finish. Press Activate to enable the plugin on your site. The plugin is ready to use after activation.
Configuring Plugin Settings
Open the plugin’s settings panel in the dashboard. Adjust button styles like color, size, and text. Set the button’s link to the desired page or action. Choose where the button appears on your site. Some plugins let you add animations or popups. Save changes and preview the button on your site. Tweak settings until the CTA looks perfect.
Using Custom Html And Css
Using custom HTML and CSS to add a call to action button gives you full control. You can design a button that fits your website style perfectly. This method works well for those who want a simple, fast, and flexible solution. It does not require extra plugins or tools.
Below, find easy steps to create, style, and embed your button using code.
Creating A Button With Html
Start by writing a simple HTML button. Use the tag for links. For example:
Click HereThis code creates a clickable button with text. Change the URL to your target page. The class name helps apply styles next.
Styling The Button With Css
Use CSS to make your button look good. Add colors, padding, and hover effects. Example CSS:
.custom-btn { background-color: 0073e6; color: white; padding: 12px 24px; text-decoration: none; border-radius: 5px; display: inline-block; font-weight: bold; } .custom-btn:hover { background-color: 005bb5; }This style creates a blue button with rounded corners. The hover effect changes color when the mouse is over it.
Embedding Code In WordPress
Go to your WordPress editor. Switch to the HTML or code view. Paste your HTML code where you want the button.
Next, add the CSS. Use the Customizer’s “Additional CSS” section or your child theme’s style.css file. Save changes and preview your button.
Your button now appears and works on your site. You can update text, link, or style anytime using code.
Optimizing Cta For Conversions
Optimizing your call to action (CTA) button is key to getting more clicks and conversions. Small changes can make a big difference in how many visitors take action. Focus on testing, tracking, and improving your button to boost results.
A/b Testing Buttons
Test different versions of your CTA button to see what works best. Change colors, sizes, or placement. Try different phrases like “Buy Now” or “Get Started.” Compare results to find the most effective option.
Tracking Button Performance
Use tools like Google Analytics to track how many people click your button. Track clicks over time to see trends. Check which pages get the most engagement. Use this data to improve your CTA strategy.
Improving Button Copy
Write clear and simple text on your button. Use action words that tell people what to do. Make sure the text matches what happens after clicking. Avoid long or confusing phrases. Test different words to find the best fit.
Credit: wpmet.com
Credit: ultimateblocks.com
Frequently Asked Questions
How Do I Add A Call To Action Button In WordPress?
To add a call to action button in WordPress, use the block editor. Select the “Button” block, customize text and link, then style the button. Publish or update your page to display it live on your site.
Can I Customize Call To Action Buttons In WordPress?
Yes, WordPress lets you customize buttons easily. You can change colors, size, shape, font, and links. Use the block editor or plugins for more design options and enhanced functionality.
What Plugins Help Add Call To Action Buttons?
Popular plugins like Elementor, WPForms, and MaxButtons simplify adding call to action buttons. These plugins offer customizable templates, advanced styling, and easy placement without coding knowledge.
Where Should I Place Call To Action Buttons On My Site?
Place call to action buttons where visitors notice them easily. Common spots include headers, footers, blog posts, and landing pages. Positioning affects click rates and conversions significantly.
Conclusion
Adding a call to action button on WordPress helps guide your visitors clearly. It makes your site more user-friendly and boosts interaction. You can choose styles and links that fit your goals. Small changes like this can improve your website’s success over time.
Keep testing different buttons to see what works best. Now, you have the steps to add a button easily. Start making your website more engaging today.


