
Are you ready to bring your website idea to life on WordPress but don’t know where to start? Adding a website to WordPress might seem tricky at first, but it’s easier than you think.
With just a few simple steps, you can have your site up and running, looking great, and ready to attract visitors. In this guide, you’ll discover exactly how to add your website to WordPress without any confusion or frustration. Keep reading, and by the end, you’ll have the confidence to build your online presence quickly and smoothly.
Credit: www.omnisend.com
Setting Up WordPress
Setting up WordPress is the first step to creating your website. It involves picking the right tools and installing the software. This process prepares your site for content and design.
Choosing A Hosting Provider
A hosting provider stores your website files on the internet. Choose one that offers good speed and uptime. Look for providers with easy WordPress installation. Check if they include customer support and security features.
Installing WordPress
Most hosting providers offer one-click WordPress installation. This tool makes setup quick and simple. Follow the on-screen instructions to install the software. Set your site name, username, and password carefully. These details keep your site secure.
Accessing The Dashboard
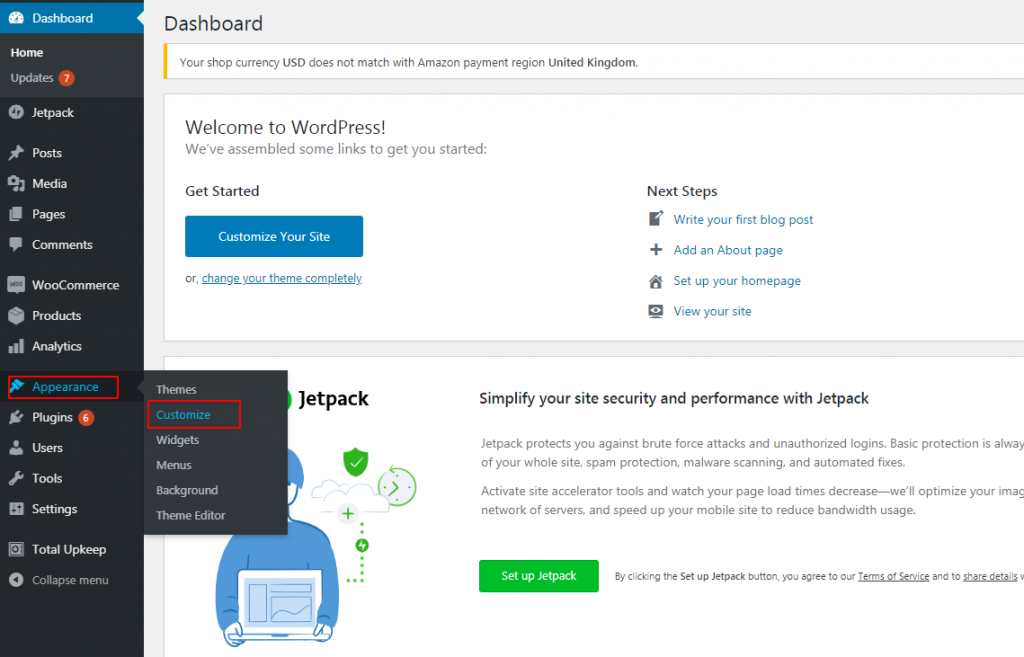
After installation, access your WordPress dashboard by adding /wp-admin to your site URL. Log in using the username and password you created. The dashboard is your control center. Here you can add pages, posts, and customize your site’s look.
Credit: www.inmotionhosting.com
Selecting A Theme
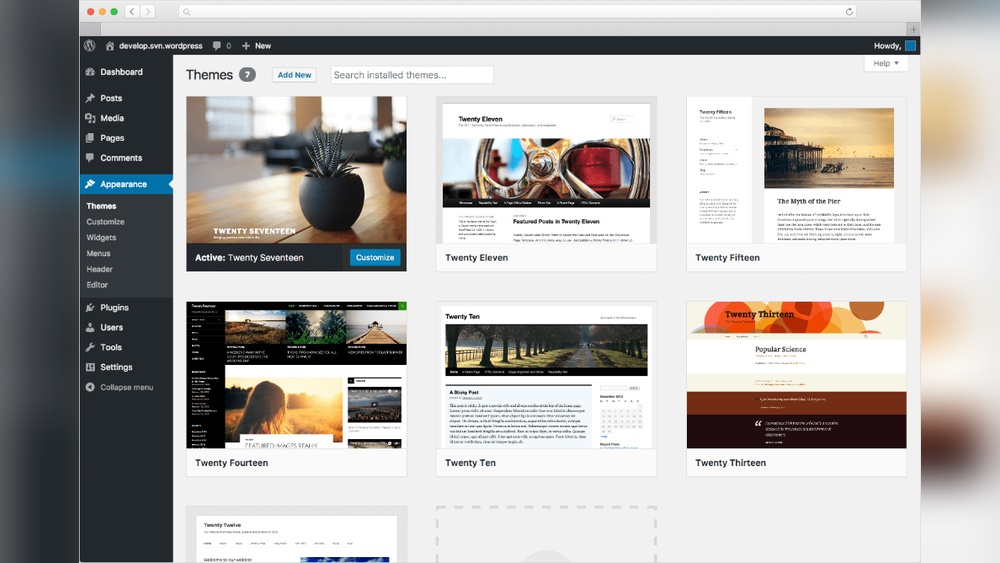
Selecting the right theme is a key step in creating your WordPress website. Themes control the look and feel of your site. They affect colors, fonts, and layout. A good theme makes your site easy to use and attractive. Choose one that matches your website’s purpose and style. There are many themes available, both free and paid. Each has its own features and design options. Understanding how to find, install, and customize a theme helps you build a site that stands out.
Browsing Free And Premium Themes
WordPress offers thousands of free themes in its official directory. These themes are easy to access and try out. Free themes often cover basic needs and simple designs. Premium themes come with extra features and support. You can buy them from marketplaces or developers. Premium themes usually include advanced options and better designs. Browse themes by category or feature to find the best fit. Preview themes to see how they look on your site.
Installing And Activating A Theme
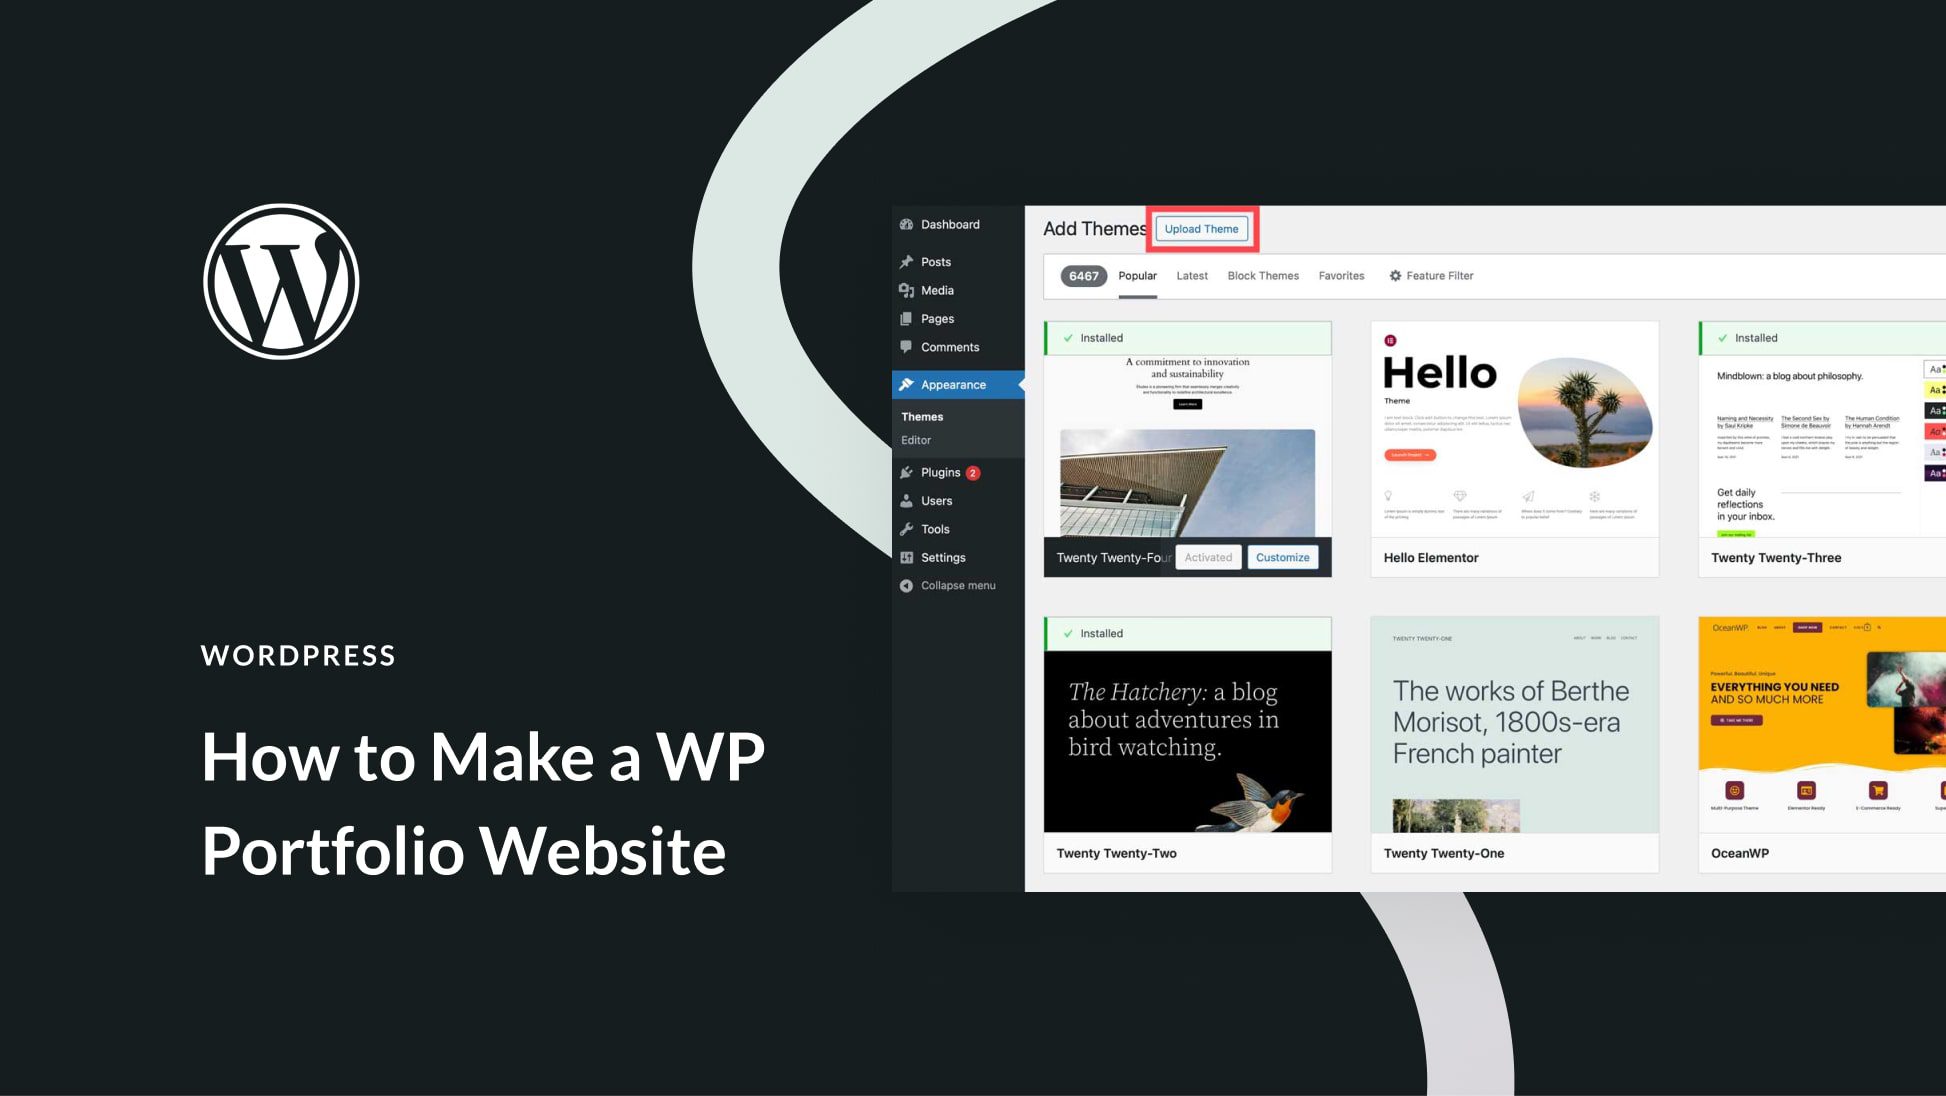
Installing a theme is simple and quick. From your WordPress dashboard, go to “Appearance” then “Themes.” Click “Add New” to search for free themes. For premium themes, upload the theme file you downloaded. After installing, click “Activate” to apply the theme to your site. Activation makes the theme visible to visitors. You can switch themes anytime without losing your content.
Customizing Theme Settings
Most themes let you change colors, fonts, and layouts. Use the WordPress Customizer under “Appearance” to adjust settings. You can add your logo, change the header image, and set menus. Preview changes live before saving them. Customization helps your site match your brand and style. Spend time adjusting settings to create a unique look. Keep it simple and clear for the best user experience.
Adding Essential Plugins
Adding essential plugins improves your WordPress site’s features and performance. Plugins help customize your website without coding. They add tools for security, SEO, contact forms, and more.
Choosing the right plugins keeps your site fast and safe. Too many plugins can slow down your site. Focus on quality over quantity for the best results.
Must-have Plugins For Beginners
Start with plugins that improve site security and SEO. A security plugin protects your site from attacks. SEO plugins help your site rank better on search engines. Contact form plugins let visitors reach you easily.
Examples include Wordfence for security, Yoast SEO for SEO, and WPForms for contact forms. These plugins are easy to use and popular among beginners.
Installing Plugins
Go to your WordPress dashboard and click “Plugins.” Select “Add New” to browse available plugins. Use the search bar to find the plugin you want.
Click “Install Now” on the chosen plugin. After installation, click “Activate” to enable it. Your plugin is now ready to use.
Configuring Plugin Settings
Each plugin has its own settings page. Access it from the dashboard menu or plugin list. Adjust settings based on your website needs.
For SEO plugins, set your site title and keywords. For security plugins, enable firewall and scan options. Contact form plugins need your email and form fields configured.
Always save changes before leaving the settings page. Test your site to ensure plugins work correctly.
Creating Website Pages
Creating website pages is a key step in building your WordPress site. Pages help organize your content and share important information with visitors. You can create pages for services, about us, contact details, and more. Each page has unique content and purpose.
WordPress makes it easy to add and edit pages. You can change page content anytime. Setting a homepage helps visitors see your main message first. Follow these steps to create and manage pages effectively.
Adding A New Page
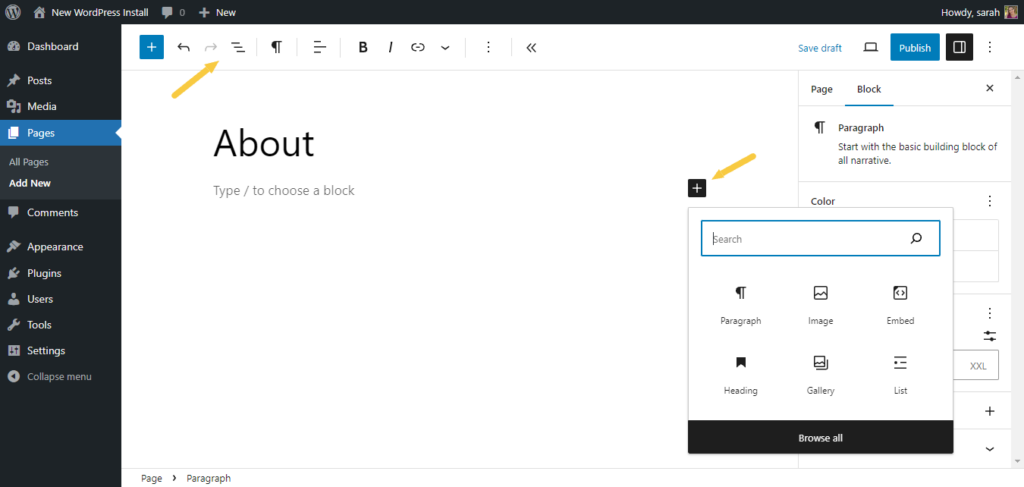
Log in to your WordPress dashboard. Find the “Pages” menu on the left side. Click “Add New” to create a new page. Enter a title for your page at the top. Use the editor to add text, images, and other content. Click “Publish” to make the page live on your site.
Editing Page Content
Go to “Pages” in your dashboard to see all pages. Click the page title you want to edit. Make changes in the content editor. You can add paragraphs, images, or links easily. Once done, click “Update” to save changes. Your site will show the latest version immediately.
Setting Up A Homepage
Open “Settings” and select “Reading” from the menu. Choose “A static page” under the homepage display option. Select the page you want as your homepage from the list. Save your changes by clicking “Save Changes.” Visitors now see your chosen page first.
Building Menus And Navigation
Menus and navigation help visitors find pages on your website easily. Clear menus improve user experience and keep visitors engaged. WordPress makes building menus simple and flexible.
Menus can include pages, posts, categories, and custom links. Organizing menus logically guides visitors through your content. A well-structured menu helps your site look professional.
Creating A Menu
Go to the WordPress dashboard and select Appearance > Menus. Click “Create a new menu” and name it. This name helps you identify the menu later. Then click the “Create Menu” button to start building.
Adding Pages To Menus
On the left side, find the “Pages” box. Check the pages you want to add to your menu. Click “Add to Menu” to move them to the menu structure. You can also add posts, categories, or custom links here.
Organizing Menu Structure
Drag and drop menu items to arrange their order. Place items below and slightly to the right to create submenus. Submenus appear as dropdowns on your site. Save the menu after organizing to apply changes.
Customizing Website Settings
Customizing website settings is a key step after adding your site to WordPress. It shapes how visitors see your site and how it works behind the scenes. Simple changes can make your website look professional and run smoothly.
Focus on three main areas: site identity, URL structure, and user interaction. These settings help make your site easy to find and use. Adjusting them early saves time later.
Configuring Site Title And Tagline
The site title appears at the top of your browser and in search results. Choose a clear, simple title that shows what your site is about. The tagline is a short phrase that describes your site’s purpose. It appears near the title and can help visitors understand your site quickly. Keep both short and relevant.
Setting Permalinks
Permalinks are the web addresses for your posts and pages. A clean and simple URL helps search engines and visitors find your content. Use the “Post name” option for easy-to-read links. This format looks like yoursite.com/post-title. Avoid URLs with long numbers or strange characters.
Managing Comments And Privacy
Comments allow visitors to share their thoughts on your posts. You can control who can comment and how comments appear. Enable moderation to review comments before they show up. Privacy settings protect user data and comply with laws. Customize these settings to keep your site safe and user-friendly.
Publishing Your Website
Publishing your website is the final step in creating your WordPress site. This step makes your content visible to everyone on the internet. It requires careful checking and some simple actions. Follow these steps to share your website with the world.
Previewing Your Site
Before making your site public, preview it carefully. Check all pages for errors or broken links. Make sure the text and images look good on all devices. Use the WordPress preview button to see your site as visitors will see it. Fix any mistakes you find to ensure a smooth user experience.
Making Your Site Public
Once you are happy with the preview, it is time to publish. Go to the WordPress dashboard and find the publish option. Click the publish button to make your site live. Your website is now available for anyone to visit. Keep your content updated regularly to keep visitors interested.
Promoting Your Website
Sharing your website helps attract visitors and grow your audience. Use social media platforms to announce your new site. Send emails to friends, family, or potential customers. Add your website link to online directories and forums. Promotion helps your site get noticed and increases traffic.
Credit: www.elegantthemes.com
Frequently Asked Questions
How Do I Add A New Website To WordPress?
To add a new website, install WordPress on your hosting server. Then, set up your domain, choose a theme, and customize content. Finally, configure essential plugins and optimize settings for performance and SEO.
Can I Add Multiple Websites In One WordPress Account?
Yes, you can use WordPress Multisite to manage multiple websites under one installation. It allows easy site creation and centralized management from a single dashboard.
What Are The Basic Steps To Connect A Domain To WordPress?
To connect a domain, update your domain’s DNS settings to point to your WordPress hosting. Then, add the domain in your hosting control panel and configure WordPress URL settings accordingly.
How Do I Install Themes When Adding A Website To WordPress?
After setting up WordPress, go to Appearance > Themes in your dashboard. Click “Add New,” search or upload a theme, then activate it to change your website’s design.
Conclusion
Adding a website to WordPress is simple and quick. Follow each step carefully to avoid mistakes. You can customize your site to match your style. Regular updates keep your website safe and fresh. Take time to explore WordPress tools and features.
Your site will grow as you learn more. Start building your online presence today with confidence.


