
Are you looking to boost your website’s performance and get a clear view of how Google sees your WordPress site? Adding Google Search Console to your WordPress is the key.
It helps you track your site’s health, fix issues fast, and improve your search rankings. In this guide, you’ll learn simple, step-by-step instructions to connect Google Console to your WordPress without any hassle. By the end, you’ll have the tools to make smarter decisions and grow your online presence with confidence.
Ready to take control of your website’s success? Let’s dive in.

Credit: improveposition.co.uk
Why Use Google Console With WordPress
Google Console is a free tool that helps you manage your WordPress site. It shows how Google sees your website. This helps you find and fix problems quickly. Using Google Console with WordPress can make your site better and easier to find on Google.
Benefits For Website Owners
Google Console gives clear data about your website’s health. It reports errors like broken links or slow pages. You can see how many visitors come from Google search. It also shows which keywords bring people to your site. This information helps you improve your content and fix issues fast.
Impact On Seo And Performance
Google Console helps improve your site’s SEO by showing search trends. It tells you which pages rank well and which do not. You can submit sitemaps to make Google find your pages easier. The tool alerts you about security problems or indexing errors. Fixing these issues improves your site’s speed and ranking on Google.
Credit: aioseo.com
Preparing Your WordPress Site
Preparing your WordPress site is the first step to connect it with Google Console. This setup helps Google understand your site better. It also improves your site’s visibility in search results. A smooth preparation makes the verification process easier and faster.
Before adding Google Console, check if you own the site. This step proves to Google that you manage the website. Next, install the necessary plugins to link Google Console with WordPress. These tools simplify the connection and improve your site’s performance.
Checking Site Ownership
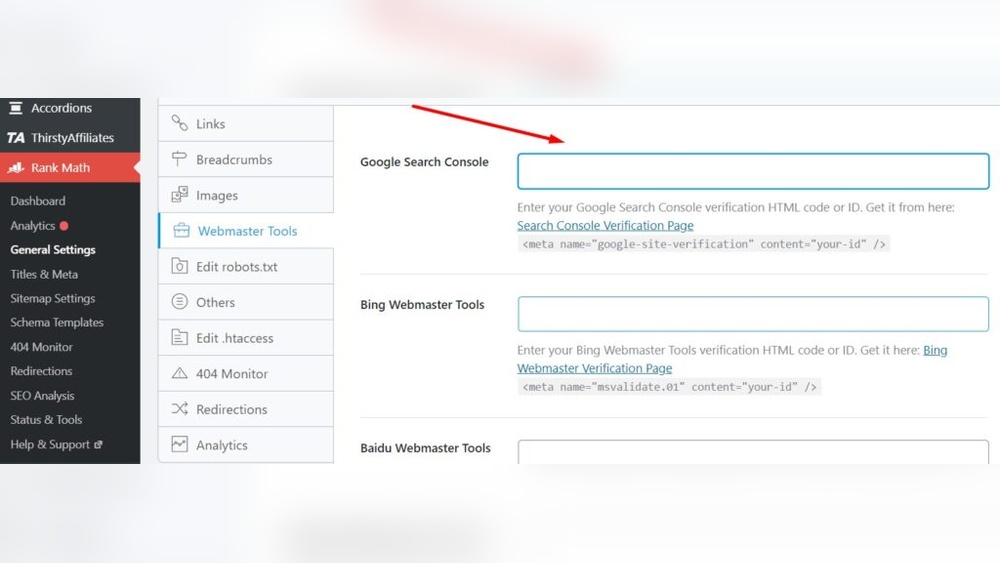
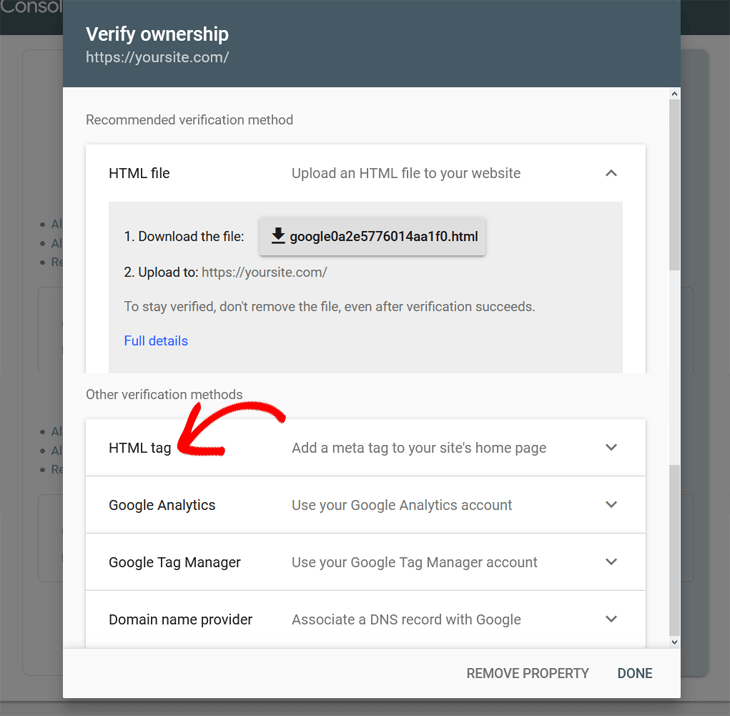
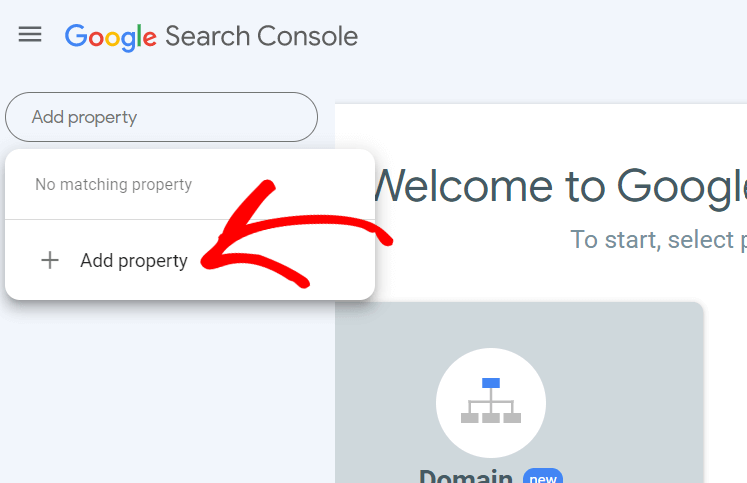
Start by logging into your WordPress dashboard. Go to the Google Search Console website and sign in with your Google account. Add your website URL to the console. Google will ask you to verify ownership. Choose the HTML tag verification method for WordPress. Copy the meta tag provided by Google.
Return to your WordPress dashboard. Navigate to the theme editor or use a plugin to add code to the header. Paste the meta tag into the header section of your site. Save the changes and go back to Google Console. Click “Verify” to confirm your ownership.
Installing Required Plugins
Some plugins make adding Google Console easier. Popular options include “Site Kit by Google” and “Insert Headers and Footers.” These plugins allow you to add Google verification codes without editing theme files. To install, go to the WordPress dashboard. Click “Plugins,” then “Add New.” Search for the plugin name. Click “Install Now” and then “Activate.”
After activation, follow the plugin’s setup instructions. Usually, you will connect your Google account and select your website. The plugin will handle the rest. This method reduces errors and keeps your site safe.
Creating A Google Console Account
Creating a Google Console account is the first step to improving your WordPress site’s search presence. This tool helps monitor your site’s health and performance in Google search results. Setting up the account is simple and takes just a few minutes.
Signing Up And Setting Up
Start by visiting the Google Search Console website. Use your Google account to sign in or create a new one. Next, add your website URL carefully. Choose the exact version of your site, either with “http://” or “https://”.
Verify your site ownership. Google offers several methods like uploading an HTML file, using a meta tag, or connecting through your domain provider. Pick the method that feels easiest. Verification proves you own the site and can access its data.
Navigating The Google Console Dashboard
Once verified, you will see the dashboard. It shows key information about your website’s presence on Google. The left menu lists different tools like Performance, Coverage, and Enhancements.
Performance shows clicks, impressions, and search queries. Coverage reveals any indexing issues. Enhancements help with mobile usability and other site improvements. Spend time exploring these sections to understand your website better.
Verifying Your WordPress Site
Verifying your WordPress site with Google Search Console is an important step. It proves you own the website. This allows you to access valuable data about your site’s performance. Google offers several ways to verify your site. Choose the method that fits your comfort level.
Using Html Tag Verification
Google gives you a special HTML meta tag. Copy this tag from your Search Console account. Next, go to your WordPress dashboard. Find the header section of your theme or use a plugin to add code to your header. Paste the meta tag inside the
area. Save the changes. Return to Google Search Console and click “Verify”. This method is simple and fast.Uploading Html File
Google provides a small HTML file for verification. Download this file to your computer. Access your WordPress hosting control panel or use an FTP client. Upload the HTML file to the root folder of your website. This folder is usually called “public_html”. After uploading, visit the file URL in your browser. Finally, click “Verify” in Google Search Console. This method works well if you can access your hosting files.
Using Dns Verification
Google also allows verification through DNS records. Copy the TXT record provided by Google. Log in to your domain registrar or DNS provider. Find the DNS management section. Add a new TXT record with the value from Google. Save your changes. DNS updates can take some time to apply. Return to Search Console and click “Verify”. This method is useful if you cannot edit website files directly.
Connecting Google Console With WordPress
Connecting Google Console with WordPress helps you track your website’s performance. It shows how visitors find your site and what keywords they use. You can fix errors and improve your site’s visibility in search engines. Setting up Google Console is simple and takes only a few minutes.
You need to verify your website ownership with Google. This proves the site belongs to you. There are two main ways to add the verification code to WordPress. Choose the method that suits your skills and tools.
Adding Verification Code Via Plugin
Using a plugin is the easiest way to add the code. Plugins handle the technical parts for you. Search for “Google Site Kit” or “Insert Headers and Footers” in your WordPress dashboard. Install and activate the plugin.
Open Google Console and copy the verification code. Go to the plugin settings in WordPress. Paste the code in the header section or the area for verification codes. Save changes and return to Google Console. Click “Verify” to complete the process.
Adding Verification Code Manually
Manual adding requires editing your website’s code. This method is good if you do not want to use plugins. Copy the verification code from Google Console.
Access your WordPress files via cPanel or an FTP client. Find the header.php file inside your active theme folder. Open this file and paste the code right before the closing tag.
Save the file and upload it back to your server. Go to Google Console and click “Verify” to finish. Your WordPress site is now connected to Google Console.
Submitting Sitemap For Indexing
Submitting your sitemap for indexing helps Google find and list your website pages. It improves your site’s visibility in search results. This process tells Google about new or updated content quickly.
A sitemap is a file that shows the structure of your website. It guides search engines to all important pages. WordPress makes it easy to create and submit this file.
Generating Sitemap In WordPress
WordPress can create a sitemap automatically. Many SEO plugins, like Yoast SEO or Rank Math, offer this feature. These plugins generate a sitemap URL you will use later.
To find your sitemap, install and activate an SEO plugin. Then go to the plugin settings. Look for the sitemap section. Usually, the sitemap URL ends with /sitemap_index.xml.
Submitting Sitemap In Google Console
Open Google Search Console and select your website. In the left menu, find the “Sitemaps” option. Enter your sitemap URL in the box provided. Click the “Submit” button to send it to Google.
Google will check your sitemap and start indexing your pages. You can see the status and errors in the console. This helps you ensure your site is properly indexed and visible.
Monitoring Site Performance
Monitoring your site’s performance with Google Console is key to keeping your WordPress site healthy. It helps you see how your site appears in Google search results. You get important data about visitors and site issues. This information lets you improve your site’s visibility and user experience.
Regular checks on your site’s data show what works and what needs fixing. Google Console provides clear reports on search traffic and technical problems. This helps you stay ahead of issues that could hurt your rankings.
Checking Search Analytics
Search Analytics in Google Console shows how many people find your site. It lists the keywords visitors use to reach your pages. You can see which pages get the most clicks and impressions. This data helps you understand what content is popular.
Tracking your click-through rate (CTR) shows if your titles and descriptions attract clicks. Low CTR means you might need better titles or meta descriptions. Search Analytics also shows your average position in Google results.
Improving your site based on these insights can bring more traffic. Regular reviews help spot trends and optimize your content over time.
Fixing Crawl Errors
Crawl errors happen when Google cannot access some pages on your site. This stops those pages from appearing in search results. Google Console lists these errors in the Coverage report. It shows if pages return errors like 404 (not found) or 500 (server error).
Fixing these errors is crucial for good SEO. You can redirect broken URLs or update links to working pages. Keeping your site error-free ensures Google indexes all your important content.
Regularly checking for crawl errors helps maintain your site’s health. It improves user experience and keeps your rankings stable.
Credit: www.monsterinsights.com
Troubleshooting Common Issues
Adding Google Console to WordPress is simple. Still, some common issues may block the process. Knowing how to fix these problems helps you connect your site easily.
Troubleshooting saves time and avoids frustration. It keeps your site running smoothly with Google Console.
Verification Failures
Verification fails when Google cannot confirm site ownership. This happens if the verification code is missing or incorrect. Double-check the code you paste into your WordPress site. Make sure it matches exactly what Google provides.
Clear your site cache after adding the code. Sometimes cached pages hide the new verification tag. Try a different verification method if one fails. HTML file upload and DNS record are good alternatives.
Plugin Conflicts
Plugins can clash and stop Google Console from working. Some plugins block scripts or remove header tags. Disable all plugins temporarily to find the culprit. Then, enable them one by one to spot the conflict.
Use a lightweight SEO or header management plugin for verification. Avoid plugins that interfere with site headers or scripts. Keep your WordPress and plugins updated to reduce conflicts.
Frequently Asked Questions
What Is Google Console And Why Use It With WordPress?
Google Console is a free tool that helps monitor website performance. It shows search traffic, indexing status, and site errors. Integrating it with WordPress improves SEO, helps fix issues, and boosts your site’s visibility on Google.
How Do I Verify My WordPress Site With Google Console?
To verify, add your WordPress site URL in Google Console. Then, choose a verification method like HTML file upload or meta tag. For WordPress, using a plugin to insert the meta tag is the easiest option.
Which Plugin Is Best For Adding Google Console To WordPress?
Popular plugins like Yoast SEO and Site Kit by Google allow easy Google Console integration. They enable verification, data viewing, and site management directly from your WordPress dashboard.
Can Google Console Help Improve My WordPress Seo?
Yes, Google Console identifies SEO issues like broken links and slow pages. It provides data on keywords and user behavior. Fixing these improves your WordPress site’s ranking and user experience.
Conclusion
Adding Google Console to WordPress helps track your website’s health. It shows how Google sees your site. You can find and fix errors fast. This improves your site’s performance and ranking. Regularly check the console for updates and issues. It takes only a few steps to set up.
Stay patient and follow the instructions carefully. Your website will become easier to manage and grow. Simple tools like this make a big difference. Start using Google Console today for better site control.


