
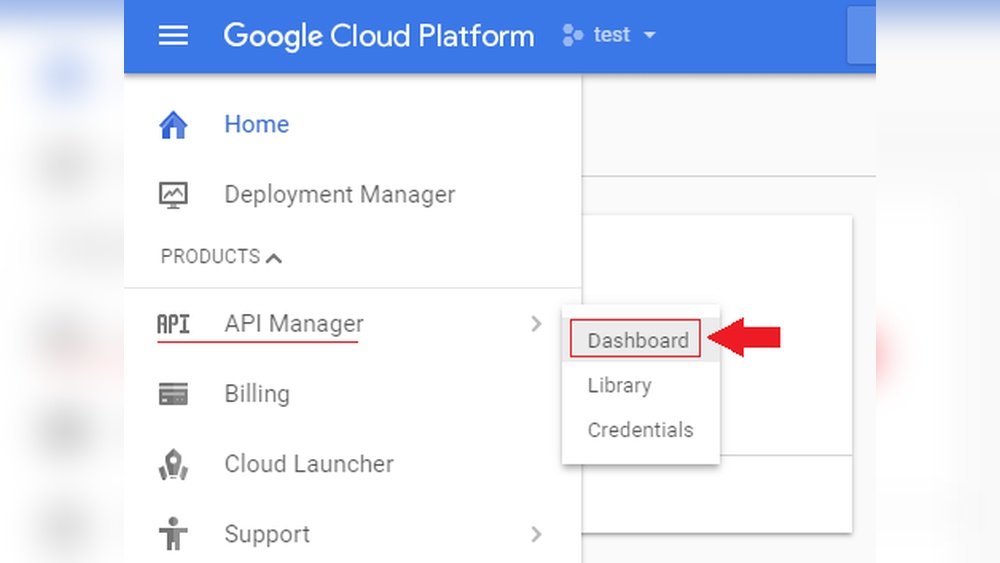
Are you ready to take your WordPress website to the next level? Transferring your domain name to Google Cloud Hosting can boost your site’s speed, security, and reliability.
But the process might seem confusing at first. Don’t worry—this guide will walk you through every step clearly and simply. By the end, you’ll have full control over your domain and enjoy the powerful benefits of Google Cloud. Let’s dive in and make your website work smarter for you.
Preparing Your WordPress Domain
Preparing your WordPress domain is the first step before moving it to Google Cloud Hosting. This process ensures a smooth transfer without delays or issues. It involves checking if your domain can be transferred, making it ready for transfer, and getting a special code. Each step is important to avoid downtime and keep your website safe.
Check Domain Eligibility
Not all domains can be transferred immediately. Your domain must be at least 60 days old. Also, it should not be locked or recently transferred. Check your domain status in your current registrar’s dashboard. Make sure it is active and not expired. If your domain is eligible, you can proceed to the next step.
Unlock Your Domain
Domains are often locked to prevent unauthorized transfers. You must unlock it before moving. Log into your domain registrar account. Find the domain settings or management section. Look for the domain lock option and disable it. This action allows other hosts to accept the transfer request.
Obtain Authorization Code
The authorization code, also called EPP or transfer code, is needed for the transfer. Request this code from your current domain registrar. It is usually sent to your registered email. Keep this code safe and do not share it. You will enter it during the transfer process on Google Cloud Hosting.
Setting Up Google Cloud Hosting
Setting up Google Cloud Hosting is the first step to move your WordPress site. It gives you control and flexibility. You get a reliable platform that can grow with your needs.
This section guides you through creating an account, picking a plan, and configuring your server. Each step is clear and simple.
Create A Google Cloud Account
Start by visiting the Google Cloud website. Click on the sign-up button. Use your email to register. You may need to add payment details. Google offers a free trial with credits. This helps you test the service without cost. After signing up, access the Google Cloud Console. This is your dashboard to manage everything.
Choose The Right Hosting Plan
Google Cloud offers many hosting options. For WordPress, a Virtual Machine (VM) is common. Choose a plan with enough CPU and memory. Start small to save money. You can upgrade as your site grows. Look for plans with SSD storage. This keeps your site fast. Check the data center location. Pick one close to your visitors.
Configure Your Vm Instance
In the Google Cloud Console, go to Compute Engine. Click on “Create Instance.” Give your VM a name. Select the machine type based on your plan. Choose the operating system, like Linux or Windows. Set up the firewall to allow web traffic. Assign a static IP address to your VM. This keeps your website accessible. Finally, click “Create” to launch your server.
Transferring Domain To Google Cloud
Transferring your WordPress domain to Google Cloud hosting is a straightforward process. Moving your domain helps manage your website and hosting in one place. It also provides better control and security for your site. Follow these steps to transfer your domain smoothly.
Access Google Domains
Start by logging into your Google Domains account. If you don’t have one, create an account at domains.google.com. This platform will manage your domain after transfer. Access the domain dashboard to begin the process.
Initiate Domain Transfer
Find the option to transfer a domain inside Google Domains. Enter your WordPress domain name in the transfer box. Google will check if the domain is eligible for transfer. Confirm you want to move the domain to Google Cloud hosting.
Enter Authorization Code
Get the authorization code from your current domain registrar. This code is also called an EPP code. Enter this code in Google Domains to prove you own the domain. The code ensures security during the transfer process.
Verify Domain Ownership
Google will ask you to verify your domain ownership. This step confirms you are the rightful owner. You may receive an email with a verification link. Click the link or follow the instructions to complete verification.

Credit: www.youtube.com
Configuring Dns Settings
Configuring DNS settings is a key step in moving your WordPress domain to Google Cloud Hosting. DNS controls how visitors find your website online. Setting it up correctly ensures your site stays live and fast. This process involves changing where your domain points and adding records for Google Cloud.
Update Name Servers
Start by logging into your domain registrar account. Find the option to change name servers. Replace the current name servers with those provided by Google Cloud. These usually look like ns-cloud-a1.googledomains.com and similar. Save the changes. This tells the internet to look at Google’s servers for your domain.
Set Up Dns Records
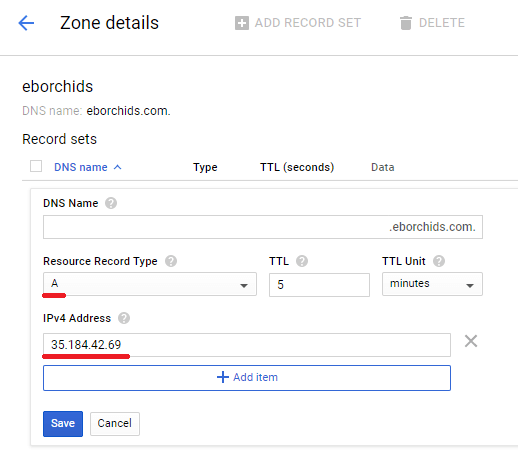
Next, go to your Google Cloud Console. Open the Cloud DNS section. Create a new DNS zone for your domain. Add records like A, CNAME, and MX to point to your website and email. The A record links your domain to your website’s IP address. The CNAME connects subdomains to the main domain. MX records handle email delivery. Double-check each record for accuracy.
Test Domain Propagation
DNS changes take time to spread worldwide. This is called propagation. Use tools like DNSChecker or dig commands to check your domain’s status. Enter your domain and see if the new name servers and records appear. Propagation may take up to 48 hours. Be patient and monitor your site during this time to catch any issues early.
Migrating WordPress Website
Migrating your WordPress website to Google Cloud Hosting improves site speed and reliability. This move gives you more control over your hosting environment. It requires careful steps to ensure your website stays safe and functional during the transfer. Follow these steps for a smooth migration.
Backup WordPress Files And Database
Start by backing up all WordPress files. Use an FTP client to download your site’s files. Next, export your database from phpMyAdmin or use a plugin. Save both files and database securely. This backup helps restore your site if anything goes wrong.
Install WordPress On Google Cloud
Create a new virtual machine on Google Cloud. Choose the WordPress image for easy setup. Follow the prompts to install WordPress on the server. Set up your admin account and configure basic settings. Your new site is ready for content import.
Import Website Content
Upload your WordPress files to the Google Cloud server. Use the FTP client for this process. Import your database using phpMyAdmin on Google Cloud. Update the wp-config.php file with new database details. Check that all links and images show correctly.
Test Website Functionality
Visit your website on the new host. Check pages, posts, and plugins for errors. Test forms, menus, and interactive elements. Clear your browser cache if you see old content. Confirm your site runs smoothly before making it live.
Troubleshooting Common Issues
Transferring a WordPress domain name to Google Cloud Hosting can sometimes cause issues. These common problems often slow down the process or disrupt your site. Knowing how to fix these issues saves time and reduces stress. This section covers three main problems and their solutions.
Domain Transfer Delays
Domain transfers can take several days. Delays happen if the domain is locked or the transfer code is wrong. Check the domain status in your current registrar’s dashboard. Make sure the domain is unlocked. Use the correct authorization code for transfer. Confirm your email to approve the transfer promptly. Patience is key, but these steps help speed up the process.
Dns Configuration Errors
DNS settings control your website’s address on the internet. Errors in DNS can make your site unreachable. After transfer, update your DNS records to point to Google Cloud IP addresses. Double-check the A, CNAME, and MX records. Incorrect entries cause broken links and email failures. Use DNS tools to verify your setup. Correct settings ensure visitors find your website smoothly.
Website Downtime Solutions
Downtime frustrates visitors and hurts your reputation. Prepare for downtime by setting up a maintenance page before the transfer. Use Google Cloud’s load balancers to reduce downtime during DNS propagation. Monitor your site closely after transfer. Clear caches and test website functions regularly. Quick action restores your site fast and keeps visitors happy.
Optimizing Your Google Cloud Setup
Optimizing your Google Cloud setup is key to running a smooth WordPress site. A well-tuned environment keeps your site safe, fast, and reliable. Simple steps can improve your site’s security and performance. This section covers three important tasks to enhance your hosting experience.
Enable Ssl Certificate
SSL certificates protect data sent between your site and visitors. Google Cloud lets you add SSL for free using Let’s Encrypt. Secure your site by installing the certificate through your server settings. Visitors see a padlock icon, which builds trust and improves your SEO ranking.
Set Up Automatic Backups
Backups save your site data in case of problems. Google Cloud offers easy backup options to keep your files safe. Schedule daily or weekly backups to avoid data loss. Restore your site quickly if anything goes wrong. Regular backups give peace of mind and reduce downtime.
Monitor Website Performance
Tracking your website speed helps spot issues early. Google Cloud provides tools to check server load and response times. Use these tools to find slow pages or errors. Fix problems fast to keep visitors happy and improve search rankings. Good performance means better user experience and more traffic.

Credit: www.youtube.com
Credit: onepagezen.com
Frequently Asked Questions
How Do I Transfer A WordPress Domain To Google Cloud?
To transfer a WordPress domain to Google Cloud, update your domain’s DNS settings to Google’s nameservers. Then, migrate your website files and database to a Google Cloud VM or managed WordPress hosting. Finally, configure your domain within Google Cloud Console for proper routing.
Is Google Cloud Hosting Suitable For WordPress Sites?
Yes, Google Cloud hosting offers scalable resources, high performance, and strong security. It supports managed WordPress hosting and custom virtual machines. This ensures fast load times and reliable uptime for WordPress websites of any size.
What Are The Dns Changes Required For Domain Transfer?
You need to change your domain’s nameservers to Google Cloud DNS servers. This step directs your domain traffic to Google’s infrastructure. Make sure to update A, CNAME, and MX records as needed for your website and email services.
How Long Does The Domain Transfer To Google Cloud Take?
Domain transfer typically takes 24 to 48 hours. DNS propagation varies by registrar and can take up to 72 hours. Plan accordingly to avoid downtime during the transfer process.
Conclusion
Transferring your WordPress domain to Google Cloud hosting is simple with the right steps. Start by backing up your website to avoid data loss. Then, update your domain settings carefully to point to Google Cloud. Check that everything works after the transfer.
This move can improve your site’s speed and reliability. Keep your login details safe and monitor your site regularly. Follow these tips to make the switch smooth and stress-free. Your website will run better and stay secure on Google Cloud hosting.


