
Are you struggling to make your images look just right on your WordPress site? When images are not aligned properly, your content can look messy and unprofessional, turning visitors away before they even start reading.
But don’t worry—getting your images perfectly aligned is easier than you think. In this post, you’ll discover simple, step-by-step ways to align images in WordPress that will make your site look polished and keep your readers engaged. Ready to transform your pages with clean, eye-catching visuals?
Let’s dive in!
Credit: ultimateblocks.com
Image Alignment Basics
Image alignment is a key part of creating a clean and organized WordPress blog. It controls where your pictures appear in relation to your text. Proper alignment helps your content look professional and easy to follow. Understanding the basics of image alignment makes your posts more appealing and readable.
Types Of Image Alignment
WordPress offers several ways to align images. You can place images to the left, right, center, or leave them without alignment. Left and right alignment lets the text wrap around the image. Center alignment places the image alone on a line, with text above and below. No alignment keeps the image inline with the text.
Why Alignment Matters
Good image alignment improves user experience. It stops your page from looking messy or cluttered. Aligned images guide the reader’s eye through the content naturally. This helps keep visitors on your site longer. Proper alignment also enhances the overall design and professionalism of your blog.

Credit: www.youtube.com
Aligning Images In The Block Editor
Aligning images in the WordPress Block Editor helps create clean and attractive posts. Proper alignment makes content easier to read. It also improves the overall look of your pages. The Block Editor offers simple tools to place images exactly where you want them.
Using The Alignment Toolbar
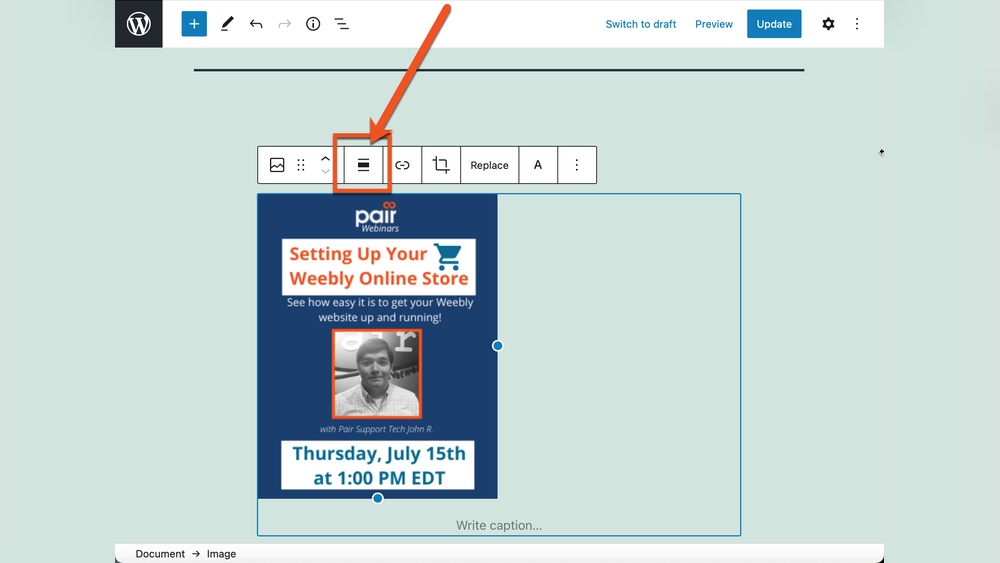
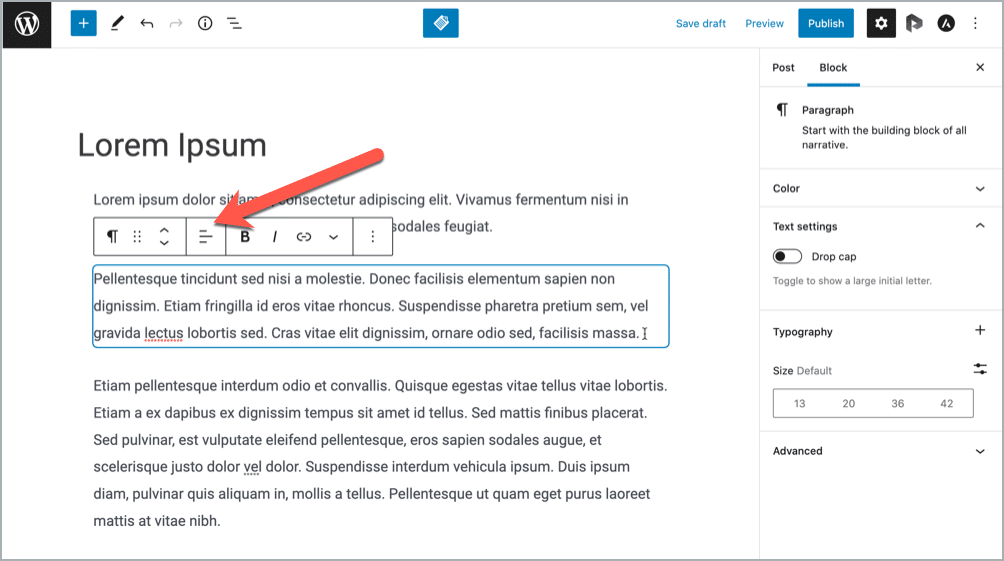
Select the image block in the editor. The alignment toolbar appears above the image. It shows options like left, center, and right alignment. Click any option to move the image instantly. The text flows around the image based on your choice. This toolbar is quick and easy to use for basic alignment.
Adjusting Image Size And Position
The Block Editor also lets you change image size. Drag the corner handles to resize the image. Use the block settings on the right side to set exact width and height. For fine-tuning, add margin or padding in the block options. This controls the space around the image. Adjusting size and position helps fit images perfectly in your layout.
Aligning Images In The Classic Editor
Aligning images in the Classic Editor of WordPress is simple and quick. This editor lets you place images exactly where you want them in your posts or pages. Understanding how to use its tools helps you create neat and appealing content. Proper alignment improves the look and makes your text easier to read.
Alignment Options In The Toolbar
The Classic Editor toolbar offers four main alignment choices. You can align images to the left, center, right, or have no alignment. Select the image by clicking on it. Then, choose the alignment button in the toolbar. Left alignment places the image on the left side, with text flowing on the right. Center alignment puts the image in the middle. Right alignment moves the image to the right side, with text on the left. No alignment keeps the image in line with the text.
Using Html For Custom Alignment
For more control, use HTML in the Classic Editor’s text view. Switch from Visual to Text mode to see the code. Add style attributes inside the image tag to adjust alignment. For example, use style="float:left;" to float the image left. Use style="margin: 0 auto; display: block;" to center an image. This method allows precise placement beyond toolbar options. It also helps when you want to add margins or padding around images.
Using Css For Advanced Alignment
Using CSS for advanced image alignment in WordPress allows more control and precision. CSS helps position images exactly where you want on the page. This method works well for unique layouts and custom designs. It also keeps your images responsive on different screen sizes.
You can add custom CSS classes to your images and write styles for those classes. This keeps your code clean and easy to manage. CSS properties like margin, float, and display help align images horizontally and vertically. Let’s explore how to use CSS for better image alignment.
Adding Custom Css Classes
First, select the image block in the WordPress editor. In the block settings, find the “Advanced” section. Enter a custom class name in the “Additional CSS Class” field. Use simple names like align-left or center-image.
Next, add CSS rules for these classes in your theme’s stylesheet or the Customizer’s Additional CSS area. This method keeps your custom styles separate from default styles. It also makes it easy to reuse the same classes on multiple images.
Common Css Properties For Alignment
Use float to align images left or right with text wrapping. For example, float: left; moves the image to the left side. Use margin to add space around images. For center alignment, use display: block; with margin: 0 auto;.
Vertical-align helps align images with text baseline or middle. Use position and transform for advanced vertical or horizontal placement. These CSS properties give full control over image placement beyond default WordPress options.
Tips For Responsive Image Layouts
Responsive image layouts improve user experience on all devices. Images should adjust smoothly to different screen sizes. This keeps your site looking professional and clean. Proper alignment helps images fit well on mobile phones and tablets. Follow these tips to create flexible, attractive image displays.
Ensuring Mobile-friendly Alignment
Use percentage widths for images instead of fixed pixels. This allows images to resize with the screen. Align images with CSS rules like max-width: 100% and height: auto. These styles keep images from overflowing their containers.
Choose center or left alignment for smaller screens. It prevents awkward white space around images. Test your site on multiple devices to check alignment. Adjust CSS as needed to maintain a neat layout.
Using Plugins For Better Control
Plugins can simplify responsive image alignment. They offer options to set image size and position easily. Some plugins provide drag-and-drop interfaces for layout control. This helps those who avoid direct code editing.
Look for plugins that optimize images for fast loading. Faster sites improve user satisfaction and search rankings. Always pick well-reviewed plugins updated for the latest WordPress version.
Credit: www.wpbeginner.com
Troubleshooting Alignment Issues
Image alignment issues can disrupt the look of your WordPress site. They may cause images to overlap or appear out of place. Troubleshooting these problems helps keep your site clean and professional. This section covers common alignment problems and how to fix them quickly.
Fixing Overlapping Images
Overlapping images often happen when images are too large for their container. Check the image size and reduce it if needed. Use the WordPress editor to adjust the image width or height. Another cause is incorrect float settings. Clear any float styles or use the “Clear” block feature in the editor.
Sometimes padding or margin settings cause overlap. Inspect the image with browser tools and adjust margins. Adding a small margin around images prevents them from touching each other. Avoid placing too many images side by side without space.
Dealing With Theme Conflicts
The active theme may override image alignment settings. This happens because themes use custom CSS styles. Test your site using a default WordPress theme to see if the problem persists. If images align correctly there, the theme is the issue.
Fix theme conflicts by adding custom CSS in the Customizer. Use simple CSS rules like img { display: block; margin: auto; } to fix alignment. Contact your theme support for help if CSS changes do not work. Keep your theme updated to avoid known bugs.
Frequently Asked Questions
How Do I Align Images In WordPress Posts?
To align images in WordPress, select the image in the editor. Use the alignment buttons (left, center, right). This adjusts the image’s position relative to the text and page layout instantly and easily.
Can I Align Images Differently On Mobile Devices?
Yes, responsive themes often adjust image alignment automatically. Use custom CSS for precise control on mobile. Plugins can also help manage image alignment per device.
What Image Alignment Options Does WordPress Offer?
WordPress offers left, center, right, and none alignment options. These control image placement relative to surrounding text. Choose the one that best fits your content style.
How To Fix Misaligned Images In WordPress?
Check the image block’s alignment settings first. Clear any conflicting CSS styles. Update the theme or plugin if alignment issues persist. Use custom CSS for advanced fixes.
Conclusion
Aligning images in WordPress is simple and quick. You can place images left, right, or center with ease. This helps your content look neat and professional. Clear image placement also improves readers’ experience. Try different alignments to see what fits best.
Keep practicing to feel comfortable with WordPress tools. Good image alignment makes your posts more attractive and easier to read. Now, you have the basics to start aligning images confidently.


