
Are you ready to take full control of your website’s address? Hosting a domain name using AWS DNS can seem tricky at first, but once you know the steps, it becomes simple and powerful.
Imagine having your website’s name pointing exactly where you want, with speed and reliability you can trust. In this guide, you will learn exactly how to set up and manage your domain name on AWS DNS, step by step. By the end, you’ll feel confident handling your domain like a pro—and your website visitors will thank you for it.
Let’s dive in and make your domain work perfectly for you.

Credit: aws.amazon.com
Choosing A Domain Name
Choosing a domain name is the first step in creating your online presence. It shapes how visitors see your site and helps with search engine rankings. A good domain name is easy to remember, spell, and type. It should clearly represent your brand or topic.
Take time to pick a name that fits your website’s purpose. A strong domain name builds trust and attracts the right audience. Avoid names that confuse or mislead visitors. Simple and clear works best.
Selecting The Right Domain
Pick a domain name that matches your business or content. Use common words that people search for. Shorter names are easier to recall and type quickly. Avoid numbers or hyphens as they cause mistakes.
Choose a domain extension like .com, .net, or .org. The .com extension is most popular and trusted. Think about your target audience and location too. For example, use .us for the United States or .uk for the United Kingdom.
Domain Registration Tips
Register your domain through a reliable provider. Check if the name is available before buying it. Register your domain for several years to protect it. Use strong passwords to keep your domain account safe.
Keep your contact information updated in the domain records. This helps you receive important notifications. Renew your domain before it expires to avoid losing it. Consider registering similar names to protect your brand.
Setting Up Aws Account
Setting up an AWS account is the first step to host a domain name using AWS DNS. AWS, or Amazon Web Services, offers a reliable platform to manage your domain’s DNS settings. The process is straightforward and designed for users of all skill levels.
Starting with an AWS account allows access to Route 53, Amazon’s DNS service. This service helps connect your domain name to your website or application. The setup involves creating an account and learning to navigate the AWS Console.
Creating An Aws Account
Visit the official AWS website to begin registration. Provide a valid email address and create a strong password. AWS requires basic personal information like name, address, and phone number.
Next, enter payment details for billing purposes. AWS offers a free tier, so many services cost nothing initially. After verification, your account becomes active and ready for use.
Navigating The Aws Console
Log in to the AWS Console using your credentials. The console is the main dashboard for managing AWS services. Search for “Route 53” in the service search bar to access DNS management.
The dashboard shows various options like hosted zones and domain registration. Familiarize yourself with these sections to manage your domain efficiently. AWS also provides guides and help features within the console.
Registering A Domain With Aws Route 53
Registering a domain with AWS Route 53 is a simple way to secure your website’s address. This service offers a fast and reliable way to manage your domain names. It helps you connect your website to the internet easily. AWS Route 53 also provides tools to check if your desired domain name is available.
Understanding the registration process makes it easier to get started. AWS Route 53 guides you step-by-step to complete your domain registration. This process ensures your domain is ready for hosting and use.
Searching For Domain Availability
Begin by visiting the AWS Route 53 console. Enter the domain name you want to register in the search box. The system quickly checks if the name is available.
If the domain is taken, Route 53 suggests similar names. You can try different spellings or extensions like .com, .net, or .org. This helps find a domain that fits your needs.
Once you find an available domain, you can proceed to register it. This step is crucial to securing your online identity.
Completing Domain Registration
After selecting your domain, click the button to start registration. You must provide contact details for the domain owner. This information is required by ICANN rules.
Choose the registration period, usually one year or more. Then, review the privacy protection options. AWS Route 53 offers privacy services to hide your contact details.
Next, confirm your payment information. The system processes your payment securely. Finally, submit your registration request.
Within minutes, AWS Route 53 confirms your domain registration. Your domain is now ready to use with AWS DNS services.

Credit: aws.amazon.com
Configuring Hosted Zones In Route 53
Configuring hosted zones in Amazon Route 53 is a key step to manage your domain’s DNS settings. Hosted zones act like containers for your domain records. They help Route 53 know how to route traffic for your domain. Proper setup ensures visitors reach your website without issues.
Each hosted zone corresponds to a domain or subdomain. You control how the domain name resolves to IP addresses or other endpoints. This section guides you through creating hosted zones and understanding record sets.
Creating A Hosted Zone
Start by signing in to the AWS Management Console. Go to the Route 53 dashboard. Choose “Hosted zones” from the menu. Click on “Create hosted zone.”
Enter your domain name exactly as registered. Select the type, usually “Public hosted zone.” Public zones direct internet traffic. Click “Create.”
A hosted zone appears with a unique ID. AWS automatically creates default record sets. These include the NS and SOA records. They are essential for DNS to work correctly.
Understanding Record Sets
Record sets define how your domain routes traffic. They tell DNS what IP address or service to use.
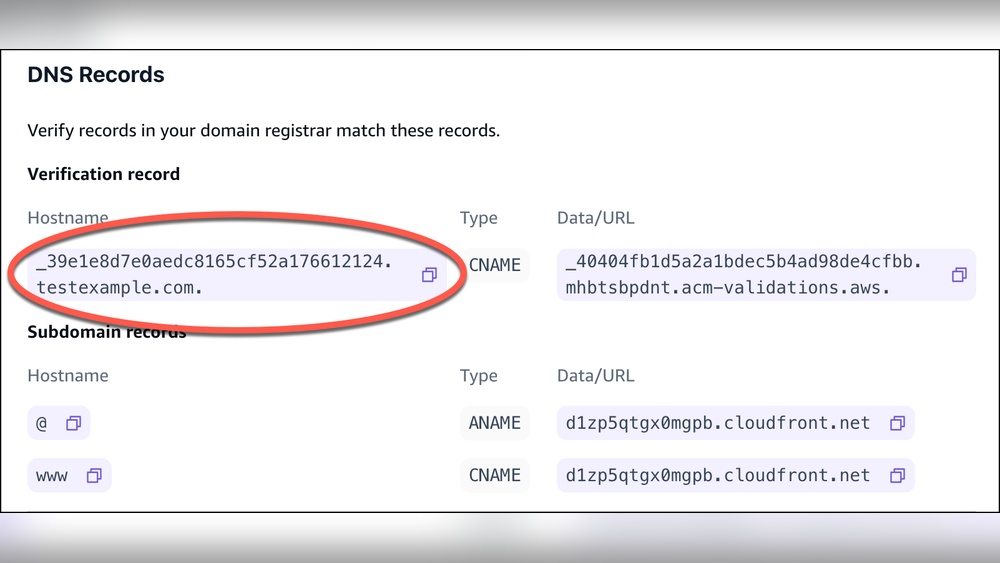
Common record types include A, CNAME, and MX. An A record links a domain to an IP address. A CNAME points one domain to another domain. MX records direct email to mail servers.
You can add, edit, or delete record sets in your hosted zone. Each record set needs a name and value. TTL (Time to Live) controls how long DNS caches the record.
Managing record sets correctly ensures your website and email work smoothly. Always double-check values before saving changes.
Adding Dns Records
Adding DNS records is a key step in hosting a domain name with AWS DNS. These records tell the internet where to find your website and how to handle emails. Each type of record has a specific role. Proper setup ensures your site and services work smoothly.
Let’s explore how to add the most common DNS records in AWS DNS. These include A, CNAME, MX, and TXT records. Each record type serves a different purpose and needs careful configuration.
Setting Up A And Cname Records
A records link your domain to an IP address. This points visitors directly to your website server. In AWS DNS, create a new A record and enter your server’s IP address. Use the root domain or subdomain as the record name.
CNAME records point a domain to another domain. Use this for subdomains or to alias one domain to another. Add a CNAME record and set the target domain. This helps manage domains without IP changes.
Configuring Mx And Txt Records
MX records handle email delivery for your domain. Add MX records with mail server addresses and priority values. This setup directs where emails should be sent.
TXT records store text information. Use them for domain verification or to improve email security. Common uses include SPF, DKIM, and DMARC settings. Add TXT records with the required text values to protect your domain.
Linking Domain To Aws Services
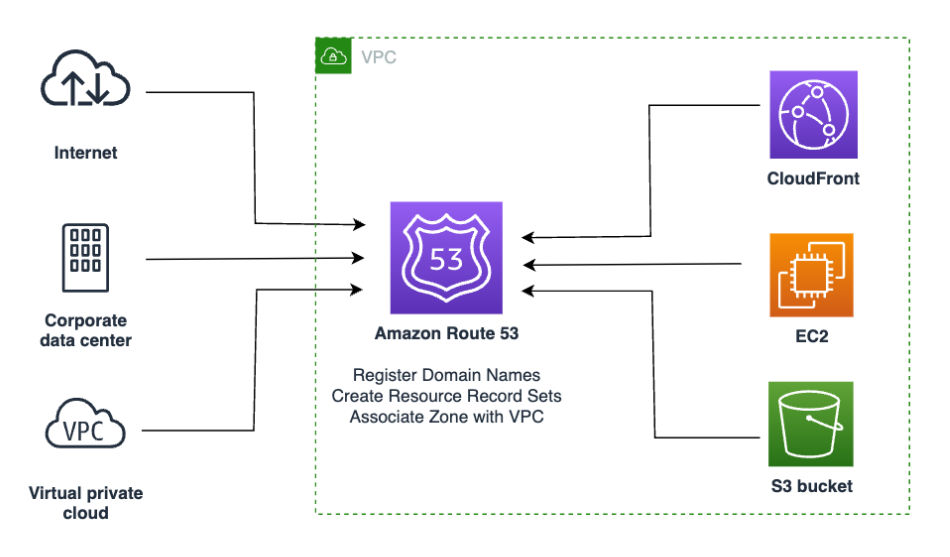
Linking your domain to AWS services helps make your website or app easy to find. AWS DNS allows you to point your domain name to different AWS resources. This makes your site faster and more reliable. You can connect your domain to EC2 instances or use Elastic Load Balancers for better traffic management.
Connecting To Ec2 Instances
To connect your domain to an EC2 instance, use Amazon Route 53. Create an A record in Route 53 that points to your EC2 public IP address. This links your domain directly to the server hosting your website or app. Remember to check your EC2 instance’s security group for proper inbound rules. This ensures traffic can reach your server through HTTP or HTTPS ports.
Using Elastic Load Balancers
Elastic Load Balancers (ELB) distribute traffic to multiple EC2 instances. Use Route 53 to create an alias record pointing to your ELB. This improves your site’s availability and performance. ELB also helps handle more visitors by balancing the load. Your domain name will route traffic smoothly across all servers behind the load balancer.
Testing Domain Resolution
Testing domain resolution is a key step after hosting a domain name with AWS DNS. It ensures your domain points to the correct server. This helps visitors reach your website without errors. You can check if DNS changes have spread across the internet. Fast and accurate testing prevents downtime and confusion.
Using Dns Lookup Tools
DNS lookup tools check how your domain resolves online. They show the IP address linked to your domain name. You can use tools like nslookup, dig, or online DNS checkers. Enter your domain name to see the DNS records. Confirm that AWS DNS records appear correctly. This step verifies if your domain resolves as expected.
Troubleshooting Common Issues
DNS may not resolve due to several common problems. Incorrect DNS records often cause resolution failures. TTL values might delay updates spreading worldwide. Clear browser cache or use a different device to test. Verify your domain registration status is active. Check for typos in DNS entries. Fixing these issues speeds up domain resolution.
Credit: tutorialsdojo.com
Managing Domain Settings
Managing domain settings is essential for keeping your website online and secure. It lets you control how your domain works with AWS DNS. You can make changes to your domain’s registration, privacy, and transfer options. These settings help protect your domain and make sure it stays active.
Renewing And Transferring Domains
Renew your domain before it expires to avoid losing it. AWS DNS allows easy renewal through the management console. Set automatic renewal to keep your domain active without worry.
Transferring a domain moves it from one registrar to another. Use the AWS DNS transfer tool to move your domain smoothly. Make sure your domain is unlocked and you have the transfer code ready. Transfers may take a few days to complete.
Setting Up Domain Privacy
Domain privacy hides your personal contact details from the public. AWS DNS offers privacy protection to keep your information safe. Enable privacy to prevent spam and unwanted contacts. Privacy settings can be updated anytime in your domain management panel.
Frequently Asked Questions
What Is Aws Dns For Domain Hosting?
AWS DNS, through Amazon Route 53, manages domain names by translating them into IP addresses. It enables reliable, scalable domain hosting with low latency worldwide.
How To Register A Domain In Aws Route 53?
In AWS Route 53, go to “Registered Domains,” then select “Register Domain. ” Follow prompts to search and register your desired domain.
Can I Transfer My Domain To Aws Dns?
Yes, you can transfer domains to AWS DNS by unlocking the domain, obtaining an authorization code, and initiating transfer in Route 53.
How Do I Create Dns Records In Aws?
Use the Route 53 console to create hosted zones, then add DNS records like A, CNAME, or MX to route traffic correctly.
Conclusion
Hosting a domain name with AWS DNS is simple and effective. Follow the steps carefully to set up your domain. AWS offers reliable tools to manage your website address. You control your domain settings anytime through the AWS console. This helps keep your site running smoothly and accessible.
Start hosting your domain today and enjoy a stable online presence.


