
Are you ready to take full control of your website? Hosting your domain on your own server gives you power, flexibility, and freedom that no third-party service can match.
Imagine cutting costs, boosting speed, and customizing every detail exactly how you want it. Sounds exciting, right? But you might wonder, “Where do I even start? ” Don’t worry—this guide will walk you through each step clearly and simply. By the end, you’ll know exactly how to host your domain on your own server and unlock a new level of online independence.
Keep reading to discover how easy it can be!
Credit: www.namecheap.com
Choosing Your Server Hardware
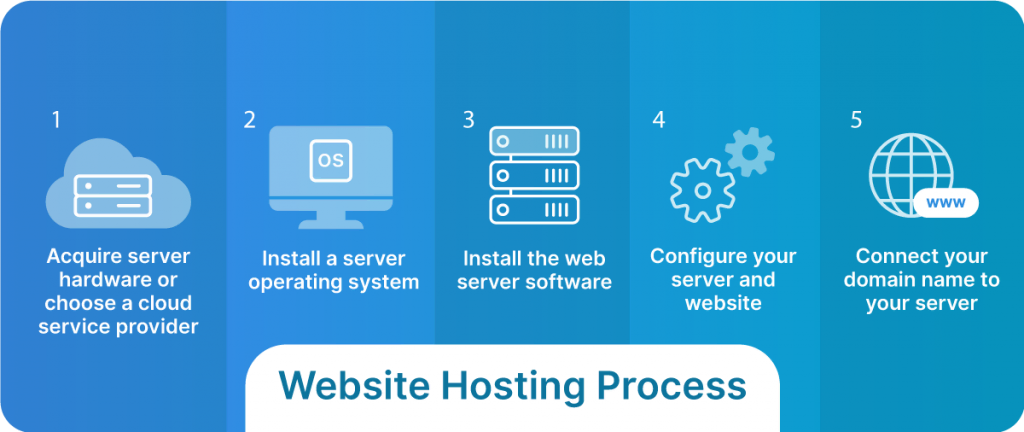
Choosing the right server hardware is a key step in hosting your domain on your own server. The hardware affects speed, reliability, and how much traffic your site can handle. Picking the right setup saves money and avoids future problems.
Dedicated Vs. Shared Servers
A dedicated server means all hardware is for your site alone. This gives better speed and control. Shared servers split resources among many users. They cost less but can slow down if others use too much power. For hosting your own domain, a dedicated server often works best.
Minimum Hardware Requirements
Your server needs a strong processor, enough memory, and enough storage. A quad-core CPU with 8GB of RAM is a good start. Storage should be SSD for faster data access. At least 100GB of space is needed. These specs help keep your site running smooth.
Power And Cooling Considerations
Servers run 24/7 and use lots of power. Make sure your power supply is stable and enough for your hardware. Cooling is also important. Without good airflow, your server may overheat and break. Use fans or air conditioning to keep the temperature steady.
Setting Up The Server Environment
Setting up the server environment is the first step in hosting your domain on your own server. This process prepares your hardware and software to handle web traffic smoothly. A well-configured server environment improves speed, security, and reliability. Follow these steps carefully to create a stable foundation for your server.
Installing The Operating System
Choose a reliable operating system like Linux or Windows Server. Linux is popular due to its stability and security. Download the OS installation files from the official website. Create a bootable USB or DVD with these files. Insert the bootable media into your server and restart it. Follow the on-screen instructions to complete the installation. Set up a strong administrator password to protect your server. Install essential updates and security patches immediately after installation.
Configuring Network Settings
Assign a static IP address to your server for consistent access. Go to the network settings panel in your operating system. Enter the IP address, subnet mask, and default gateway provided by your ISP or network administrator. Set the DNS servers to ensure proper domain name resolution. Verify the network connection by pinging a known website. Open necessary ports on your firewall, such as port 80 for HTTP and port 443 for HTTPS. Proper network settings ensure your server communicates well with the internet.
Setting Up Remote Access
Remote access lets you manage your server from anywhere. Enable SSH (Secure Shell) for Linux servers or Remote Desktop for Windows. Configure strong authentication methods to prevent unauthorized access. Use key-based authentication for SSH to increase security. Change the default port number to reduce hacking risks. Test your remote connection from another device. Proper remote access setup saves time and allows easy server management.
Installing Web Server Software
Installing web server software is a key step in hosting a domain on your own server. This software allows your server to deliver website files to visitors. Choosing and setting up the right web server software ensures your site runs smoothly and securely.
Different web servers offer unique features and performance options. Understanding how to install and configure them helps you control your hosting environment fully.
Popular Web Servers: Apache, Nginx, And Iis
Apache is the most widely used web server worldwide. It is open-source and supports many modules for added features.
Nginx is known for speed and handling many users at once. It uses less memory, making it good for busy sites.
IIS (Internet Information Services) is a Microsoft product. It works best on Windows servers and integrates with other Microsoft tools.
Configuring Server Software
After installation, configure your server to serve your website files. Set the document root, which is the folder with your website data.
Adjust security settings to protect your server from unauthorized access. Enable SSL for secure connections if needed.
Set permissions so your server can read website files but cannot be changed by visitors.
Testing Server Installation
Test your server by opening a browser and typing your server’s IP address or domain name. You should see a default web page.
If the page loads, the server is installed and running correctly. Check error logs if you face issues.
Try uploading a simple HTML file to your document root and access it via the browser. This confirms your server serves files properly.
Registering And Managing Your Domain
Registering and managing your domain is the first step to hosting it on your own server. This process makes your website address unique and reachable online. It involves selecting a domain name, registering it with a trusted company, and setting up the technical details.
Proper management ensures your domain points correctly to your server. It also keeps your website live and accessible to visitors. Understanding these tasks helps avoid downtime and connection errors.
Choosing A Domain Registrar
Select a reliable domain registrar to register your domain name. These companies handle the reservation of internet domain names. Look for registrars with good support and clear pricing. Popular options include GoDaddy, Namecheap, and Google Domains. Check if they offer easy management tools and security features. Registering your domain with a reputable registrar protects your website identity.
Configuring Dns Records
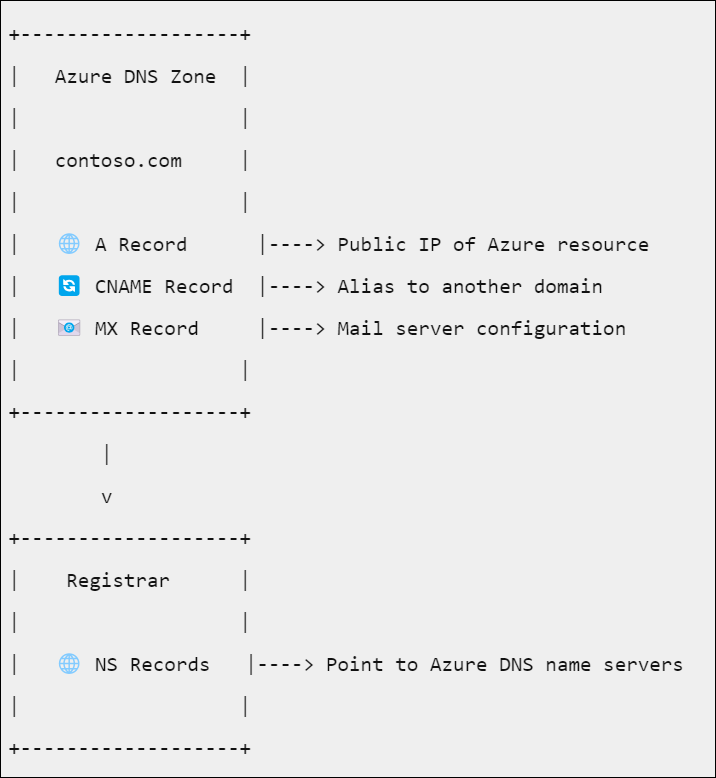
DNS records link your domain name to your server’s IP address. They control how visitors find your website online. Common records include A, CNAME, MX, and TXT records. The A record points your domain to your server’s IP address. Update these records in your registrar’s control panel. Correct DNS setup ensures your website loads quickly and correctly.
Setting Up Name Servers
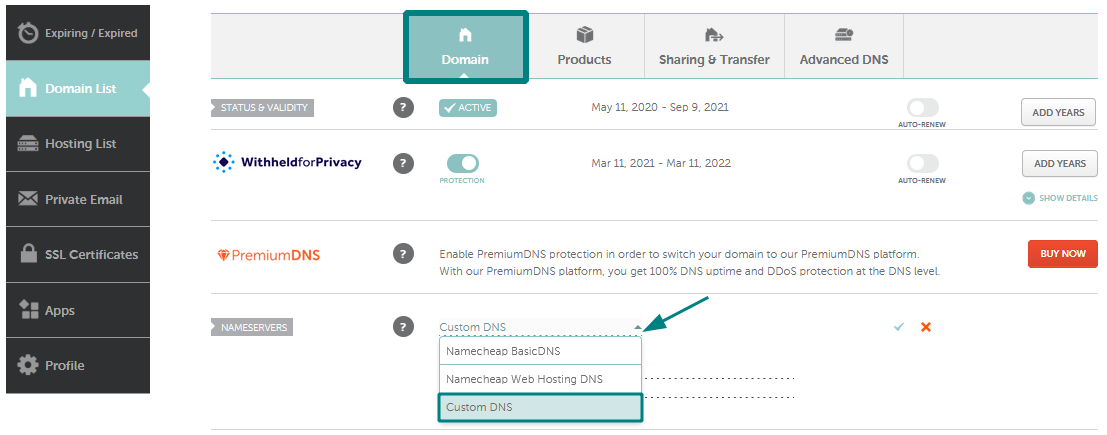
Name servers direct the internet where to find your domain’s DNS records. You can use your registrar’s default name servers or set custom ones. Custom name servers give you more control, especially with your own server. To set custom name servers, enter their addresses at your registrar. Proper name server setup is key to linking your domain and server smoothly.
Linking Domain To Your Server
Linking your domain to your own server is a key step in hosting your website. It connects your website name to your physical server. This way, visitors can find your site using your domain name. The process involves setting a fixed IP for your server and updating your domain’s DNS records. Let’s explore how to do this.
Assigning Static Ip Address
Give your server a static IP address. This means the server’s IP won’t change over time. A fixed IP lets the domain always point to the right place. Set this IP on your server through your network settings. Contact your internet provider if you need help getting a static IP.
Updating Dns Records With Ip
Go to your domain registrar’s control panel. Find the DNS management section. Update the ‘A’ record with your static IP address. This tells the domain where your server lives. Save the changes carefully. Incorrect IP will lead visitors to the wrong site.
Propagation And Verification
DNS changes take time to spread. This is called propagation. It can take from a few minutes to 48 hours. Use tools like DNS checkers to see if the update is complete. Visit your domain in a browser to confirm it connects to your server. Patience is key during this stage.
Credit: www.liquidweb.com
Securing Your Server And Domain
Securing your server and domain protects your website and data from threats. Without proper security, hackers can steal information or damage your site. Follow simple steps to keep your server safe and your domain trusted by visitors.
Installing Ssl Certificates
SSL certificates create a secure connection between your server and visitors. This protects data like passwords and credit card details. You can get free SSL certificates from providers like Let’s Encrypt. Installing SSL also improves your site’s ranking on search engines.
Configuring Firewalls
Firewalls block unwanted traffic and protect your server from attacks. Set rules to allow only trusted connections. Use both software and hardware firewalls for better protection. Regularly check firewall logs to spot suspicious activity.
Regular Security Updates
Keep your server software and applications up to date. Updates fix security weaknesses and bugs. Schedule automatic updates if possible. Outdated software is an easy target for cybercriminals. Stay ahead by applying patches quickly.
Maintaining Server Performance
Maintaining server performance is key to hosting your domain smoothly. A slow or unstable server can hurt user experience. Regular care keeps your server fast and reliable. Follow a few simple steps to keep your server running well.
Monitoring Server Health
Check your server’s health often. Use tools to track CPU, memory, and disk usage. Watch for unusual spikes or drops. Monitor network activity and response times. Early detection helps fix problems before they grow. Set alerts for critical issues to act fast.
Backup Strategies
Always keep backups of your data. Store copies on separate devices or cloud storage. Schedule backups regularly to avoid data loss. Test backups to make sure they work correctly. Backups protect your site from crashes and attacks. A good backup plan saves time and stress.
Scaling Resources
Adjust your server resources as needed. Increase CPU, RAM, or storage if traffic grows. Use load balancing to spread traffic evenly. Upgrade hardware or move to stronger servers when necessary. Scaling keeps your site fast during busy times. Plan resource needs based on your website growth.
Credit: learn.microsoft.com
Frequently Asked Questions
What Is The Main Advantage Of Hosting A Domain On Your Server?
Hosting your domain on your server gives full control over website data and configurations. It saves hosting fees and allows customization. You manage security and performance directly, enhancing reliability. This setup suits tech-savvy users wanting independence from third-party hosting services.
How Do I Link My Domain To My Own Server?
To link your domain, update the domain’s DNS settings to your server’s IP address. Use an A record to point the domain to your server. Ensure your server is properly configured to respond to the domain name. This connects your domain with your server-hosted site.
What Software Is Required To Host A Domain On My Server?
You need web server software like Apache, Nginx, or IIS to host your domain. Install and configure the server software to serve your website files. Also, set up FTP or SSH for file transfers. Proper software ensures your server handles web requests efficiently.
How To Secure My Domain Hosted On My Own Server?
Use SSL certificates to encrypt data between your server and visitors. Regularly update server software to patch vulnerabilities. Configure firewalls and limit access to essential services. Back up data frequently to prevent loss. These steps protect your domain from cyber threats.
Conclusion
Hosting your domain on your own server gives you full control. You save money by avoiding third-party hosting fees. It also helps you learn valuable technical skills. Be sure to secure your server to protect your data. Regular maintenance keeps your site running smoothly.
Start small, then expand as you gain confidence. Hosting your domain this way is rewarding and educational. Give it a try and see the difference yourself.


