

Are you ready to get your Namecheap domain live on Hostgator but don’t know where to start? You’ve come to the right place.
Hosting your domain on a reliable server is key to making your website fast and accessible. In this guide, you’ll discover simple, step-by-step instructions to connect your Namecheap domain with Hostgator hosting. By the end, you’ll have your site up and running smoothly, without any confusing tech jargon.
Keep reading, and let’s make your website dreams a reality.
Credit: www.namecheap.com
Preparing Your Namecheap Domain
Preparing your Namecheap domain is a key step before hosting it on Hostgator. This process ensures smooth transfer and proper setup. It involves accessing your Namecheap account, managing domain settings, and unlocking the domain. Follow these simple steps to get started.
Accessing Your Namecheap Account
Visit the Namecheap website and log in with your username and password. Use the main dashboard to see all your domains. This page is your control center for domain management. Keep your login details safe to avoid access issues later.
Locating Domain Management Settings
Find your domain list in the dashboard. Click on the domain you want to host on Hostgator. This opens the domain settings page. Here, you can manage DNS, contacts, and other important options. Check each section carefully before making changes.
Unlocking The Domain
Domains are locked by default to prevent unauthorized transfers. Locate the domain lock option on the settings page. Switch it off to unlock your domain. This step allows you to connect your domain to Hostgator smoothly. Remember to lock your domain again after the process is complete.
Configuring Dns Settings
Configuring DNS settings is a key step in hosting a Namecheap domain on Hostgator. It connects your domain name to your hosting account. Without this, visitors cannot reach your website. The process involves changing nameservers from Namecheap to Hostgator. This setup ensures your domain points to the right server.
Finding Hostgator Nameservers
Start by logging into your Hostgator control panel. Look for the section labeled “Server Information” or “Account Details.” Here, you will find two or more nameservers. They usually look like ns1.hostgator.com and ns2.hostgator.com. Write these down or keep the tab open. These nameservers tell Namecheap where to direct your domain.
Updating Nameservers On Namecheap
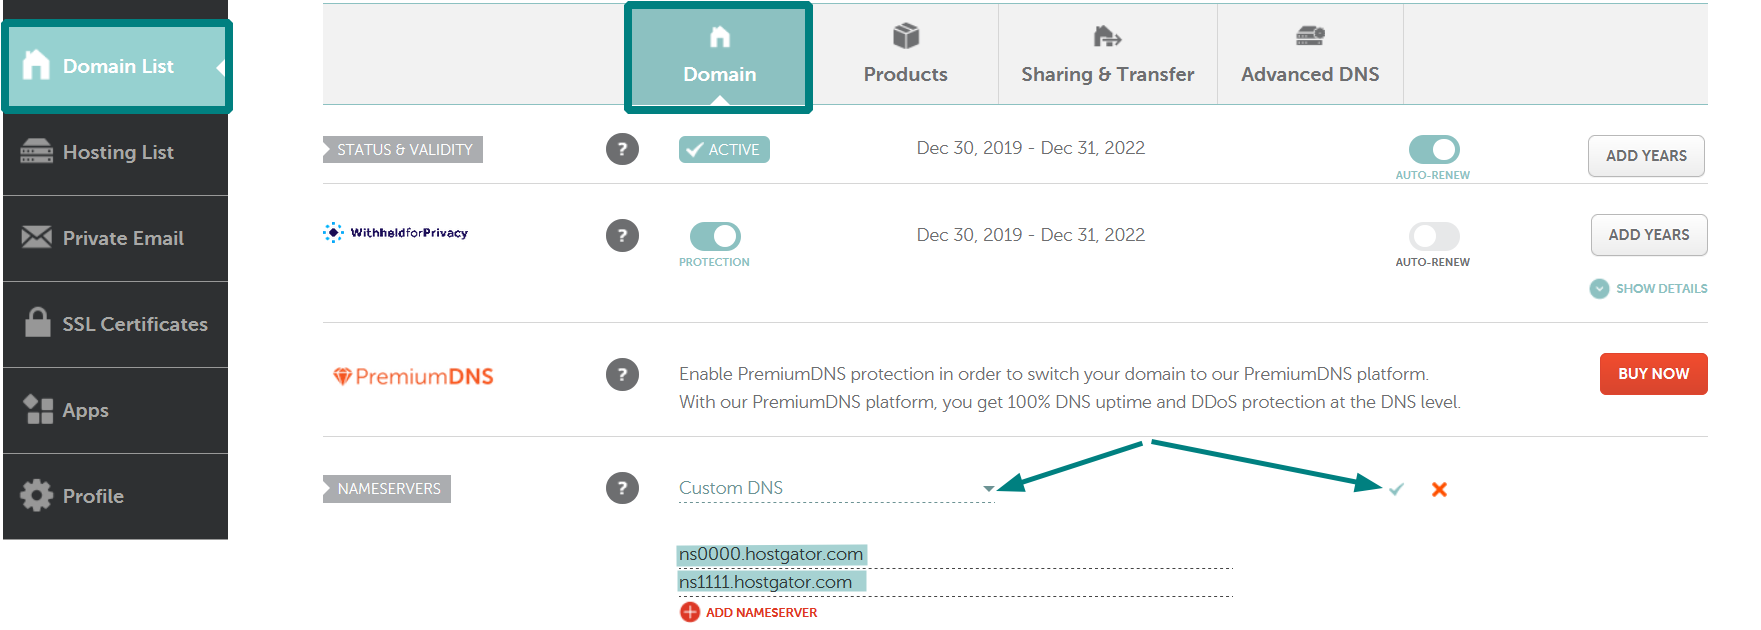
Next, log in to your Namecheap account dashboard. Go to the “Domain List” and select the domain you want to host on Hostgator. Find the “Nameservers” option and choose “Custom DNS.” Enter the Hostgator nameservers you noted earlier into the fields. Make sure each nameserver is typed correctly. This step links your domain to Hostgator’s servers.
Saving And Verifying Changes
After entering the nameservers, save the changes on Namecheap. The update may take some time, usually a few hours to 48 hours. You can check if the change worked by using online DNS lookup tools. Enter your domain to see if it points to Hostgator nameservers. Once verified, your domain is ready to use with Hostgator hosting.
Setting Up Hosting On Hostgator
Setting up hosting on Hostgator is simple and straightforward. It allows your website to go live quickly. Follow these steps carefully to connect your Namecheap domain to Hostgator hosting.
Creating A Hostgator Account
Start by visiting the Hostgator website. Choose a hosting plan that fits your needs. Enter your personal and payment information. Verify your email to activate the account. You will get access to the Hostgator control panel.
Adding Your Domain To Hostgator
Log in to your Hostgator control panel. Find the “Domains” or “Addon Domains” section. Enter your Namecheap domain name carefully. Make sure to set the document root folder. This folder stores your website files. Save the changes to link the domain.
Uploading Website Files
Access the Hostgator control panel and open the File Manager. Navigate to the folder linked to your domain. Use the upload feature to add your website files. Upload the homepage file named “index.html” or “index.php”. Check your website by typing your domain in a browser.

Credit: www.shoutmeloud.com
Testing Your Website
After setting up your Namecheap domain on Hostgator, testing your website is crucial. This step ensures your site is live and working as expected. It also helps catch issues early.
Testing involves checking if the domain changes have spread across the internet, accessing the site, and fixing common problems. Each part is important for a smooth launch.
Checking Domain Propagation
Domain propagation is the time it takes for DNS changes to update worldwide. This can take from a few minutes to 48 hours.
Use online tools like DNS Checker to see if your domain points to Hostgator’s servers. Enter your domain and check A records.
Wait for full propagation before making more changes. Patience ensures your site appears correctly for all users.
Accessing Your Website Online
Type your domain into a browser address bar to visit your site. If it loads, your hosting setup is correct.
Clear your browser cache if you see old content or errors. Sometimes, cached pages block new updates.
Try different devices or browsers to confirm the site works everywhere. This helps identify local issues.
Troubleshooting Common Issues
Website not loading? Check your domain’s DNS settings in Namecheap. Ensure they match Hostgator’s nameservers.
Verify your hosting account is active and files are uploaded properly. Missing files cause errors.
Contact Hostgator support if problems persist. They can help diagnose server or account issues quickly.
Maintaining Your Domain And Hosting
Maintaining your domain and hosting is important for a smooth website experience. It keeps your site active and safe from problems. Regular care helps avoid downtime and security risks.
Simple tasks like renewing services and managing settings keep your website running. Taking time to secure your site protects your data and visitors. These steps ensure your online presence stays strong and reliable.
Renewing Domain And Hosting Services
Always renew your domain and hosting before they expire. Expired services cause your website to go offline. Set reminders for renewal dates to avoid surprises. Use your Namecheap account for domain renewal. Hostgator’s dashboard helps renew hosting plans easily. Renew early to prevent losing your domain or hosting.
Managing Dns Records
DNS records link your domain to your hosting server. Update DNS settings in your Namecheap account. Point your domain to Hostgator’s nameservers. Check DNS propagation after changes to confirm updates. Correct DNS settings ensure visitors reach your website. Keep DNS records accurate to avoid website issues.
Securing Your Website
Security protects your site from hackers and malware. Use SSL certificates to encrypt visitor data. Hostgator often provides free SSL with hosting plans. Keep your website software and plugins updated. Use strong passwords for your accounts. Regular backups help restore your site after issues. Security steps keep your website safe and trustworthy.

Credit: www.youtube.com
Frequently Asked Questions
How Do I Connect Namecheap Domain To Hostgator?
Log in to Namecheap, update your domain’s nameservers to Hostgator’s. Then, add the domain in your Hostgator cPanel to complete the connection.
Can I Host Multiple Domains From Namecheap On Hostgator?
Yes, Hostgator allows hosting multiple Namecheap domains. Add each domain as an addon domain in your Hostgator account for separate website hosting.
How Long Does Dns Propagation Take For Namecheap To Hostgator?
DNS propagation typically takes 24-48 hours. During this time, your domain may not resolve correctly worldwide.
Do I Need To Transfer My Domain To Hostgator?
No, transferring is not required. You can keep your domain registered at Namecheap and host your site on Hostgator.
Conclusion
Hosting your Namecheap domain on Hostgator is simple and clear. Follow the steps carefully to avoid errors. Change your domain’s nameservers to Hostgator’s addresses. Wait a few hours for the changes to take effect. Check your website to ensure it loads correctly.
This process helps you manage your domain and hosting together. Keep your login details safe for future updates. Now, your website is ready to go live with Hostgator. You can focus on creating content and growing your site.


