
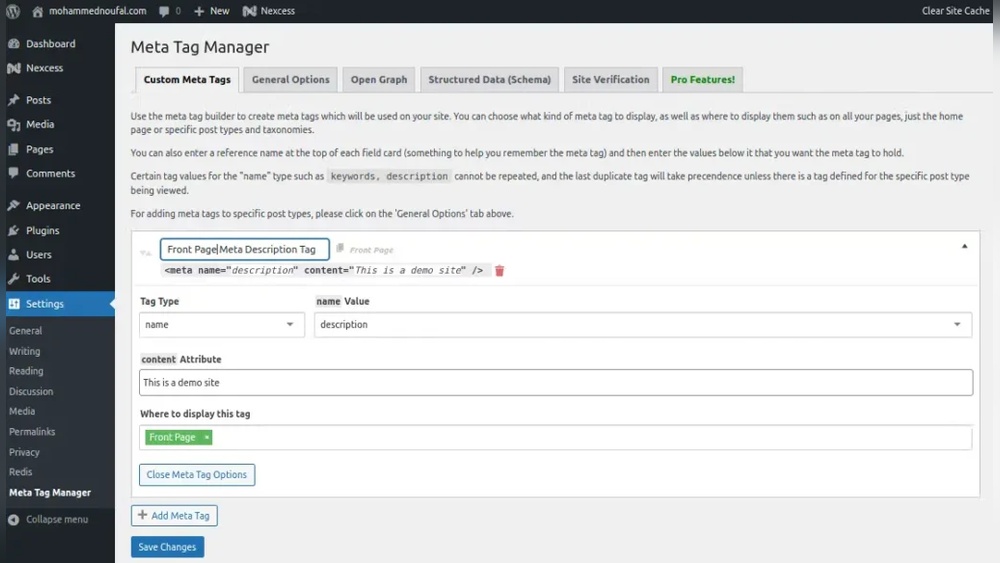
Are you struggling to improve your WordPress site’s visibility on search engines? Adding meta tags is a simple yet powerful way to boost your SEO and attract more visitors.
But if you’re not sure how to do it, don’t worry—using a plugin makes the process easy and hassle-free. You’ll learn step-by-step how to add meta tags in WordPress with a plugin, so your site can stand out and get noticed.
Keep reading, and you’ll be optimizing your pages like a pro in no time!
Credit: www.greengeeks.com
Why Meta Tags Matter
Meta tags play a key role in how search engines and users see your website. They provide important information about your page’s content. This helps search engines understand what your site is about. Meta tags also influence how your page appears in search results. Using them correctly can improve your website’s visibility and appeal.
Good meta tags guide search engines to show your site to the right audience. They also help users decide if your page matches their needs. This can increase the number of visitors to your site. Proper meta tags make your website more attractive and easier to find.
Impact On Seo
Meta tags affect your site’s ranking on search engines. Search engines read meta tags to understand page content. Clear and relevant meta tags help search engines index pages better. This can lead to higher positions in search results. Higher ranking means more people will see your site.
Enhancing Click-through Rates
Meta tags influence how your page looks in search results. Well-written meta descriptions catch users’ attention. They provide a quick summary of your content. This encourages users to click on your link. More clicks bring more traffic and potential customers.

Credit: onesmartsheep.com
Choosing The Right Plugin
Choosing the right plugin is key to adding meta tags easily in WordPress. The right tool saves time and avoids technical issues. It also helps improve your site’s SEO effectively. Not all plugins work the same. Some offer more features, while others keep it simple. Picking the best one depends on your needs and skill level.
Popular Meta Tag Plugins
Several plugins are popular for managing meta tags in WordPress. Yoast SEO is widely used for its user-friendly interface and strong features. All in One SEO Pack offers a good balance of options and ease. Rank Math is growing fast, known for its detailed control over meta tags. Each plugin has a large user base and regular updates.
Features To Look For
Check if the plugin supports custom meta tags for posts and pages. It should allow editing titles and descriptions easily. Look for automatic generation of meta tags to save time. Compatibility with your WordPress theme matters. The plugin must be updated regularly for security and performance. User support and clear documentation are helpful too.
Installing Your Plugin
Installing a plugin is the first step to add meta tags in WordPress. Plugins make this process simple and quick. You can install plugins directly from the WordPress dashboard or by uploading files manually. Both methods work well and depend on your preference.
Using The WordPress Dashboard
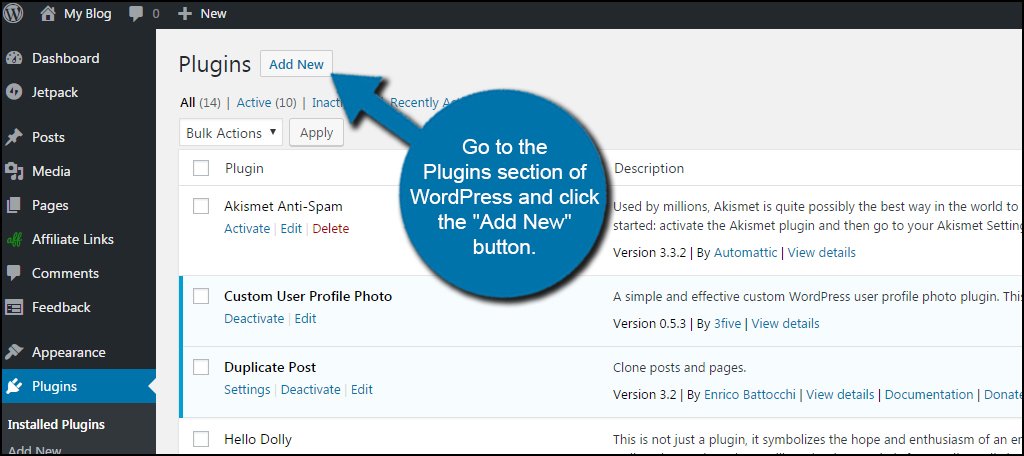
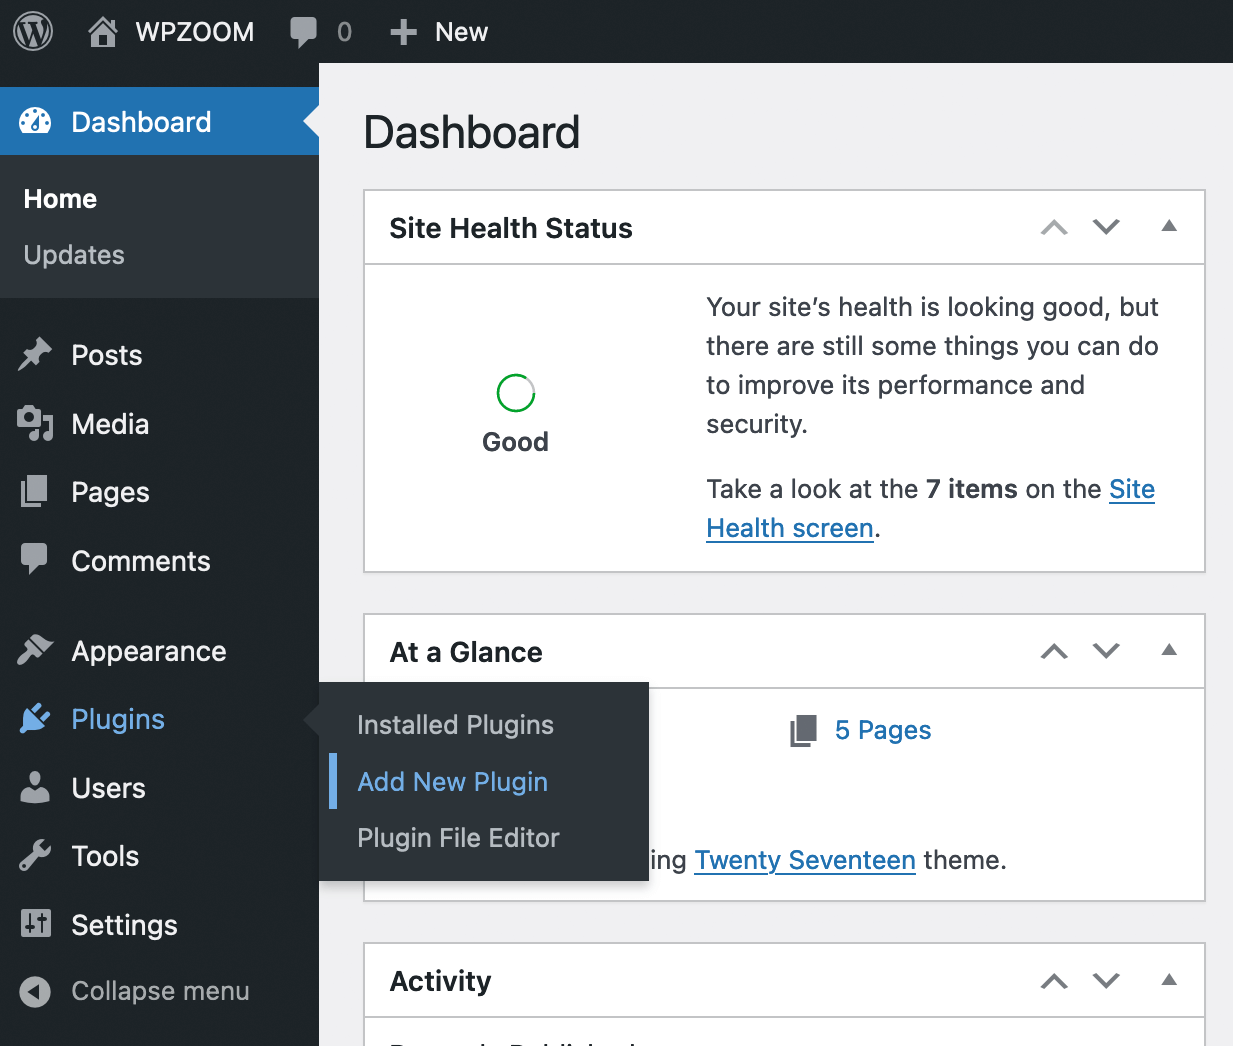
Go to your WordPress dashboard. Click on “Plugins” in the sidebar menu. Then, select “Add New.”
Use the search bar to find a meta tag plugin. Popular choices include “Yoast SEO” or “All in One SEO Pack.”
Click “Install Now” next to the plugin you want. After installation, click “Activate” to enable it.
The plugin is now ready for use. You can start adding meta tags to your pages and posts.
Manual Installation Steps
Download the plugin’s ZIP file from the official website or repository. Save it on your computer.
Go to your WordPress dashboard. Click on “Plugins” and then “Add New.”
Click the “Upload Plugin” button at the top. Choose the ZIP file you downloaded.
Click “Install Now.” Wait for the upload to finish, then click “Activate Plugin.”
The plugin is now installed and ready. You can configure it to add meta tags easily.
Configuring Plugin Settings
Configuring plugin settings is a key step after installing a meta tag plugin on WordPress. This process lets you control how your site’s meta tags appear in search engines. Correct settings help improve your site’s visibility and click rates.
Most meta tag plugins offer a simple dashboard for configuration. You can set up default tags for your homepage and all posts or pages. This saves time and keeps your site consistent.
General Setup
Start with the general setup to enter your site’s basic information. This includes the site title and description. These details show up in search results. Make sure they reflect your site’s purpose clearly.
Choose whether to enable meta tags for posts, pages, or custom post types. Some plugins allow you to add meta tags for categories and archives too. Set your preferred options carefully.
Check if the plugin supports social media meta tags. These tags improve how your content looks when shared on platforms like Facebook or Twitter. Enable these features if available.
Customizing Meta Tags
Customize meta tags for each page or post to boost SEO. Use the plugin’s editor box below the content area in WordPress. Add unique titles and descriptions that match your content.
Keep titles under 60 characters and descriptions under 160 characters. This prevents text from getting cut off in search results. Use keywords naturally to attract visitors.
Some plugins offer template tags to auto-generate meta tags. This helps maintain a consistent format while saving time. Adjust templates based on your site’s style and needs.
Adding Meta Tags To Posts And Pages
Adding meta tags to posts and pages helps search engines understand your content better. It improves how your site appears in search results. Meta tags include titles and descriptions that describe the page content. You can add these tags easily using a WordPress plugin designed for SEO.
Plugins let you customize meta tags for each post or page. This control helps you target specific keywords. You also can set default tags for all content. This saves time and keeps your site consistent.
Editing Individual Posts
Open the post or page you want to edit. Scroll down to the SEO plugin section. Usually, it is below the content editor.
Enter a custom meta title that matches the post topic. Write a clear meta description with important keywords. Keep descriptions under 160 characters for best results.
Save or update the post to apply the changes. The plugin will add these tags to the page’s code automatically.
Setting Default Meta Tags
Go to the SEO plugin settings in your WordPress dashboard. Find the section for default meta tags.
Enter a general title and description for posts and pages. These defaults appear if you do not add custom tags. It helps keep your site SEO-friendly without extra work.
Save your settings. The plugin will use these tags site-wide unless you override them on individual posts.
Verifying Meta Tag Implementation
Verifying meta tag implementation is a key step after adding meta tags using a plugin in WordPress. It ensures your tags appear correctly on your site. Proper verification helps search engines and browsers read your meta information. This improves your site’s SEO and user experience. There are simple methods to check if meta tags are working well. You can use browser tools or online checkers. These methods are free and easy to use.
Using Browser Tools
Your browser has built-in tools to view meta tags. Right-click on your webpage and select “View Page Source.”
This shows the HTML code of your page. Look for the tags in the
section.You can also use browser developer tools. Press F12 or right-click and choose “Inspect.”
Find the “Elements” tab and open the
part. Check if your meta tags are listed there. This confirms your tags are added correctly.Online Meta Tag Checkers
Online tools help verify meta tags easily. Enter your website URL in a meta tag checker.
The tool scans your page and lists the meta tags it finds. It shows details like title, description, and keywords.
These checkers also highlight missing or duplicate tags. This helps fix any issues quickly.
Using online checkers saves time and ensures your tags are accurate. It supports better SEO results and site performance.
Troubleshooting Common Issues
Adding meta tags with a plugin in WordPress is simple but may cause some issues. Troubleshooting these problems helps keep your site SEO-friendly. This section covers common challenges and easy fixes.
Plugin Conflicts
Sometimes, plugins clash with each other. This can stop meta tags from working right. Deactivate other SEO or meta tag plugins first. Check if the problem goes away. If yes, only keep one plugin active for meta tags.
Also, update all plugins to their latest versions. Outdated plugins often cause conflicts. Clear your site cache after updating. This ensures changes take effect immediately.
Meta Tags Not Showing
Meta tags may not appear on your pages for a few reasons. First, check if you saved the meta tag settings correctly. Unsaved changes will not show up on your site.
Next, view the page source in your browser. Search for meta tags there. If missing, the plugin might not be compatible with your theme. Try switching to a default WordPress theme to test.
Clear your browser and site cache. Cached pages may hide new meta tags. Lastly, disable caching plugins temporarily to see if they block meta tags.
Credit: www.wpzoom.com
Optimizing Meta Tags For Better Results
Optimizing meta tags helps search engines understand your content better. It also improves your site’s appearance in search results. Proper meta tags can increase clicks and attract the right visitors. Focus on clear, relevant titles and descriptions for each page or post.
Writing Effective Titles
Keep titles short and to the point. Use important keywords naturally. Place the main keyword near the beginning. Avoid keyword stuffing. Titles should describe the content clearly. Make titles unique for every page. A good title grabs attention and explains the page quickly.
Crafting Compelling Descriptions
Descriptions must summarize the page content well. Write in simple, clear language. Use keywords but keep it natural. Stay within 150-160 characters to avoid cut-off. A strong description encourages users to click. Avoid repeating the title in the description. Make each description unique and relevant.
Frequently Asked Questions
What Are Meta Tags In WordPress Plugins?
Meta tags are snippets of code that provide search engines with information about your webpage. WordPress plugins help easily add and manage these tags for better SEO and content visibility.
Which Plugin Is Best For Adding Meta Tags In WordPress?
Yoast SEO and All in One SEO Pack are popular plugins. They offer simple tools to add and optimize meta tags for better search rankings.
How Do I Add Meta Tags Using A WordPress Plugin?
Install and activate your chosen SEO plugin. Go to the plugin settings, find the meta tag section, and enter your title, description, and keywords.
Can Meta Tags Improve My WordPress Seo Rankings?
Yes, meta tags help search engines understand your content. Properly optimized meta tags can boost your site’s click-through rates and improve search rankings.
Conclusion
Adding meta tags in WordPress with a plugin is simple and quick. It helps your website show better in search results. Plugins guide you step-by-step, so no coding is needed. Use clear titles and descriptions for each page. This improves how people find your site online.
Keep meta tags updated for best results. Start adding them today to boost your site’s visibility. Small steps can bring big changes in web traffic. Stay consistent and watch your website grow.


