
Are you looking to make your WordPress site more engaging by adding audio files? Whether you want to share podcasts, music, or voice messages, adding audio can instantly boost your site’s appeal.
But if you’re not sure where to start, don’t worry. This guide will walk you through simple, clear steps to get your audio playing on your site quickly. By the end, you’ll have the confidence to add sound that connects with your visitors and keeps them coming back for more.
Let’s dive in and make your WordPress site sound amazing!
Preparing Your Audio File
Preparing your audio file is an important step before uploading it to WordPress. It helps ensure your audio plays smoothly and sounds clear. Proper preparation also improves the user experience on your site. Take time to select the best format, optimize the size, and name your file correctly. These steps will make your audio easy to manage and accessible to visitors.
Choosing The Right Format
Pick a format that works well with WordPress and most browsers. MP3 is the most popular choice. It offers good sound quality and small file size. Other formats like WAV or OGG are supported but less common. MP3 files load faster and reach more users. Use MP3 unless you have a specific reason to choose another format.
Optimizing File Size
Keep your audio file size small for faster loading. Large files slow down your website and can frustrate visitors. Use audio editing software to reduce the bitrate or length. Aim for a balance between sound quality and file size. A file size under 5MB usually works well for short clips. Compress files without losing too much quality.
Naming Your Audio File
Use clear, simple names for your audio files. Avoid spaces and special characters. Use dashes or underscores instead. A good name helps you find the file later. It also improves SEO by describing the content. For example, use “morning-birds-song.mp3” instead of “audio1.mp3”. This makes your files easier to manage and search engines to understand.
Credit: www.hostinger.com
Uploading Audio To WordPress
Uploading audio to WordPress lets you share sound files easily on your site. You can add music, podcasts, or any audio content. WordPress supports many audio formats like MP3, WAV, and OGG. This section shows simple ways to upload audio files to your WordPress site.
Using The Media Library
The Media Library is the easiest way to upload audio files. Go to your WordPress dashboard and click “Media.” Then select “Add New.” Click “Select Files” and find your audio on your computer. After uploading, WordPress stores the file and gives you a URL. You can use this URL to add audio anywhere on your site.
Drag And Drop Upload Method
You can also drag and drop audio files directly into the Media Library. Open the “Add New” section under Media. Drag your audio file from your computer and drop it into the upload area. WordPress will upload the file automatically. This method is fast and works well for multiple audio files at once.
Uploading Via Ftp
FTP is another option to upload audio files. Use an FTP client like FileZilla to connect to your server. Navigate to the “wp-content/uploads” folder. Upload your audio files into the correct year and month folder. After uploading, use the file URL to add audio to your posts or pages. FTP is useful for large files or many files at once.
Embedding Audio In Posts Or Pages
Adding audio to your WordPress posts or pages makes your content more lively. Audio helps share music, podcasts, or voice messages directly. It also keeps visitors engaged longer on your site. WordPress offers simple ways to embed audio files. Each method fits different needs and editor types.
Using The Audio Block
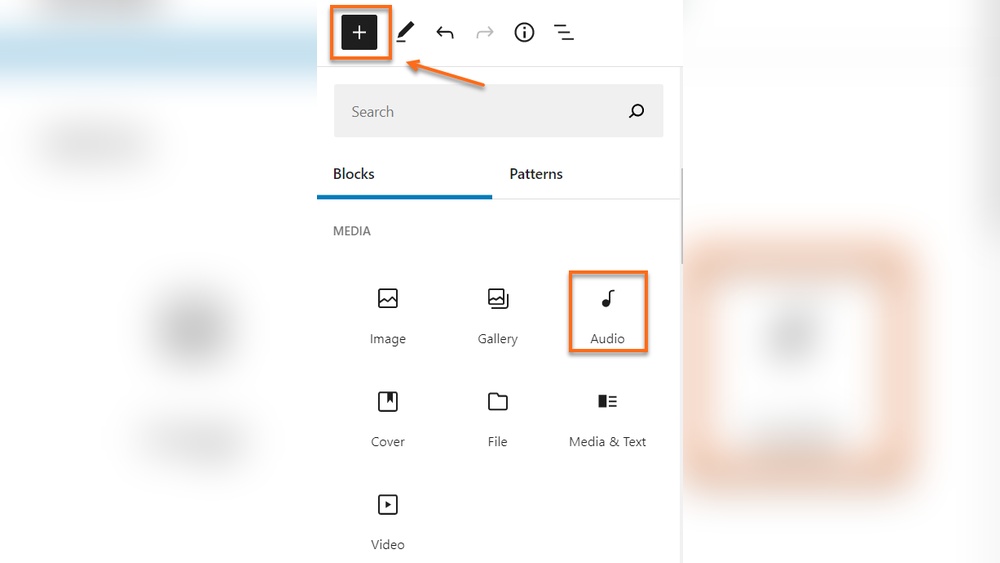
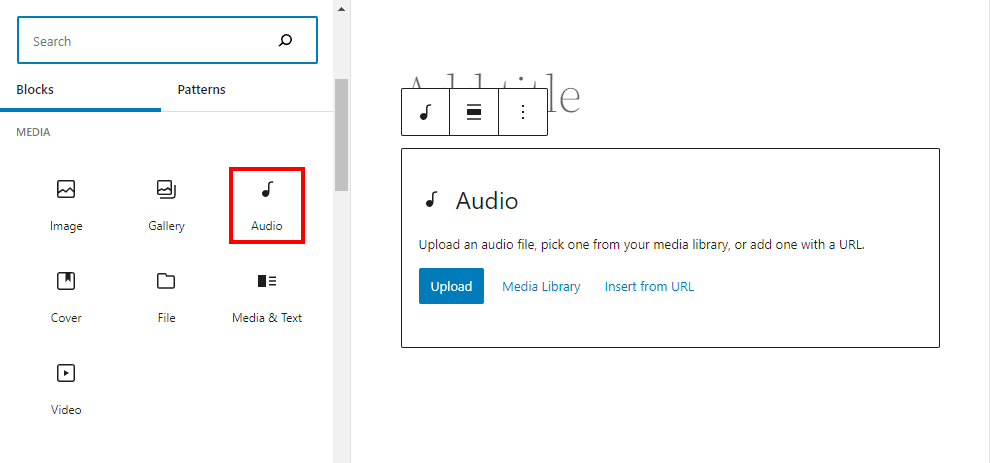
The Audio block works well in the WordPress Block Editor. Click the “+” button to add a new block. Select the Audio block from the list. Upload your audio file or choose one from the media library. The block shows a player right inside your post. Visitors can play, pause, or skip the audio easily. This method is quick and requires no coding.
Embedding With Shortcodes
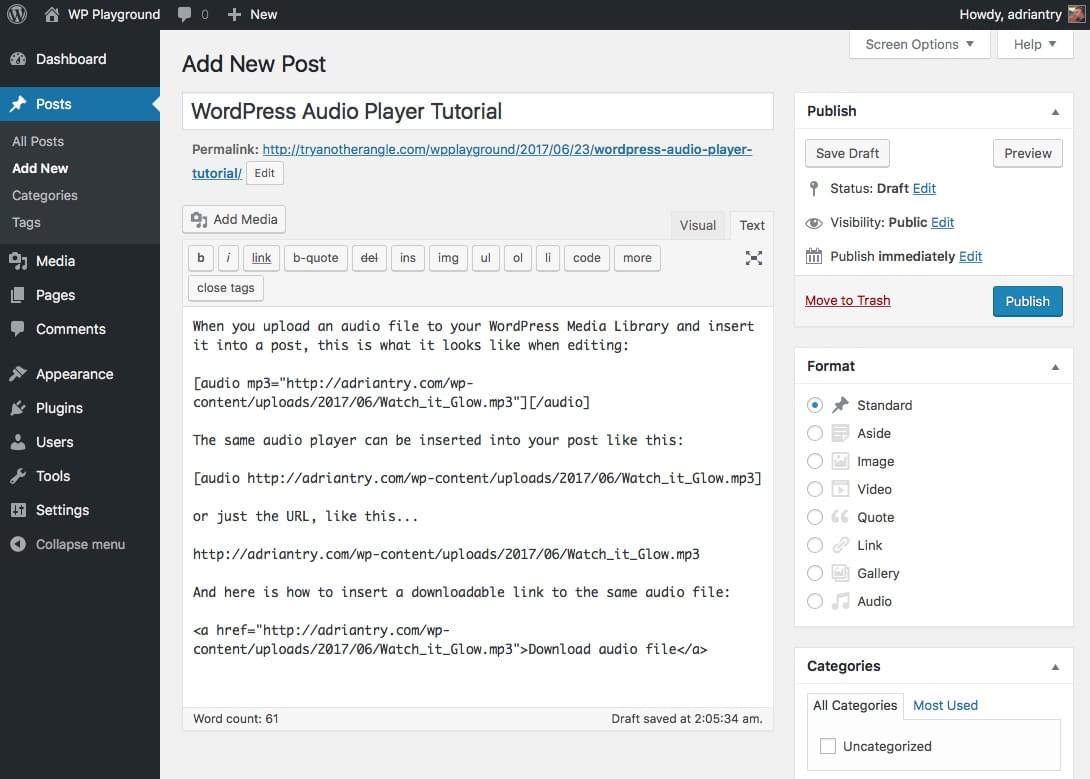
Shortcodes offer a flexible way to add audio anywhere. Use the shortcode URL with your audio file’s URL. This method works in both Block and Classic Editors. It allows you to place audio inside paragraphs or other blocks. Just replace “URL” with the direct link to your audio file. The player appears where you insert the shortcode.
Adding Audio In Classic Editor
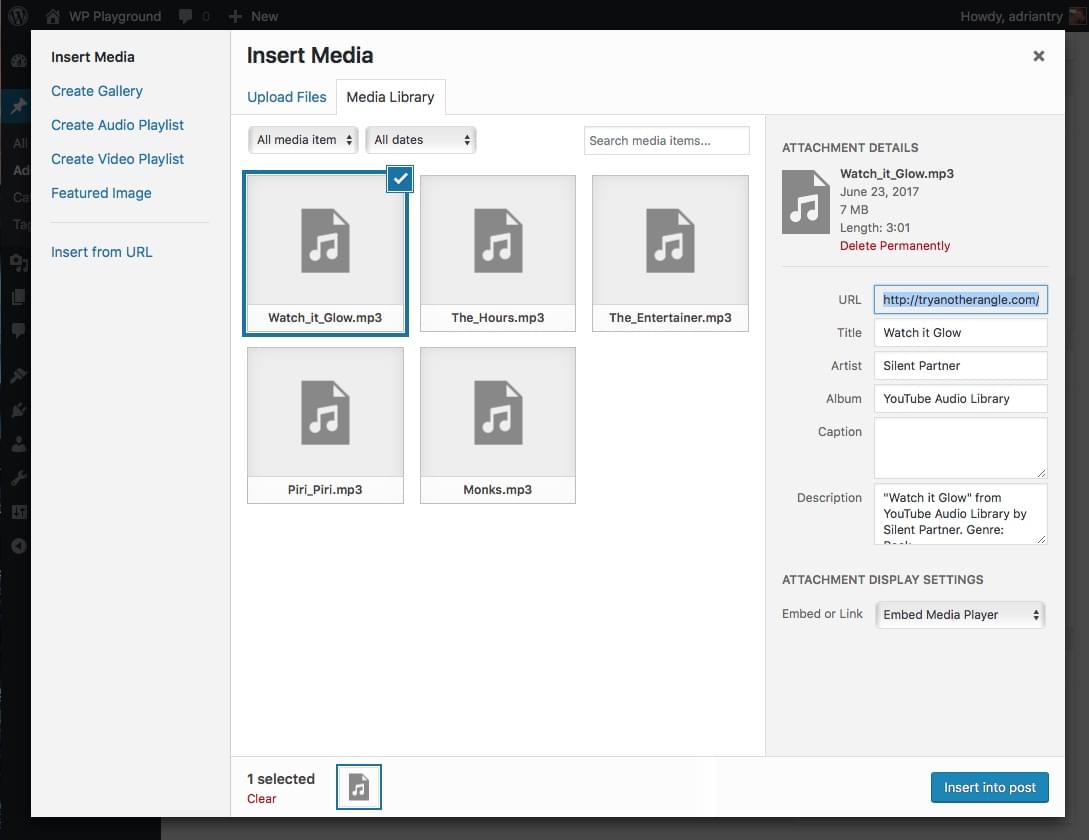
The Classic Editor uses a simple toolbar and text box. Click “Add Media” above the editor. Upload or select your audio file from the media library. Click “Insert into post” to add the audio link. WordPress automatically adds the audio shortcode. You see the player in the editor and on your live page. This method suits users familiar with the old editor style.
Credit: www.sitepoint.com
Customizing The Audio Player
Customizing the audio player in WordPress helps create a better listening experience. You can change how the player looks and works. This makes your site more user-friendly and engaging. Simple tweaks can make a big difference.
Adjusting Player Settings
WordPress offers basic controls for the audio player. You can change the size and colors. Choose a style that matches your website. Adjust volume controls and playback speed. These settings help your visitors enjoy the audio easily.
Adding Captions And Descriptions
Captions explain the audio content to all users. Descriptions give extra details or context. Adding these helps people with hearing difficulties. It also improves SEO by giving search engines more information. Use clear and simple words for captions and descriptions.
Choosing Autoplay And Loop Options
Autoplay starts the audio automatically when the page loads. Loop plays the audio repeatedly until stopped. Use autoplay carefully to avoid annoying visitors. Loop is useful for background music or short clips. These options control how your audio behaves on your site.
Using Plugins For Advanced Audio Features
Adding audio to your WordPress site becomes easier with plugins. Plugins offer more features than the basic audio block. They let you customize players and control how audio works. These tools help you create a better experience for your visitors.
With the right plugin, you can play music, podcasts, or sound effects smoothly. You also get options to organize multiple audio files. This makes your site more interactive and fun to use.
Top Audio Player Plugins
Many plugins exist for adding audio players. Some popular ones include Compact WP Audio Player and AudioIgniter. These plugins let you add stylish players easily. They support MP3 and other common audio formats. You can change colors and sizes to fit your site.
Choose a plugin that matches your needs and budget. Most offer free versions with essential features. Premium versions provide more controls and design options.
Integrating Playlists
Playlists help group several audio tracks together. Plugins allow you to create playlists users can click through. This is great for podcasts or music albums.
You can add titles and descriptions for each track. Some plugins also show images or album art. Visitors enjoy listening without leaving your site.
Adding Download Buttons
Offering downloads lets visitors save audio files. Many audio plugins include download button features. You can place the button near the player or playlist.
This is useful for podcasts or educational content. Visitors can listen offline on any device. Make sure to keep file sizes reasonable for quick downloads.
Troubleshooting Common Issues
Adding audio files to WordPress is easy, but sometimes problems occur. This section helps you fix common issues fast. You will learn how to solve audio playback troubles, upload errors, and compatibility problems.
Audio Not Playing
Check if the audio file format is supported by WordPress. Use MP3 or WAV for best results. Clear your browser cache and reload the page. Try a different browser to see if the problem continues. Make sure your internet connection is stable. Disable any browser extensions that might block audio playback.
File Upload Errors
Large audio files may cause upload errors. Check your WordPress file size limit in media settings. Use an FTP client to upload big files directly to your server. Rename the file with simple characters and no spaces. Ensure your internet connection does not drop during upload. Update WordPress and plugins to avoid compatibility issues.
Compatibility Problems
Some audio players do not work well with all themes or plugins. Test your audio on a default WordPress theme like Twenty Twenty-Three. Deactivate plugins one by one to find conflicts. Use the built-in WordPress audio block for best compatibility. Update your browser to the latest version. Choose widely supported audio formats for fewer issues.
Credit: www.sitepoint.com
Frequently Asked Questions
How Do I Upload An Audio File To WordPress?
To upload audio, go to your WordPress dashboard, click “Media,” then “Add New. ” Select your audio file and upload it. You can then insert the audio into posts or pages using the block editor’s audio block.
What Audio Formats Does WordPress Support?
WordPress supports common audio formats like MP3, WAV, OGG, and M4A. Using MP3 is recommended for best compatibility across browsers and devices. Always check your file format before uploading to ensure smooth playback.
Can I Embed Audio From External Sources In WordPress?
Yes, WordPress allows embedding audio from platforms like SoundCloud and Spotify. Simply paste the audio URL into the post editor, and WordPress will automatically generate the embedded player. This saves storage and improves site performance.
How Do I Add An Audio Player To My WordPress Site?
Use the WordPress audio block to add a built-in audio player. After uploading your file, insert the audio block in your post or page. The player provides playback controls for visitors to listen directly on your site.
Conclusion
Adding an audio file to WordPress is simple and quick. You can share music, podcasts, or sounds with your visitors easily. Just follow the steps and use the tools available in WordPress. This makes your website more interesting and interactive.
Practice a few times to get comfortable with the process. Your visitors will enjoy listening to your audio content. Keep your files small for faster loading. Now, you can enhance your site with sound without any trouble.


