
Are you ready to take control of your online presence by hosting your domain on Azure? Whether you’re launching a personal website or managing a business site, knowing how to host your domain on Azure can make a huge difference.
Imagine having your site run smoothly, securely, and with the power of Microsoft’s cloud behind it. In this guide, you’ll discover simple, step-by-step instructions that anyone can follow—even if you’re not a tech expert. Keep reading to unlock the secrets to hosting your domain on Azure quickly and confidently.
Your website deserves the best foundation, and this article will show you exactly how to build it.

Credit: www.youtube.com
Choosing The Right Azure Service
Choosing the right Azure service is key to hosting your domain effectively. Each service offers different features. Picking the one that fits your needs saves time and cost. Understanding these options helps you make the best choice.
Azure App Service
Azure App Service is perfect for web apps and APIs. It handles hosting, scaling, and patching automatically. Developers focus on code, not infrastructure. It supports multiple languages like .NET, Node.js, and Python. App Service includes built-in security and custom domain support. This option suits dynamic websites and applications.
Azure Virtual Machines
Azure Virtual Machines offer full control over your server. You can install any software and configure settings freely. This service works well for complex or custom environments. It requires more management but provides flexibility. Ideal for applications needing specific configurations or legacy software.
Azure Blob Storage For Static Sites
Azure Blob Storage hosts static websites with ease. Store HTML, CSS, and JavaScript files directly in storage. It serves content fast and securely. This service is cost-effective for simple, static sites. No server management needed. Great for portfolios, landing pages, or small business sites.
Registering A Domain Name
Registering a domain name is the first step to host your website on Azure. It gives your site a unique address on the internet. Choosing the right domain makes your site easy to find and remember.
This process involves picking a domain registrar, buying the domain, and setting it up properly. Each step helps secure your online presence and connects your domain to Azure hosting.
Selecting A Domain Registrar
A domain registrar sells domain names and manages them. Choose a registrar that is reliable and well-known. Check if they offer good customer support and easy domain management tools. Prices and renewal fees can vary, so compare before buying.
Purchasing Your Domain
Search for your desired domain name on the registrar’s website. Make sure it is available and easy to spell. Complete the purchase by providing your contact details and payment. Keep your registration information accurate to avoid future issues.
Configuring Domain Settings
After buying, configure your domain’s DNS settings. Point your domain to Azure by updating the name servers or DNS records. This step connects your domain name to your Azure web app. Verify the changes have propagated before launching your site.
Setting Up Dns In Azure
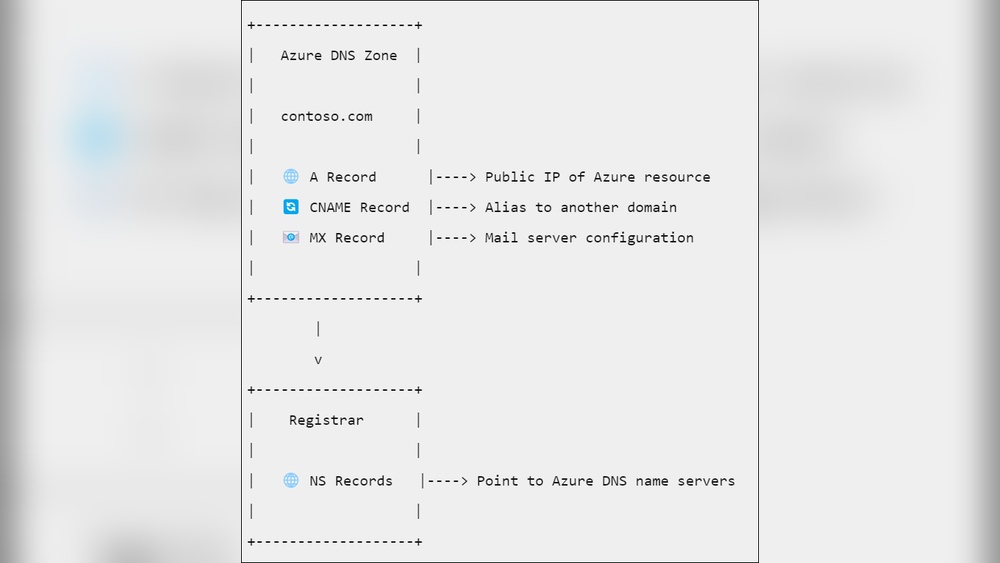
Setting up DNS in Azure is an important step to host your domain properly. DNS controls how users find your website online. Azure DNS offers a reliable and fast way to manage your domain’s DNS settings. This section covers how to create a DNS zone, add DNS records, and configure name servers.
Creating A Dns Zone
A DNS zone holds all the DNS records for your domain. Start by logging into the Azure portal. Search for “DNS zones” and select it. Click “Create” to add a new DNS zone. Enter your domain name exactly as it is registered. Choose your subscription and resource group. Click “Review + create” then “Create.” Your DNS zone is now ready to use.
Adding Dns Records
DNS records tell the internet where to find your website and other services. In your DNS zone, click “Add record set.” Choose the record type, such as A, CNAME, or MX. Enter the name and value for the record. For example, an A record points your domain to an IP address. Set the TTL (time to live) to control how long the record is cached. Save your record. Repeat for all needed DNS entries.
Configuring Name Servers
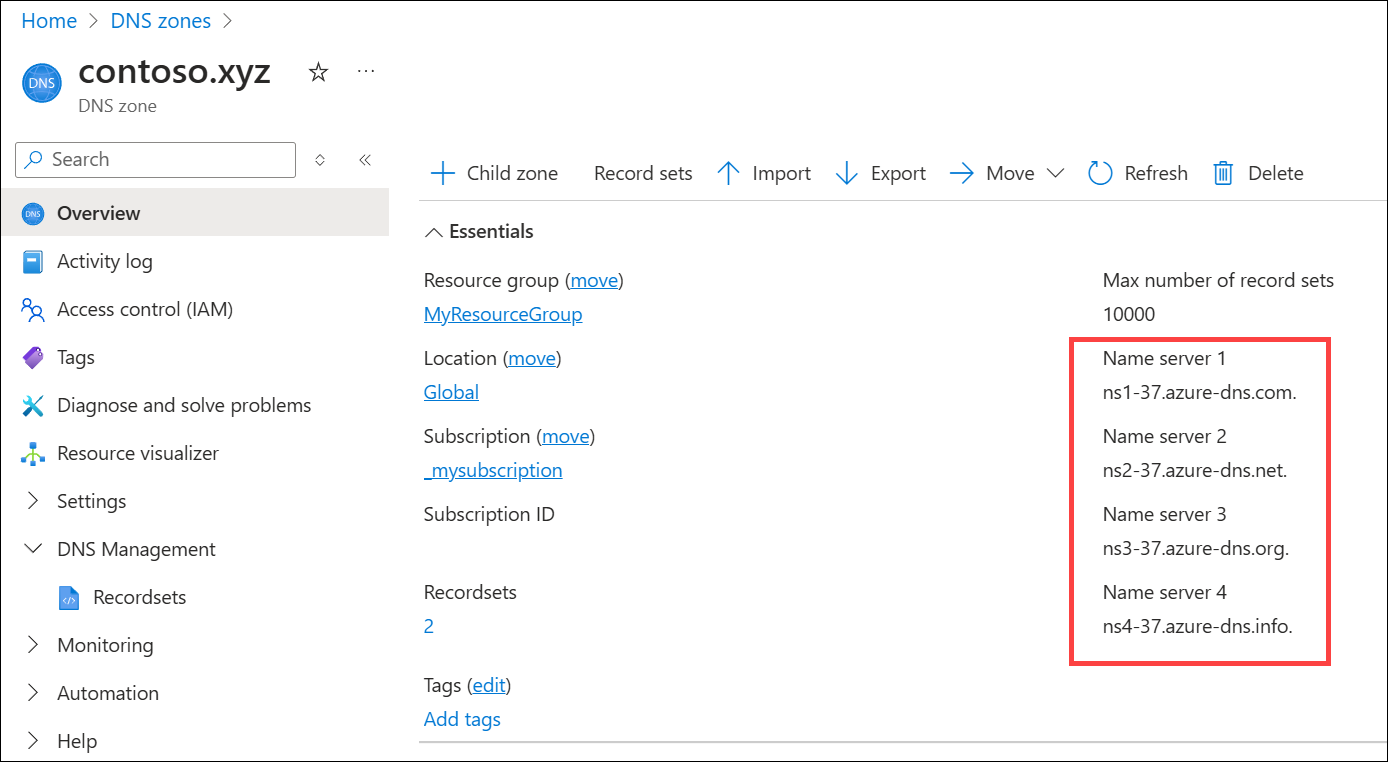
Name servers direct internet traffic to your DNS zone. Azure provides default name servers when you create the DNS zone. Copy these name servers from the Azure portal. Go to your domain registrar’s website. Find the option to change name servers. Replace the old name servers with the Azure ones. Save the changes. It may take some time for these changes to apply worldwide.
Deploying Your Website
Deploying your website on Azure is the next step after setting up your domain. This process moves your site files to the cloud. It makes your website live and accessible online. Azure offers several ways to deploy your site easily. Choose the one that fits your needs and skills.
Preparing Your Website Files
Start by organizing your website files. Include all HTML, CSS, JavaScript, and image files. Check that your homepage is named correctly, usually index.html. Compress your files into a ZIP folder for faster upload. Ensure all links and resources work locally before deploying.
Using Azure Portal For Deployment
Log in to the Azure Portal with your account. Navigate to your web app service. Use the Deployment Center to upload your ZIP file directly. Azure extracts and places files in the right folder automatically. This method is simple and good for beginners. Check your website URL to see the live site.
Deploying With Azure Cli
Azure CLI is a command-line tool for deployment. Open your terminal or command prompt. Use the command az webapp up --name YourAppName --resource-group YourResourceGroup. This uploads your local files to Azure quickly. It suits users comfortable with commands. After deployment, visit your site to confirm everything works.
Configuring Custom Domain In Azure
Configuring a custom domain in Azure lets you use your own website name instead of a default Azure address. This step makes your site look professional and easy to remember. It also helps visitors find your site quickly. Setting up a custom domain involves linking your domain, proving you own it, and securing it with SSL.
Linking Domain To Azure Service
First, connect your domain to the Azure service hosting your website. Log in to the Azure portal and go to your app or service settings. Find the option for Custom Domains. Enter your domain name and follow the instructions to update your domain’s DNS records. This usually involves adding an A record or CNAME to point to Azure.
Verifying Domain Ownership
Azure needs to confirm you own the domain. Verification stops others from using your domain by mistake. You will add a TXT or CNAME record to your domain’s DNS settings. This record contains a unique value Azure gives you. Once added, Azure checks this record to confirm ownership. Verification can take a few minutes to hours.
Enabling Ssl For Security
SSL encrypts data between your visitors and your site. This keeps information safe and builds trust. Azure offers free SSL certificates for custom domains. Enable SSL in your Azure portal under TLS/SSL settings. Bind the SSL certificate to your custom domain. After activation, your site will use HTTPS for secure browsing.

Credit: www.youtube.com
Managing And Monitoring Your Domain
Managing and monitoring your domain on Azure ensures smooth operation and quick issue resolution. Proper management helps maintain uptime and performance. Monitoring keeps track of your domain’s health and alerts you to problems early.
Using Azure tools makes managing your domain easier. You can set alerts, scale resources, and troubleshoot issues fast. These steps help keep your domain reliable and responsive.
Setting Up Alerts And Notifications
Azure lets you create alerts for important events. These alerts notify you about downtime or unusual activity. Set notifications for CPU use, memory, or network traffic. Alerts help catch problems before they affect users. You can receive alerts by email, SMS, or push notifications.
Scaling Resources
Azure allows easy scaling of your domain’s resources. Increase or decrease server power based on traffic. Scaling prevents slowdowns during high visits. You can set automatic scaling to adjust resources. This saves money and keeps your site fast.
Troubleshooting Common Issues
Some issues may arise while hosting your domain. Check Azure’s diagnostic logs for errors. Restart services if your domain is not responding. Clear cache and verify DNS settings for connectivity problems. Use Azure support tools to find and fix issues quickly.
Credit: learn.microsoft.com
Frequently Asked Questions
How Do I Host A Domain On Azure?
To host a domain on Azure, first buy or transfer your domain. Then, create a DNS zone in Azure. Finally, configure DNS records to point to your Azure web app or service.
Can I Use A Custom Domain With Azure Web Apps?
Yes, Azure Web Apps support custom domains. You need to verify domain ownership and configure CNAME or A records in your DNS settings to link your domain.
What Dns Records Are Needed For Azure Domain Hosting?
You typically need A records or CNAME records. A records point your domain to an IP address. CNAME records map your domain to Azure services like web apps.
Is Azure Domain Hosting Secure And Reliable?
Yes, Azure offers high security and reliability. It provides SSL certificates and DDoS protection. Azure’s global network ensures fast and stable domain hosting services.
Conclusion
Hosting a domain on Azure is simple and cost-effective. You can control your website easily with Azure’s tools. Follow the steps carefully for smooth setup. Keep your domain secure and updated regularly. Azure offers good support for beginners and experts alike.
Start your hosting journey with confidence today. Your online presence is ready to grow.


