
Are you ready to get your website online quickly and easily? Hosting your domain on Namecheap is a smart choice that puts you in control without any hassle.
Whether you’re starting a blog, launching a business, or just want your own space on the web, this guide will show you exactly how to host your domain step-by-step. By the end, you’ll feel confident managing your domain and making your website accessible to the world.
Let’s dive in and make your online presence happen!
Choosing The Right Domain
Choosing the right domain is a key step in hosting your website on Namecheap. Your domain name represents your brand and influences how visitors see your site. It affects your online presence and search engine ranking. Picking the right domain can make your site easier to find and remember.
Domain Extensions And Their Uses
Domain extensions are the letters after the dot in your domain name. Common ones include .com, .net, and .org. Each extension has a different purpose. For example, .com is ideal for commercial businesses. .org suits non-profit groups. .net is often used for internet services. New extensions like .shop or .blog help define your site’s focus. Choose an extension that fits your website’s goal. It helps visitors understand what your site is about.
Tips For Selecting A Memorable Domain
Keep your domain short and simple. Short names are easier to remember and type. Avoid numbers and hyphens as they confuse users. Use keywords related to your business or topic. Keywords improve your site’s ranking on search engines. Make the domain unique to stand out from competitors. Check if the name sounds good when spoken aloud. Test it with friends for feedback. Ensure the domain is easy to spell and pronounce. This helps visitors find your site quickly.
Creating A Namecheap Account
Creating a Namecheap account is the first step to hosting your domain. It is simple and quick. This account will let you manage your domains and services easily.
Follow the instructions below to sign up and verify your email. This will ensure a smooth start with Namecheap.
Signing Up For Namecheap
Go to the Namecheap homepage. Find the “Sign Up” button at the top right corner. Click on it to open the registration form.
Enter your username, password, and email address. Choose a strong password for security. Confirm the password by typing it again.
Read the terms of service and privacy policy. Tick the box to agree. Click “Create Account” to finish signing up.
Verifying Your Email Address
After registration, Namecheap sends a verification email. Check your inbox and spam folder for this message.
Open the email and click the verification link inside. This step activates your account fully.
Your account is now ready to use. You can start hosting your domain and managing settings.
Registering Your Domain
Registering your domain is the first step to creating your online presence. It gives your website a unique name that visitors use to find you. Namecheap makes this process simple and fast. Follow the steps below to register your domain with ease.
Searching For Available Domains
Start by entering your desired domain name in the search bar on Namecheap’s homepage. The tool shows if your domain is available or taken. If your first choice is unavailable, try variations or different extensions like .net or .org. Pick a name that is short, clear, and easy to remember.
Completing The Registration Process
Once you find an available domain, add it to your cart. Provide your personal information for ownership details. Choose how many years you want to register the domain. Review your order carefully before payment. Namecheap offers several payment options. After payment, you receive a confirmation email. Your domain is now yours and ready for hosting.
Credit: www.namecheap.com
Accessing Domain Management
Accessing domain management is the first step to control your domain settings. This area lets you change DNS records, update contact info, and manage renewals. Understanding how to find and use domain management tools saves time and avoids confusion. Follow these steps to easily access and manage your domain on Namecheap.
Navigating To The Dashboard
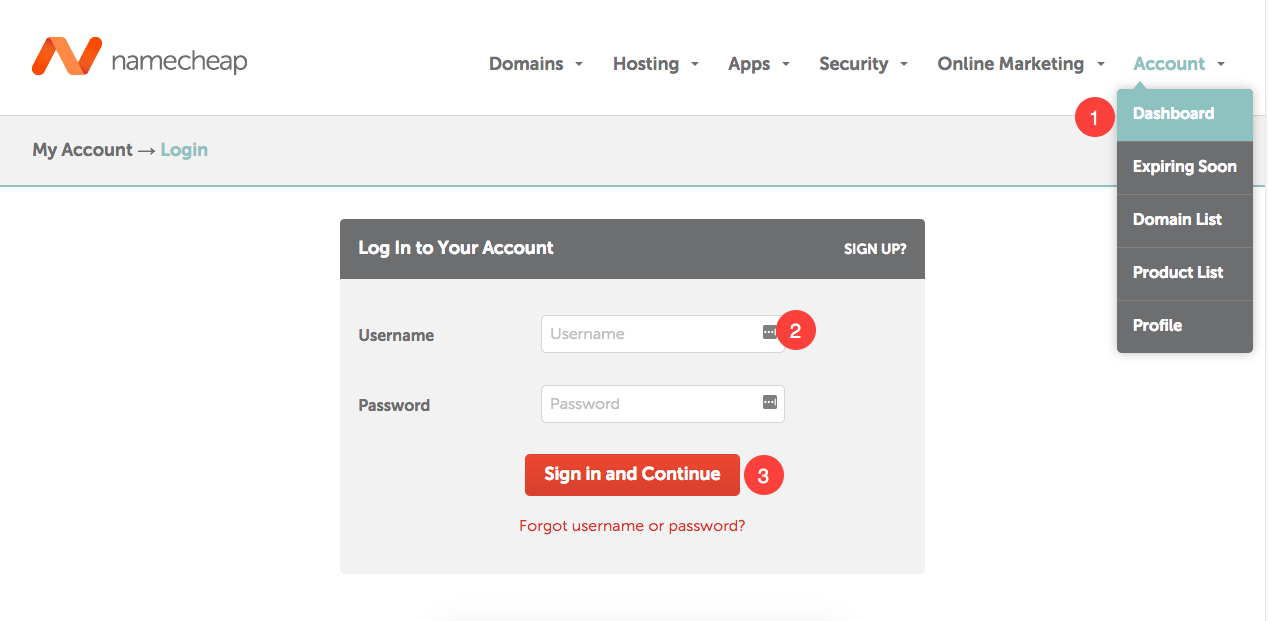
Start by logging into your Namecheap account. The dashboard is the main page you see after login. It shows an overview of your domains, services, and account details. Locate the “Domain List” tab on the left side menu. Click on it to see all your registered domains in one place. This area is your control center for domain management.
Locating Domain Settings
In the “Domain List,” find the domain you want to manage. Click the “Manage” button next to that domain name. This opens the domain settings page. Here, you can access important options like DNS settings, Whois contact info, and domain locking. Each setting is clearly labeled for easy navigation. Make changes carefully to keep your domain secure and functional.
Configuring Dns Settings
Configuring DNS settings is a key step in hosting your domain on Namecheap. These settings control how your domain connects to the internet. Proper DNS setup ensures visitors reach your website and emails arrive correctly.
This process involves managing different types of DNS records. Each record has a specific role in directing traffic. Understanding these records helps you make the right changes easily.
Understanding Dns Records
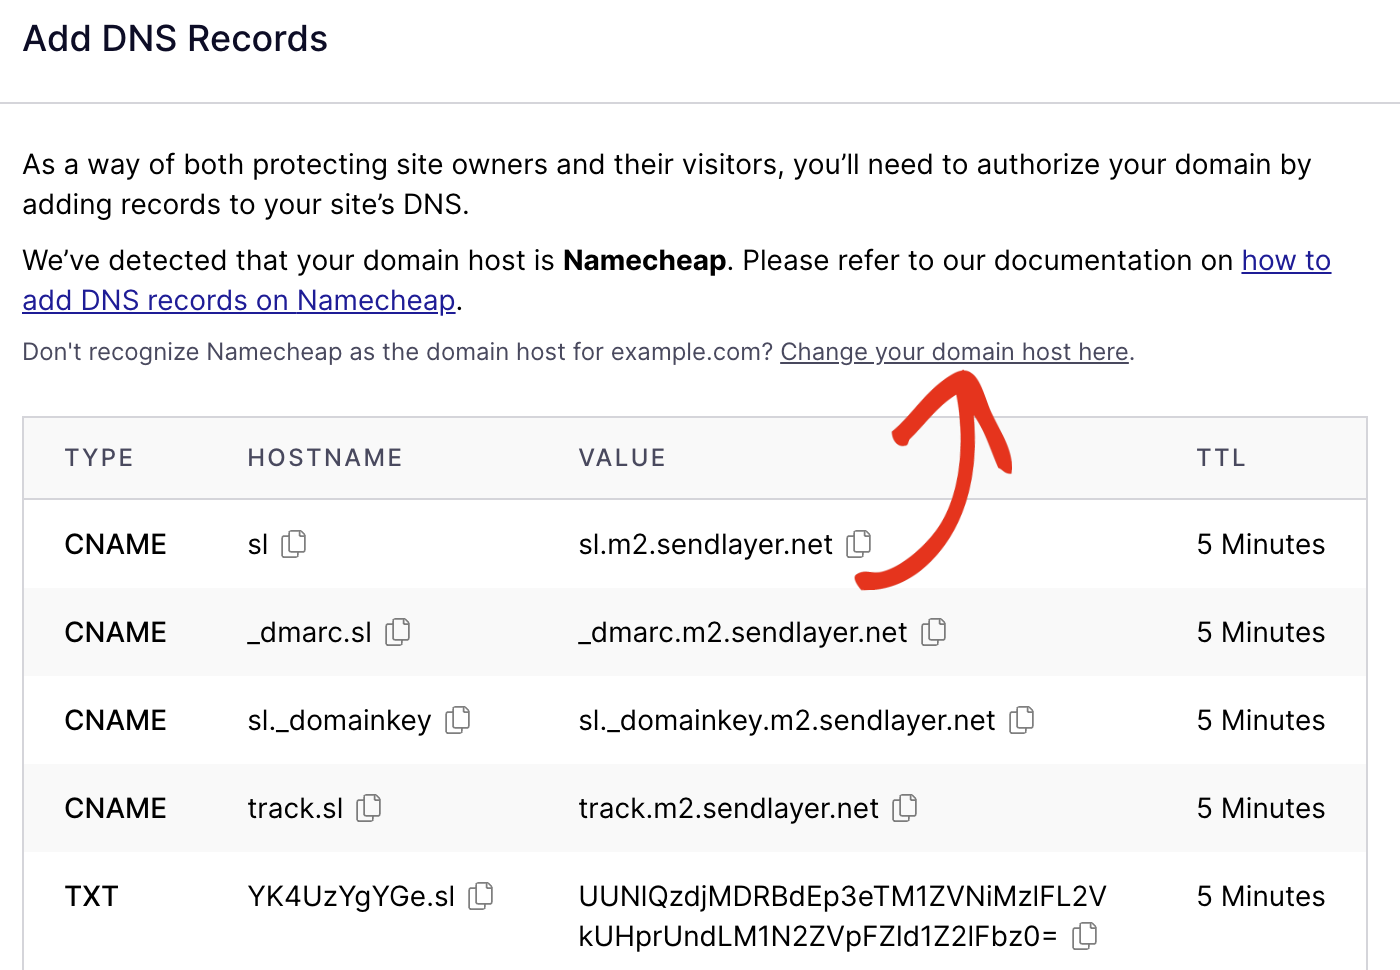
DNS records tell the internet where to find your website and email servers. The most common types are A, CNAME, and MX records. A records point your domain to an IP address. CNAME records link one domain name to another. MX records direct email traffic to your mail server.
Each record has a name, type, value, and sometimes a time-to-live (TTL). TTL tells servers how long to keep the record cached. Correct records prevent website downtime and email issues.
Adding Or Editing A Records
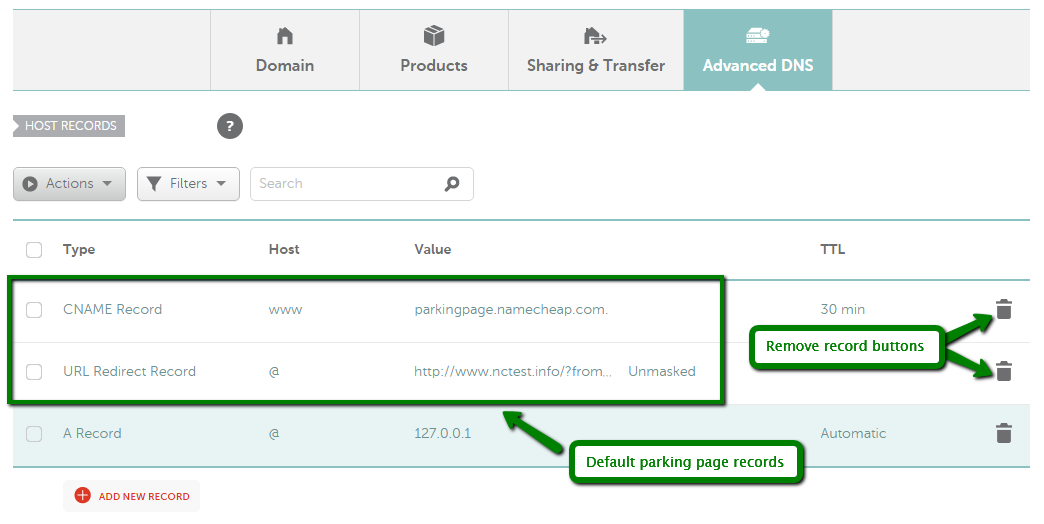
A records connect your domain to your website’s hosting IP address. To add or edit an A record, log in to your Namecheap account. Go to the Domain List and find your domain. Click “Manage,” then select the “Advanced DNS” tab.
Look for the A record section. To add a new record, click “Add New Record” and choose “A Record.” Enter the hostname, usually “@” for the root domain, and the IP address of your hosting server. Save changes.
To edit an existing A record, click the edit icon next to it. Update the IP address and save. Changes may take a few minutes to propagate.
Setting Up Cname And Mx Records
CNAME records create an alias for your domain. For example, you can point “www” to your root domain. In the “Advanced DNS” tab, add a new record and select “CNAME Record.” Enter the alias name and the target domain.
MX records handle your email delivery. To set them, add a new record and choose “MX Record.” Enter the mail server address and priority number. Priority determines which server receives mail first.
Always double-check the values for CNAME and MX records. Incorrect setup can cause email failure or website errors.
Connecting Domain To Hosting
Connecting your domain to hosting is a key step in building your website. This process makes your website accessible online. It links your domain name with the server where your site files are stored.
There are two main ways to connect your domain to hosting on Namecheap. You can use Namecheap’s own hosting services or connect your domain to an external hosting provider. Each method has simple steps to follow.
Using Namecheap Hosting Services
Namecheap offers easy hosting plans that work well with your domain. After buying hosting, log in to your Namecheap account. Go to the “Domain List” and select your domain.
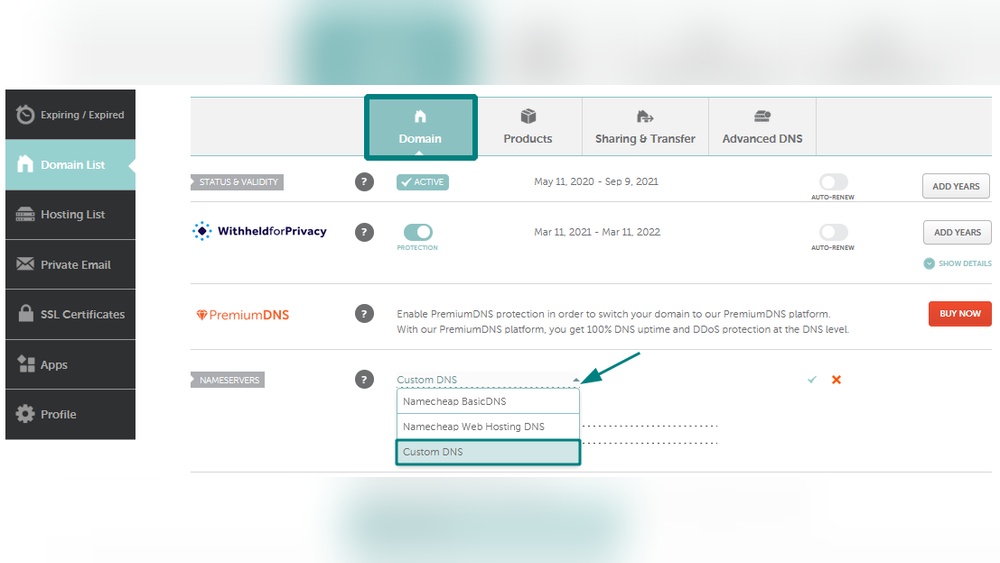
Click on “Manage” and find the “Nameservers” section. Choose “Namecheap Web Hosting DNS” from the dropdown menu. This will link your domain to Namecheap’s hosting servers.
Wait a few minutes for the changes to take effect. Upload your website files using the hosting control panel. Your site will go live once the files are in place and DNS updates finish.
Linking To External Hosting Providers
To connect your domain to a hosting provider outside Namecheap, use custom nameservers. Get the nameserver addresses from your hosting provider. They usually look like ns1.example.com and ns2.example.com.
In your Namecheap account, go to the “Domain List.” Click “Manage” next to your domain. Find the “Nameservers” section and select “Custom DNS.”
Enter the nameserver addresses provided by your hosting company. Save the changes. It may take up to 48 hours for DNS propagation. Your domain will then point to the external hosting server.
Enabling Domain Privacy Protection
Enabling domain privacy protection is a smart step after registering your domain on Namecheap. It keeps your personal details hidden from the public. This adds a layer of security and peace of mind. Privacy protection stops spammers and scammers from accessing your contact information. It also reduces unwanted emails and calls. Namecheap offers WhoisGuard to help you protect your data easily.
Benefits Of Privacy Protection
Privacy protection keeps your name, address, and phone number private. It blocks access to your personal details in the WHOIS database. This reduces spam emails and phone calls. It also helps prevent identity theft and fraud. Protecting your domain information increases your online security. Privacy protection gives you control over who sees your data.
Activating Whoisguard On Namecheap
Log in to your Namecheap account. Go to the Domain List section. Find the domain you want to protect and click Manage. Look for the WhoisGuard option and enable it. Confirm the activation by following the on-screen steps. WhoisGuard will replace your personal data with generic contact details. This keeps your information safe from public view. Activation is quick and usually free for the first year.
Troubleshooting Common Issues
Troubleshooting common issues helps keep your domain running smoothly on Namecheap. Some problems may seem complex but have simple fixes. Understanding these issues saves time and reduces frustration.
Most problems relate to DNS settings or domain configuration. Checking these areas often resolves the issue quickly. Below are common issues and easy ways to fix them.
Dns Propagation Delays
DNS changes take time to spread across the internet. This delay is called DNS propagation. It can take from a few minutes to 48 hours.
During this time, your website or email may not work properly. Patience is key. Avoid making repeated changes to DNS records.
Clear your browser cache and try accessing your site from different devices. You can also use online DNS checkers to see if changes have spread.
Domain Not Resolving Correctly
Your domain may not resolve if DNS records are incorrect or missing. Check the Namecheap dashboard to confirm your DNS settings.
Ensure your domain points to the right nameservers or IP addresses. Double-check for typos or extra spaces in the records.
Sometimes, expired domains cause resolution issues. Make sure your domain registration is active and paid.
Contact Namecheap support if problems persist after verifying your settings.
Renewing And Managing Your Domain
Renewing and managing your domain ensures your website stays online without interruption. Domains expire if not renewed on time, causing your site to go offline. Managing your domain properly saves you from losing it or facing downtime. Namecheap offers simple tools to keep your domain active and secure. Let’s explore how to set up auto-renewal and transfer your domain.
Setting Up Auto-renewal
Auto-renewal keeps your domain active automatically. Namecheap charges your payment method before the expiry date. This avoids forgetting to renew your domain. To enable it, log into your Namecheap account. Go to the Domain List and find your domain. Click the “Manage” button, then look for Auto-Renewal. Turn it on and save changes. Check your payment details to ensure smooth processing.
Transferring Your Domain
Transferring your domain moves it from one registrar to another. You may want to transfer for better control or pricing. To start, unlock your domain in Namecheap’s dashboard. Obtain the authorization code, also called EPP code. Share this code with your new registrar. The transfer may take a few days to complete. Keep your contact details updated to receive transfer notifications.
Credit: help.pixpa.com
Credit: sendlayer.com
Frequently Asked Questions
How Do I Connect My Domain To Namecheap Hosting?
To connect your domain, update your domain’s nameservers to Namecheap’s hosting nameservers. This links your domain to your hosting account for website access.
Can I Transfer My Domain To Namecheap Hosting?
Yes, you can transfer domains to Namecheap by unlocking your domain and obtaining an authorization code. Then initiate transfer in Namecheap dashboard.
How Long Does Domain Hosting Setup Take On Namecheap?
Domain hosting setup on Namecheap usually takes a few minutes to a couple of hours. DNS propagation can take up to 48 hours.
What Are The Costs Of Hosting A Domain On Namecheap?
Namecheap offers affordable hosting plans starting at a few dollars monthly. Domain registration and hosting are billed separately.
Conclusion
Hosting your domain on Namecheap is simple and fast. You just need to follow clear steps. Setting up your domain helps your website go live. Namecheap offers reliable service and easy tools. Stay patient while changes take effect online. Your site will be ready to reach visitors soon.
Keep learning about hosting to improve your skills. Start now and watch your website grow steadily.


