
Are you thinking about switching your domain from Bluehost to Namecheap? You’re not alone.
Many people find themselves wanting to move their domains for better pricing, enhanced features, or a more user-friendly experience. Whatever your reason, transferring your domain can seem daunting at first. But don’t worry—you’ve come to the right place. In this guide, you’ll discover step-by-step instructions designed to make the process as smooth as possible.
Imagine the freedom of having your domain managed by a service that truly meets your needs. With our help, you’ll be able to navigate the transfer with confidence and ease. So, let’s get started and unlock the potential of your domain management. Keep reading to learn how you can make this transition seamlessly and efficiently.

Credit: www.youtube.com
Preparation Steps
Start by unlocking your domain from Bluehost. Next, find the authorization code in Bluehost’s domain settings. Finally, initiate the transfer on Namecheap using the code.
Transferring a domain from Bluehost to Namecheap might seem daunting, but with the right preparation steps, you’ll be on your way in no time. Before diving into the actual transfer, it’s crucial to ensure you’re fully prepared. Taking these preliminary steps will save you time and avoid potential hiccups.Check Domain Eligibility
The first step is to verify if your domain is eligible for transfer. Domains need to be at least 60 days old before they can be transferred. Is your domain older than that? Make sure it’s not locked for transfer, a common security feature that prevents unauthorized domain movement. You can check the status in your Bluehost dashboard under domain settings. Unlock it if necessary, and make sure your domain is not set to expire soon. Having ample time before expiration ensures a smooth transition.Gather Necessary Information
Start by collecting all relevant details about your domain. You’ll need your current account information from Bluehost, including your domain’s EPP code. The EPP code acts like a security key and is crucial for the transfer. Without it, Namecheap won’t be able to process your request. Also, make sure your contact information is up-to-date. If you’ve ever changed your email or phone number, verify these details to ensure you receive all communications promptly. Preparation is half the battle. Are you ready to take your domain to Namecheap?Unlocking Domain At Bluehost
Transferring your domain from Bluehost to Namecheap involves unlocking the domain and obtaining the EPP code. Follow the steps in your Bluehost account to initiate the transfer process. Ensure your domain is eligible and not within 60 days of registration or previous transfer.
Unlocking your domain at Bluehost is a crucial step in transferring it to Namecheap. If you’ve ever felt the thrill of moving your digital assets, you know how satisfying it can be to gain control and flexibility. Whether you’re looking to streamline your online presence or simply find better features, unlocking your domain is the first action you need to take.Access Domain Management
To get started, log into your Bluehost account. Navigate to the “Domains” tab, where you’ll find a list of all your registered domains. Click on the domain you wish to transfer to access its management settings. This area is your control center, where you can adjust various features related to your domain. Spend a moment exploring these options, as understanding this interface will serve you well during the transfer process.Remove Domain Lock
Domain lock is a security feature that prevents unauthorized transfers. You’ll need to disable this lock to proceed with your transfer. In the domain management settings, locate the “Lock” option. Clicking here will present you with the choice to remove the lock. Once unlocked, your domain is ready for transfer. Did you know that unlocking your domain also gives you the freedom to update DNS settings? This step not only facilitates the transfer but opens doors for other customizations. Have you ever faced challenges during a domain transfer? Share your experiences and tips in the comments below. Your insights could help others navigate the domain transfer maze with ease!Getting Authorization Code
Obtaining the authorization code is essential for transferring your domain from Bluehost to Namecheap. Access your Bluehost account and navigate to the domain settings. Look for the transfer section and request your unique code. This code is necessary to complete the transfer process smoothly.
Transferring a domain from Bluehost to Namecheap might sound daunting, but it’s actually a straightforward process once you know the steps. One crucial part of this process is obtaining the authorization code. This code, often referred to as an EPP code, is essential for verifying that you have the right to transfer your domain. Think of it as a key that unlocks the door to a successful domain transfer.Locate Transfer Code
To find your authorization code, start by logging into your Bluehost account. Navigate to the “Domains” tab, which you can find at the top of your dashboard. Once there, you’ll see a list of all your domains. Click on the domain you wish to transfer to Namecheap. Look for an option that says “Transfer EPP” or something similar. This is where you’ll find your authorization code. If you’re anything like me, you might have spent more time than you’d care to admit clicking around looking for this code. But don’t worry, it’s there, and it’s your ticket to a smooth transfer.Save Transfer Code Securely
Once you’ve found your authorization code, it’s vital to save it securely. You could jot it down in a physical notebook or save it in a password manager. Avoid saving it in plain text on your computer or phone where it might be easily accessed. This code is like a sensitive password, and you wouldn’t want it falling into the wrong hands. Consider this: If someone else gets hold of your authorization code, they could potentially transfer your domain without your consent. It’s not just a sequence of numbers and letters—it’s the guardian of your domain’s security.Have you ever realized how a tiny code can hold so much power over your digital assets? It’s fascinating, yet humbling. As you prepare to transfer your domain, remember that careful management of your authorization code is key to a successful transition. Are you ready to take control and ensure your domain moves safely?
Initiating Transfer At Namecheap
Start the domain transfer from Bluehost to Namecheap by unlocking your domain and obtaining the EPP code. Enter this code on Namecheap’s transfer page to initiate the process. Ensure your domain is not within 60 days of registration or a previous transfer.
Transferring a domain from Bluehost to Namecheap can seem daunting at first, but breaking it down into simple steps makes it manageable. By initiating the transfer at Namecheap, you’re taking a crucial step in ensuring your domain is under a more flexible and affordable registrar. If you’ve ever felt overwhelmed by the technicalities of domain transfers, rest assured that Namecheap simplifies this process significantly. A few clicks and some basic information are all you need to get started. ###Log Into Namecheap Account
First things first, log into your Namecheap account. If you don’t have one, setting it up is straightforward and only takes a few minutes. Have you ever tried juggling multiple passwords and user IDs? Keeping them organized is key. Once logged in, navigate to the dashboard. You’ll find a clear interface that makes managing domains a breeze. If you’ve transferred domains before, you’ll appreciate Namecheap’s intuitive design. ###Enter Domain And Authorization Code
Next, enter the domain you wish to transfer. This is where you need to be precise; a typo here could lead to unnecessary delays. After inputting the domain, you’ll be prompted to enter the authorization code. The authorization code, also known as the EPP code, is essential. Think of it as the key to unlock your domain. You can obtain this from your Bluehost account under the domain management section. Have you ever misplaced a key? Ensure you have this code ready to avoid any hiccups. After entering the code, double-check everything. Accuracy at this stage saves you from future headaches. Once confirmed, proceed with the transfer initiation. Remember, patience is a virtue. Domain transfers aren’t instantaneous and might take a few days. Meanwhile, keep an eye on your email for any updates from Namecheap. Your domain will soon find its new home!Confirming Transfer Process
Transferring a domain from Bluehost to Namecheap involves a few simple steps. Unlock your domain on Bluehost, then obtain the authorization code. Initiate the transfer on Namecheap using the code to finalize the process.
Transferring your domain from Bluehost to Namecheap involves several steps, but one crucial phase is confirming the transfer process. This is where you ensure everything is moving in the right direction and avoid any potential hiccups. Imagine you’ve packed your bags for a trip but haven’t checked if your flight is confirmed. It’s the same with domain transfers. You need to verify that your domain is indeed on its way to its new home. How do you do that? Let’s dive into the essential steps to ensure your domain transfer is seamless.Approve Transfer Via Email
Once you initiate the transfer, keep an eye on your inbox. You’ll receive an email from Bluehost asking you to approve the transfer. It’s like getting a confirmation email for a concert ticket you’ve been waiting for. Without this approval, your domain won’t be able to move. Be prompt; emails can sometimes end up in the spam folder, so check there if you don’t see it immediately. Click on the link provided in the email to approve the transfer. This step is essential for keeping the process moving. Imagine missing out on an exclusive event because you forgot to confirm your RSVP. Don’t let your domain transfer stall; click that approval link as soon as you can.Monitor Transfer Status
After you’ve approved the transfer, it’s time to monitor its status. Namecheap provides a dashboard where you can track the progress. Think of it as checking your food delivery app to see how far your order is. This dashboard will show you each stage of the transfer, from initiation to completion. Keep checking the status regularly. It’s important to know if there’s a delay or if additional action is needed. You don’t want your domain hanging in limbo. Have you ever waited for a package that seemed to take forever? Monitoring the status ensures you know exactly what’s happening and can act swiftly if issues arise. Ask yourself, how can you make this process as smooth as possible? By staying on top of these steps, you can ensure your domain transfer is both efficient and stress-free.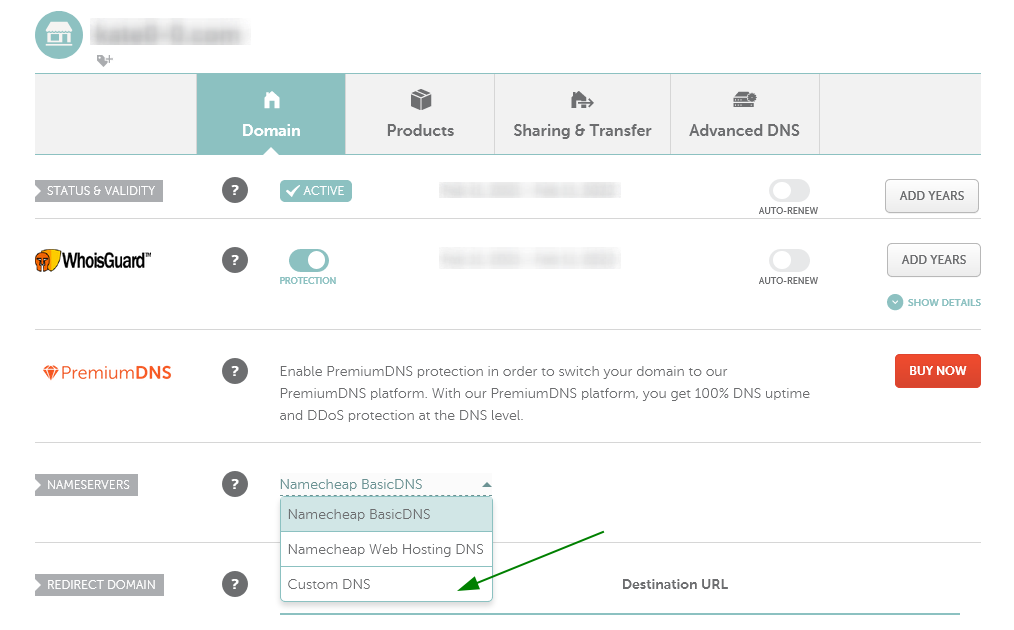
Credit: www.namecheap.com
Post-transfer Actions
After transferring your domain from Bluehost to Namecheap, update your DNS settings. Ensure your website points to the correct servers. Verify that all services, like email, continue to function smoothly.
After transferring your domain from Bluehost to Namecheap, a few steps remain. These post-transfer actions ensure your domain functions correctly. They also help in maintaining your website’s performance.Verify Domain Settings
First, check your domain settings in your Namecheap account. This ensures everything is correctly configured. Look for any errors or discrepancies. Check the registrar lock status. Make sure it’s set according to your preference. Verify contact details for accuracy. Incorrect details may cause communication issues. Confirm the domain’s expiration date. Ensure it’s within your expected timeline.Update Dns Records
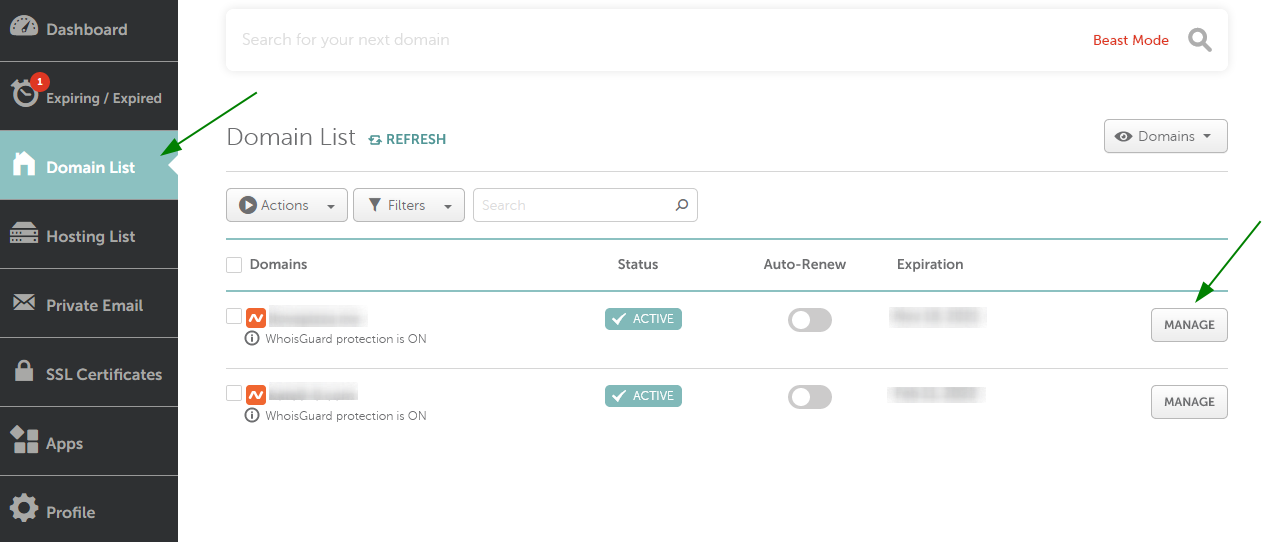
Next, update your DNS records. This step is crucial for your site’s accessibility. Log in to your Namecheap account. Go to the domain list. Select your transferred domain. Find the DNS settings section. Update records to match your hosting requirements. This includes A records, CNAME, and MX records. Each record type serves a specific purpose. Ensure their settings align with your hosting provider. Changes may take time to propagate. Be patient as they update globally.Troubleshooting Common Issues
Transferring a domain from Bluehost to Namecheap can sometimes present challenges. These common issues can often be resolved with simple solutions. Knowing how to troubleshoot these problems is essential for a smooth transfer.
Resolving Transfer Delays
Transfer delays usually occur due to pending verification. Ensure all your contact details are accurate. Check your email for verification requests from Bluehost and Namecheap. Respond promptly to avoid unnecessary delays.
Another reason for delays can be the domain’s lock status. Domains must be unlocked for transfer. Log into your Bluehost account and navigate to the domain settings. Disable any lock features that might be active.
Addressing Authorization Problems
Authorization issues often stem from incorrect EPP codes. This code is required for domain transfer. Retrieve it from your Bluehost account and ensure it matches the code entered on Namecheap.
Double-check your EPP code to prevent any errors. If the code is still rejected, contact Bluehost support. They can verify and provide the correct code.
Permissions can also affect authorization. Confirm you have administrative rights to transfer the domain. Without these rights, authorization issues will persist.
Credit: www.namecheap.com
Frequently Asked Questions
Can I Transfer My Domain From Bluehost?
Yes, you can transfer your domain from Bluehost. Unlock your domain and obtain the EPP code. Initiate the transfer with your new registrar. Follow their instructions to complete the process. Ensure your domain is eligible for transfer, usually after 60 days of registration or transfer.
How Do I Transfer The Domain To Namecheap?
Start by unlocking your domain at the current registrar. Obtain the authorization code. Initiate the transfer on Namecheap by entering the domain and code. Confirm the transfer via email. Wait for completion.
Can I Move My Domain From One Hosting Service To Another?
Yes, you can move your domain to another hosting service. Update the DNS settings to point to the new host. Ensure your domain is unlocked and obtain the authorization code. Initiate the transfer with your new hosting provider. The process usually takes a few days to complete.
How Long Does It Take To Transfer A Domain To Namecheap?
Domain transfer to Namecheap takes 30 minutes to 6 days. Ensure domain is unlocked and correct authorization code is provided. Transfer speed varies depending on registrar and domain settings. Monitor progress through your Namecheap account for updates.
Conclusion
Transferring a domain from Bluehost to Namecheap is straightforward. Follow the steps carefully for a smooth process. First, unlock your domain in Bluehost. Then, get the EPP code. Next, initiate the transfer on Namecheap. Enter your EPP code when prompted.
Finally, confirm the transfer via email. Your domain should transfer within days. Remember to check your email for updates. Ensure all information is accurate before starting. This will help avoid delays. With patience and attention, you’ll succeed. Enjoy managing your domain at Namecheap!


