
Are you looking to transfer your domain from Namecheap to Bluehost? You’ve come to the right place.
Moving a domain can seem overwhelming, but it doesn’t have to be. Imagine the peace of mind you’ll have once your domain is securely transferred, allowing you to focus on building your brand and expanding your online presence. This guide is designed to walk you through each step, ensuring a smooth transition without any hiccups.
You don’t need to be a tech wizard to complete this task; with clear instructions and a bit of patience, you’ll be on your way to successfully transferring your domain. Dive in to discover how easy it can be and unlock the potential of your new hosting environment.
Prepare For Transfer
Transferring your domain from Namecheap to Bluehost requires careful preparation. This process ensures a smooth transition without any hiccups. Let’s dive into the steps you need to take to prepare your domain for transfer.
Unlock Domain
First, you need to unlock your domain. Log into your Namecheap account. Navigate to the domain list. Find the domain you want to transfer. Click on “Manage.” Look for the “Domain Lock” option. Set it to “Off.” This allows the domain to be transferred. An unlocked domain is essential for the transfer process.
Disable Domain Privacy
Next, disable domain privacy. This is crucial for the transfer. Domain privacy hides your contact details. Go to the domain management page. Look for “Domain Privacy” settings. Turn it off. Make sure your email address is visible. Bluehost needs to contact you during the transfer. Visible contact details ensure successful communication.

Credit: www.youtube.com
Get Transfer Code
Easily transfer your domain from Namecheap to Bluehost by obtaining the transfer code. Navigate to Namecheap’s dashboard to request it. Once received, input the code on Bluehost to complete the transfer process smoothly.
Transferring your domain from Namecheap to Bluehost is a straightforward process, but it starts with obtaining a transfer code. This code is crucial as it ensures that the transfer is secure and authorized by you. Imagine this code as the key to unlock your domain’s potential on a new platform. Let’s dive into how you can get your transfer code from Namecheap effortlessly. ###Access Namecheap Account
First, log into your Namecheap account. You might want to do this on a computer for ease of navigation. Once logged in, head over to the “Dashboard” section. This is where all your domain information resides. Find the domain you wish to transfer and click on it. You should see detailed information about your domain. ###Request Authorization Code
In the domain settings, look for the option labeled “Manage.” Clicking this will reveal more options. Scroll down until you find “Transfer Out.” This section will guide you to request your authorization code. Click on “Request Auth Code” and Namecheap will send this code to your registered email. While waiting for the email, think about why you’re transferring your domain. Is it for better hosting services or improved website performance? Knowing your reasons can help you make informed choices in the future. Once you receive the email, copy the code carefully. This is your ticket to initiating the transfer to Bluehost. Have you ever felt nervous about transferring domains? I did, but with the right steps, it’s just another task in your website journey. Remember, getting your transfer code is a pivotal step towards greater website management and better hosting solutions. What’s your next move? Are you ready to take control of your website’s future?Initiate Transfer At Bluehost
Starting the domain transfer process from Namecheap to Bluehost involves accessing your Namecheap account. Unlock your domain and obtain the EPP code. Once prepared, initiate the transfer at Bluehost by entering the code and completing the necessary steps.
Transferring your domain from Namecheap to Bluehost is a straightforward process, but it requires attention to detail and careful execution. The first major step is to initiate the transfer at Bluehost. This step is crucial as it sets the ball rolling for the entire process. Your domain will soon be nestled comfortably in its new home at Bluehost, ready to serve your online needs. But how do you get started? Let’s break it down. ###Log In To Bluehost
Begin by logging into your Bluehost account. If you don’t have one, now’s the time to create it. It’s simple and takes just a few minutes. Once logged in, navigate to the ‘Domains’ section. This is your go-to area for all things domain-related. Here, you can manage existing domains or initiate new transfers. Have you ever wondered how seamless processes can enhance your productivity? With Bluehost’s user-friendly interface, you’ll find it easy to manage your domains without any hassle. ###Enter Domain And Transfer Code
Next, you’ll need to enter the domain you wish to transfer from Namecheap. Ensure you have the correct domain name to avoid any missteps. After entering your domain, you’ll be prompted to input a transfer code or EPP code. This code is essential as it authorizes the transfer. You can find this code in your Namecheap account under the domain management section. Remember, accuracy is key here. A small typo can lead to delays. Double-check your entries before moving on. Are you keeping track of how each step builds on the last? Each detail you tend to now saves you time and stress later. By following these steps, you’re well on your way to successfully transferring your domain to Bluehost. What’s next on your list after the transfer? Maybe it’s time to give your website a fresh look!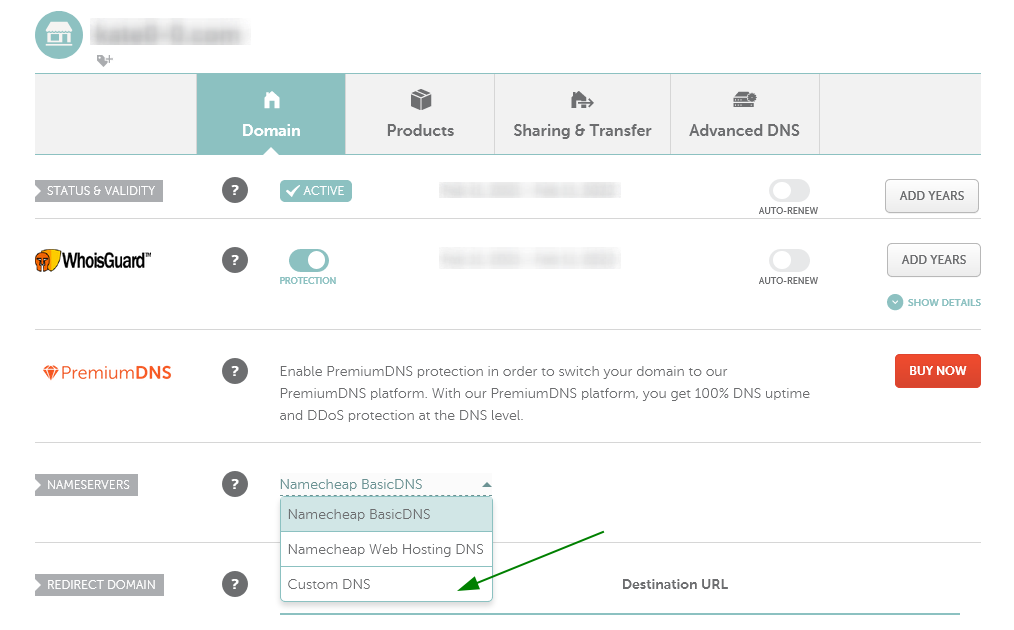
Credit: www.namecheap.com
Verify Domain Ownership
Transferring your domain from Namecheap to Bluehost involves several steps. One crucial step is verifying domain ownership. This ensures you have the authority to move the domain. It protects against unauthorized transfers. Without verification, the process can’t proceed smoothly.
Check Confirmation Email
After initiating the transfer, you’ll receive a confirmation email. This email is sent to the domain registrant’s email address. Check your inbox and spam folder. The email contains important instructions. Follow them carefully to verify ownership.
Approve Transfer Request
Once you’ve checked the confirmation email, approving the transfer is next. Access your email’s link to approve. This step confirms your intent to transfer the domain. Without approval, the process halts. Ensure you complete this step promptly.
Complete Transfer Process
Transferring a domain from Namecheap to Bluehost may seem daunting. But with the right steps, it becomes straightforward. This guide will walk you through the entire process, ensuring a smooth transition. Follow each step carefully to avoid any disruptions.
Monitor Transfer Status
Once you initiate the transfer, keep track of its progress. Login to your Bluehost account. Check the “Domain” section. Here, you’ll find the status of your domain transfer. Regularly reviewing this helps you address any issues promptly. If the transfer is pending, be patient. Transfers can take up to seven days. Ensure all prerequisites are met to avoid delays.
Update Dns Settings
After a successful transfer, update your DNS settings. This ensures your website functions correctly. Access the DNS settings from your Bluehost dashboard. Update the nameservers to point to Bluehost. This might take a few hours to propagate. Once done, your website will be live on Bluehost’s servers. Regularly check your site’s functionality during this period. Any issues may need immediate attention.
Troubleshoot Common Issues
Transferring a domain from Namecheap to Bluehost can sometimes present challenges. Understanding common issues helps ensure a smooth process. If you face problems, knowing how to tackle them is key. Below, we discuss two frequent issues: transfer delays and authorization code problems. Addressing these can make your domain transfer seamless.
Transfer Delays
Transfer delays happen for various reasons. Check the domain’s status. It should not be locked. Ensure the domain is at least 60 days old. Transfers are not allowed before this period. Verify your contact information. Incorrect details can delay the process. Lastly, check for outstanding payments or fines. These must be resolved before proceeding.
Authorization Code Problems
The authorization code, or EPP code, is crucial. Without it, the transfer won’t start. Request the code from Namecheap. Log into your account to find it. Ensure the code is correct. Even a small error can cause issues. If problems persist, contact Namecheap support. They can assist in retrieving the correct code.
Tips For Smooth Transfer
Transferring a domain from Namecheap to Bluehost can be straightforward with the right steps. First, unlock your domain and get an authorization code from Namecheap. Next, initiate the transfer process on Bluehost using the provided code.
Transferring your domain from Namecheap to Bluehost might seem daunting, but with a few strategic tips, you can ensure a smooth transition. Whether you’re seeking better services or aligning with your hosting needs, the process can be simple if you pay attention to timing, leverage customer support, and prepare adequately.Timing Considerations
Choosing the right time for your transfer can make all the difference. Avoid initiating transfers close to your domain’s expiration date. This can lead to complications and potential downtime. Aim to initiate the transfer at least a month before the expiration date. If your domain was recently registered or transferred, you may need to wait for 60 days due to ICANN regulations. Planning ahead can save you unnecessary stress and ensure your website remains accessible.Customer Support Assistance
Don’t hesitate to use customer support; they’re there to help. Both Namecheap and Bluehost offer robust support services. Reach out to them to clarify any uncertainties you might have about the transfer process. A friend once shared how Bluehost’s support guided them through each step, ensuring they didn’t miss any crucial detail. This personalized assistance can prevent mistakes and streamline the process. Consider asking questions that might not be obvious. What happens if the transfer fails? What specific steps should you follow if you encounter an error? Understanding potential pitfalls can prepare you for any eventuality. By focusing on timing and leveraging customer support, you’re setting yourself up for a seamless domain transfer. It’s not just about moving your domain; it’s about ensuring your online presence remains uninterrupted.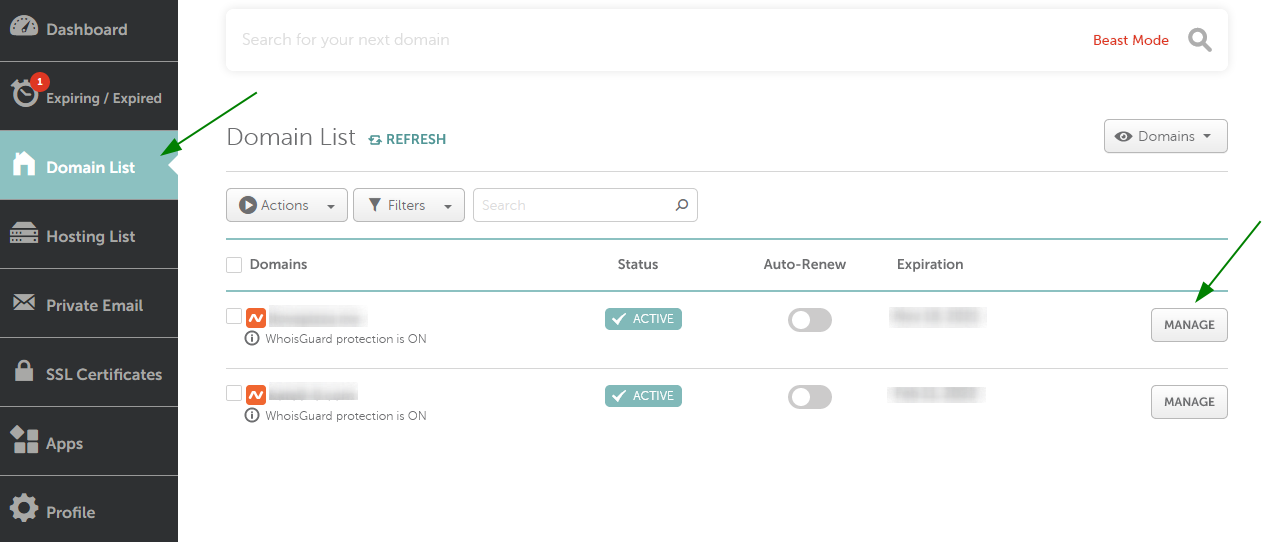
Credit: www.namecheap.com
Frequently Asked Questions
How Do I Transfer Domains Out Of Namecheap?
Unlock your domain in Namecheap account settings. Obtain the EPP code. Initiate transfer with new registrar. Confirm email verification. Complete transfer process.
How Do I Transfer A Domain To Bluehost?
To transfer a domain to Bluehost, unlock your domain, get the EPP code, and verify your email. Start the transfer on Bluehost’s website, enter the EPP code, and confirm. Ensure the domain is eligible for transfer and not within 60 days of registration or previous transfer.
How To Point Namecheap Domain To Bluehost?
Log into Namecheap, select your domain, and go to the “Domain” tab. Choose “Custom DNS” and enter Bluehost’s nameservers: ns1. bluehost. com and ns2. bluehost. com. Save the changes to point your Namecheap domain to Bluehost.
Can I Move My Domain From One Hosting Service To Another?
Yes, you can move your domain to another hosting service. Update your domain’s DNS settings accordingly. This ensures your website remains accessible. Contact your new host for guidance during the transfer process. Always check compatibility and backup your data before switching hosts to prevent any issues.
Conclusion
Transferring your domain from Namecheap to Bluehost can be simple. Follow the steps carefully. Ensure you unlock your domain and obtain the EPP code. Update your contact details for a smooth process. Start the transfer in your Bluehost account. Wait for the transfer to complete.
This usually takes a few days. Remember, patience is key. Once done, your domain will be active on Bluehost. Enjoy the benefits of your new hosting platform. For any issues, check support resources. They are always helpful. Now, you’re ready to explore more with your website.


