
Are you planning to transfer your domain to Namecheap? You’re in the right place!
Whether you’re looking for better service, lower prices, or enhanced features, moving your domain to Namecheap can be a smart decision. But the process might seem a bit daunting at first. Don’t worry; we’ve got you covered. In this guide, we’ll break down the steps you need to follow in a way that’s easy to understand.
By the end, you’ll feel confident in transferring your domain smoothly and efficiently. Get ready to unlock the full potential of your online presence with Namecheap. Let’s dive in and make this transition seamless for you!
Preparing For Domain Transfer
Transferring a domain on Namecheap involves a few simple steps. Unlock your domain and get the EPP code. Then, enter the code during the transfer process. Follow the prompts to finalize the transfer, ensuring a smooth transition.
Preparing for a domain transfer can feel like getting ready for a big move. Just like packing boxes and labeling them, you need to ensure your domain is ready for its new home. It’s essential to follow a few steps to make sure the transition goes smoothly. Let’s break down the process so you can transfer your domain on Namecheap without a hitch.Check Domain Eligibility
Before transferring your domain, you need to verify that it’s eligible for transfer. Domains have specific requirements to be eligible, such as being registered for at least 60 days. Think of it like settling into a new house; you wouldn’t want to move right after buying it. Look into your domain’s current registration details. Ensure there are no active disputes or holds. This helps avoid unexpected surprises during the transfer process. Ask yourself: Is your domain ready to move?Unlock Domain
Domains are often locked to protect them from unauthorized transfers. Unlocking your domain is like finding the key to your front door. You need to do this to proceed with the transfer. Log into your current registrar account and navigate to the domain management section. Find the option to unlock your domain. Once unlocked, it will be ready for the next step in the transfer process. Have you checked if your domain is locked? Don’t skip this step! Transferring a domain doesn’t need to be daunting. By checking eligibility and unlocking your domain, you’re setting the foundation for a seamless transition. Are you ready to make your move?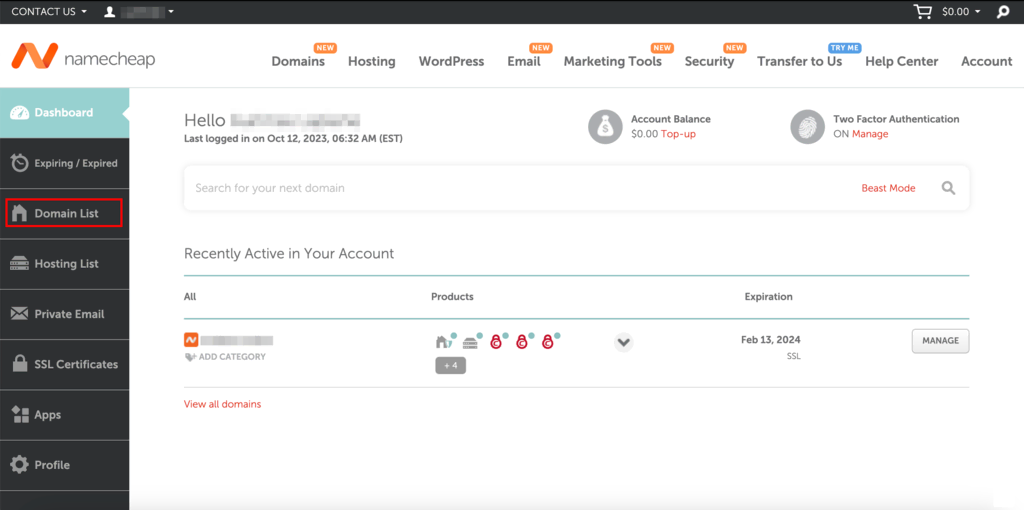
Credit: www.hostinger.com
Gathering Necessary Information
Transferring a domain on Namecheap involves a few key steps. Gathering the right information ensures a smooth process. Before you start, collect all required details. This prevents delays and keeps everything on track.
Find Authorization Code
The authorization code, or EPP code, is crucial for domain transfer. It’s like a password for your domain. You can get it from your current registrar. Log into your account and locate your domain settings. Look for an option labeled “Get EPP code” or “Authorization Code.” If you can’t find it, contact customer support. They’ll guide you through the process. Ensure you write it down or save it securely.
Verify Domain Details
Check your domain details for accuracy. Ensure your contact information is up-to-date. This includes your email address and phone number. The transfer process uses this data for verification. Log into your registrar’s dashboard to review your domain details. Correct any outdated or incorrect information. This helps avoid unnecessary complications during the transfer.
Initiating Transfer On Namecheap
Starting a domain transfer on Namecheap is straightforward. Begin by unlocking your domain with the current registrar. Then, request an authorization code and initiate the transfer through Namecheap’s platform, ensuring all details are correct.
Transferring a domain on Namecheap is straightforward. It requires a few steps. First, you need to initiate the transfer. This ensures your domain moves smoothly. Start by accessing your Namecheap account. Then, proceed to start the transfer process. Follow these steps carefully. Each step is important for a successful transfer. Let’s dive deeper into these steps.Access Namecheap Account
Log in to your Namecheap account. Use your username and password. Once logged in, find the ‘Dashboard.’ It’s your control center. Navigate to ‘Domain List.’ This section shows all your domains. Ensure you have access to the domain you want to transfer. If not, check your account details.Start Transfer Process
Select the domain you wish to transfer. Click on ‘Manage’ next to the domain name. Look for the ‘Sharing & Transfer’ tab. Click it to start the transfer process. You will see ‘Transfer Out’ options. Follow the prompts. Enter the necessary information. Ensure all details are correct. This step is crucial for a smooth transfer.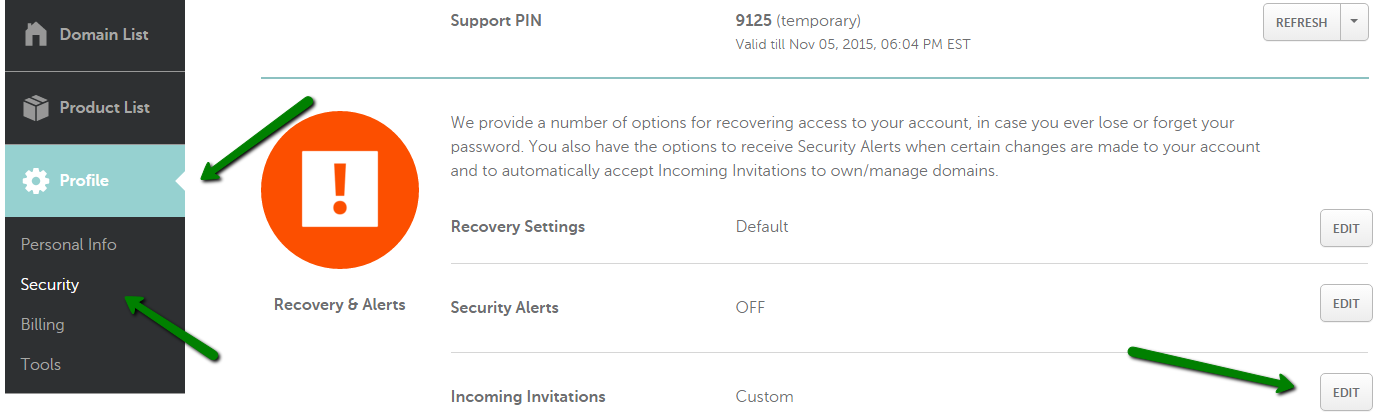
Credit: www.namecheap.com
Completing The Transfer
Transferring a domain on Namecheap involves a few simple steps. Start by unlocking your domain and obtaining the transfer code. Follow Namecheap’s instructions to ensure a smooth transfer process.
Completing the transfer of your domain on Namecheap is a pivotal step in ensuring a smooth transition of your online presence. This phase is crucial and requires attention to detail to avoid any disruptions. Whether you’re moving to a new registrar or consolidating your domains, understanding how to complete the transfer can save you time and hassle. ###Approve Transfer Request
Once you’ve initiated the transfer, you’ll receive an approval request via email. This request is crucial; it’s your green light to proceed. Check your inbox for an email from Namecheap. Don’t forget to look in your spam or junk folder, just in case it landed there. Follow the instructions in the email to approve the transfer. It might just be a click of a button, but it’s a step that’s easy to overlook if you’re busy. Have you ever missed an important email just because you didn’t check your spam folder? It happens more often than you think, and missing this email could delay your transfer. ###Monitor Transfer Progress
After approving the transfer, the next step is to monitor its progress. You can do this directly from your Namecheap account dashboard. Navigate to the domain management section and look for the transfer status. It usually takes a few days, but staying informed helps you address any issues that might arise. Imagine going on a road trip without checking the map. Would you feel confident about reaching your destination? Monitoring your transfer is like keeping an eye on that map. Keep in mind that during this period, your website should remain accessible. If you notice any downtime, it could indicate a problem that needs immediate attention. What’s your strategy when things take longer than expected? Patience is key, but so is being proactive in checking for updates. Completing a domain transfer might seem daunting, but breaking it down into these steps makes it manageable. Have you ever completed a task only to realize it wasn’t as complicated as you initially thought? That’s often the case here. By staying organized and attentive, you ensure a successful domain transfer with Namecheap.Post-transfer Steps
Once you’ve successfully transferred your domain to Namecheap, there are essential post-transfer steps to ensure your domain operates smoothly. These steps are crucial for maintaining your domain’s functionality and security. Follow these simple steps to confirm everything is set up correctly.
Confirm Domain Settings
Check your domain settings immediately after the transfer. Ensure your contact details are accurate. This information is vital for domain management and security. Verify that your domain’s registrar lock is active. This prevents unauthorized transfers. Also, review the expiration date of your domain. Keep track of renewal periods to avoid losing your domain.
Update Dns Records
Review and update your DNS records as needed. DNS records control where your domain points on the internet. Check if your website and email services are functioning. If you need changes, access the DNS settings in your Namecheap account. It’s important to ensure all records are up-to-date. This keeps your online presence stable and reliable.
Troubleshooting Common Issues
Transferring a domain on Namecheap involves simple steps. Check domain eligibility and unlock it for transfer. Update contact details and obtain the transfer code from the current registrar.
Transferring a domain on Namecheap can sometimes feel like navigating a maze. While the process is generally straightforward, you might encounter a few bumps along the road. Understanding common issues and knowing how to troubleshoot them can save you time and headaches. In this section, you’ll find practical tips to resolve typical problems during a domain transfer on Namecheap. Let’s tackle these challenges together and ensure your domain transfer goes smoothly. ###Resolving Authorization Problems
Authorization issues often arise when your current registrar blocks the transfer due to incorrect or missing information. Double-check the authorization code provided by your current registrar. Make sure it’s entered correctly on Namecheap’s platform. An outdated or incorrect WHOIS email address can also cause hiccups. Verify that your WHOIS contact details are up-to-date, as this is where your authorization code will be sent. A quick update can resolve potential authorization snags. If you find yourself stuck, don’t hesitate to reach out to Namecheap’s support. They’re known for their responsive service and can guide you through solving authorization problems efficiently. ###Handling Transfer Delays
Transfer delays can be frustrating, especially if you’re eager to get your domain set up. One common cause is the domain’s lock status. Ensure your domain is unlocked in your current registrar’s settings. Another factor could be the 60-day transfer rule. If you’ve recently updated your WHOIS information, ICANN policy might enforce a temporary hold. Check if this applies to your situation. Consider time zones and business hours. Transfers might take longer if initiated just before the weekend or holidays. Planning ahead can help you avoid such delays. Have you ever considered setting a reminder for follow-up? Regularly check the transfer status and contact support if the process seems stalled. Namecheap’s team can provide insights into any holdups and offer solutions to keep things moving. Addressing these issues head-on can significantly streamline your domain transfer experience. By being proactive and informed, you can overcome these common challenges with ease.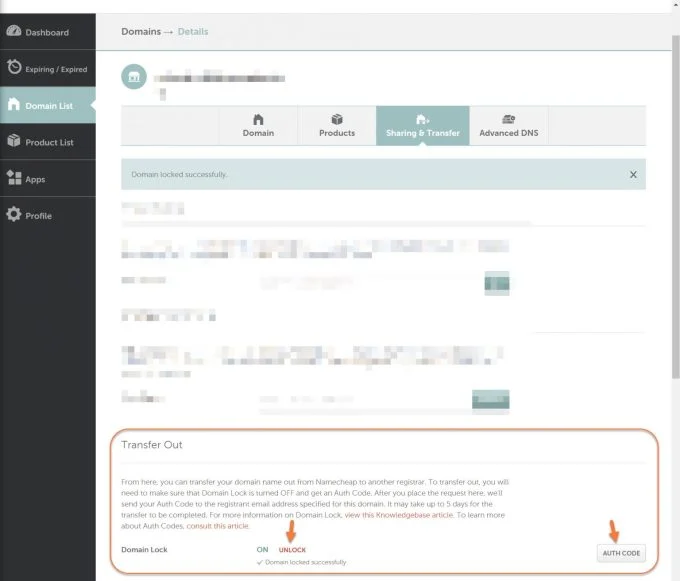
Credit: chemicloud.com
Frequently Asked Questions
Can You Transfer Domains On Namecheap?
Yes, you can transfer domains on Namecheap. Ensure your domain is unlocked and obtain the EPP code. Follow Namecheap’s domain transfer process to complete the transfer smoothly.
How Do I Transfer One Domain To Another?
To transfer a domain, unlock it with your current registrar. Obtain the transfer authorization code. Initiate the transfer with the new registrar, providing the code. Confirm the transfer through the email verification sent to the domain’s registrant. The process usually completes within 5-7 days.
How Long Does Namecheap Domain Transfer Take?
A Namecheap domain transfer typically takes 30 minutes to 6 days. It depends on factors like the current registrar’s release time. Ensure you have unlocked the domain and obtained the authorization code to facilitate the process.
How Can I Transfer Ownership Of A Domain?
To transfer domain ownership, unlock the domain and obtain the authorization code from the current registrar. Initiate the transfer with the new registrar, providing the authorization code. Confirm the transfer via email. Ensure all domain settings are updated post-transfer for seamless operation.
Conclusion
Transferring your domain on Namecheap is simple and straightforward. Follow the steps carefully, and you’ll succeed. Remember to double-check your details. This ensures a smooth transition. Patience is key during the transfer process. It may take some time. Keep an eye on your email for updates.
Need help? Namecheap’s support is always there. Don’t hesitate to reach out. With these tips, you’re on the right path. Happy transferring!


