
Are you ready to get your website live on the internet? Uploading your website to Namecheap is a crucial step that can feel a bit daunting if you haven’t done it before.
But don’t worry! This guide is here to simplify the process for you. Imagine the excitement of seeing your website accessible to people around the world, attracting visitors, and potentially growing your business. By the time you finish reading this, you’ll have the confidence and know-how to upload your website with ease.
So, let’s dive in and make your website dreams a reality!
Credit: www.namecheap.com
Choosing The Right Hosting Plan
Choosing the right hosting plan is crucial for your website’s success. A good plan ensures your site runs smoothly and efficiently. Namecheap offers various hosting plans to suit different needs and budgets. Each plan provides unique features and advantages. It’s important to understand these options to make an informed decision.
Understanding Your Website Needs
Begin by assessing your website’s requirements. Is it a personal blog or an e-commerce site? Smaller sites may need less resources. Larger sites might require more bandwidth and storage. Consider your site’s traffic expectations. High traffic demands a robust hosting plan. Evaluate any special features you need. This helps in narrowing down choices.
Exploring Namecheap Hosting Options
Namecheap provides a range of hosting options. Shared hosting is affordable and user-friendly. It’s ideal for beginners with basic needs. VPS hosting offers more control and flexibility. Great for growing websites with moderate traffic. Dedicated hosting provides maximum resources and security. Perfect for high-traffic, complex sites.
Comparing Features And Costs
Each plan comes with different features. Look at the storage space offered. Bandwidth is another critical factor. Evaluate the security features provided. Compare these against the cost of each plan. A plan should fit within your budget. But also meet your site’s needs effectively.
Considering Technical Support And Reliability
Technical support is vital for troubleshooting issues. Namecheap offers 24/7 support for all plans. Reliable hosting ensures your site stays online. Check the uptime guarantee of each plan. Higher uptime means fewer interruptions for visitors. Reliable support and uptime are crucial for a smooth user experience.
Making An Informed Decision
Research thoroughly before choosing a plan. Read reviews from other users. Consider expert recommendations. Balance cost with features and support. An informed decision leads to a successful website. Choose wisely to ensure your site’s growth and stability.
Registering A Domain Name
Uploading a website to Namecheap involves selecting your domain, accessing the cPanel, and using the File Manager. Transfer your website files into the public_html directory. Ensure everything is correctly uploaded for your site to go live.
Registering a domain name is the first step to creating your online presence. It’s like selecting your unique address on the internet where people can find you. But how do you ensure you choose the right one and register it effectively on Namecheap?Choose A Memorable Domain Name
Selecting the right domain name is crucial. Think of something easy to remember and spell. A short and catchy name can make a significant difference. Reflect on what your website is about. Is it a blog, a business, or a personal portfolio? Your domain should give visitors a hint of what they can expect. Have you ever tried to visit a website but ended up on a different site because you misspelled the domain? That’s why simplicity is key.Check Domain Availability
Once you have a name in mind, it’s time to check if it’s available. Namecheap offers a convenient search tool for this. Type your desired domain into the search bar. You’ll quickly see if it’s available or if you’ll need to brainstorm alternatives. You might find that your first choice is taken. Don’t be discouraged; consider variations or different extensions like .net or .co.Register Your Domain
Found the perfect domain? Great! The next step is to register it. This process is straightforward on Namecheap. After selecting your domain, add it to your cart. Namecheap will guide you through the registration process, ensuring your domain is securely yours. Remember, securing your domain quickly is essential. Popular names get snapped up fast, so act swiftly.Protect Your Domain
Once registered, consider adding domain privacy protection. This service keeps your personal details hidden from public databases. Namecheap offers WhoisGuard protection. It’s a small investment for peace of mind and security. Have you ever received spam calls or emails after registering a domain? Protecting your information can help you avoid this. By following these steps, you’re well on your way to establishing your digital footprint. What domain name will you choose today?Accessing Namecheap Dashboard
Access the Namecheap dashboard to upload your website files effortlessly. Navigate to the file manager and click “Upload” to transfer your site files. Ensure all files are correctly placed to display your website online.
Accessing the Namecheap Dashboard is your first step in uploading your website. It’s like finding the control center of your website universe. Here, you manage everything from domain settings to hosting services. Let’s dive into how you can access this dashboard with ease and confidence.How To Log Into Your Namecheap Account
First, head to the Namecheap website. Click on the “Sign In” button at the top right corner. Enter your username and password, then click “Login.” If you’ve forgotten your password, click the “Forgot your password?” link. Follow the instructions to reset it. Once logged in, you’ll see the dashboard. It’s your one-stop shop for managing your domains and hosting.Navigating The Dashboard Interface
Once inside, take a moment to familiarize yourself with the layout. On the left, you’ll see a menu with options like “Dashboard,” “Domain List,” and “Hosting List.” Click on “Dashboard” to get an overview of your account. Here, you can see recent activity and any alerts. It’s important to keep an eye on these alerts to stay on top of your website’s health.Locating The Hosting Section
To upload your website, you need to access your hosting account. Click on “Hosting List” from the menu. This will show you all your hosting packages. Select the hosting plan associated with your domain. Click the “Manage” button next to it. This is where the magic happens, and you can start the upload process.Exploring Account Settings
Take some time to explore the “Account” section. Here, you can update your personal information and change security settings. Check your contact details to ensure they’re current. A well-maintained account helps in smooth communication with Namecheap support.Frequently Asked Questions Section
Namecheap offers a robust FAQ section. If you encounter issues, this is a great place to start. Search for common questions related to dashboard access. You’ll find step-by-step guides and solutions to common problems. By understanding how to navigate the Namecheap Dashboard, you’re setting the stage for a successful website upload. What challenges do you anticipate in this process? Remember, every click is a step closer to having your website live.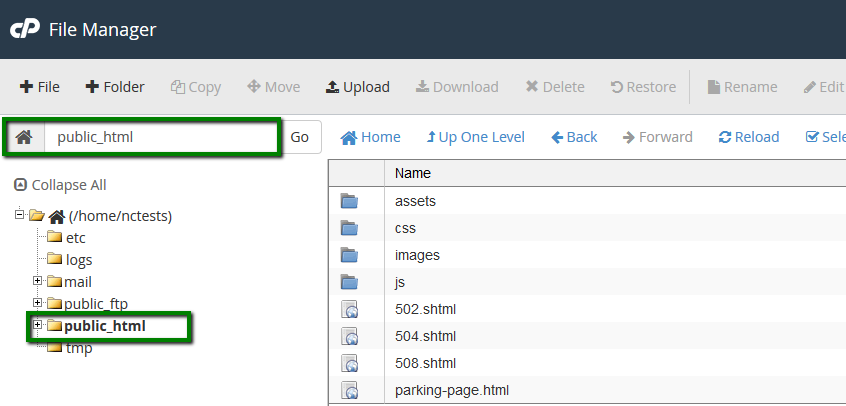
Credit: www.namecheap.com
Setting Up Your Hosting Account
Setting up your hosting account is the first step to making your website live. It’s where you store your website files, making them accessible to visitors. Namecheap offers user-friendly hosting services, ideal for beginners. This guide will help you through the initial setup process. Let’s dive into the essential steps for setting up your hosting account with Namecheap.
Navigating To Hosting Section
Start by logging into your Namecheap account. Once logged in, locate the dashboard. On the dashboard, find the “Hosting” tab. Click on it to access your hosting services. This section lists all your hosting plans. Select the hosting plan you want to use. Now, you’re ready to configure your hosting settings.
Configuring Basic Settings
After selecting your hosting plan, proceed to the settings page. Here, you can configure essential details. Start with setting your domain name. Ensure it matches your website’s address. Next, review the default settings. Adjust these if necessary to suit your website’s needs. Finally, save changes to apply your configurations. Your hosting account is now set up, ready for website upload.
Uploading Website Files
Uploading website files to Namecheap can seem challenging at first. It’s a vital step in getting your site live. You’ll learn how to use two main methods. These are using an FTP client and uploading via cPanel. Each method has unique steps but both are effective.
Using Ftp Client
FTP clients are software that help transfer files. Start by downloading an FTP client like FileZilla. Connect to your server using your FTP credentials. These credentials are found in your Namecheap account. Once connected, navigate to your website directory. This is usually named ‘public_html’. Drag and drop your website files here. Always ensure you’re uploading the correct files. Double-check file paths for accuracy.
Uploading Via Cpanel
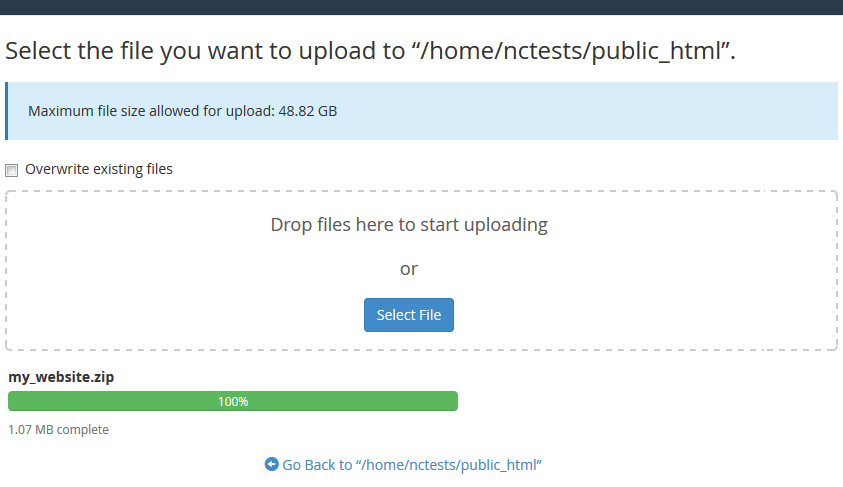
cPanel is a user-friendly control panel. Begin by logging into your Namecheap account. Access cPanel and find the ‘File Manager’ option. Click to open ‘File Manager’. Locate the ‘public_html’ directory. Click ‘Upload’ in the top menu. Select your website files from your computer. Wait for the upload process to complete. Refresh to see your files in the directory.
Configuring Dns Settings
Configuring DNS settings is essential for uploading your website to Namecheap. Start by accessing your Namecheap account dashboard. Then, navigate to the domain list and select your domain to edit DNS settings.
Configuring DNS settings is crucial for your website’s success on Namecheap. DNS, or Domain Name System, connects your domain to your website’s server. This ensures that users reach your site when they type your domain name. Understanding and updating these settings can seem complex but is essential. Let’s break it down step-by-step.Understanding Dns Records
DNS records are like a roadmap for your website. They guide internet traffic to the right place. Common types of DNS records include A, CNAME, and MX. The A record points your domain to an IP address. CNAME records alias one domain to another. MX records manage email routing for your domain. Each has a specific role in directing traffic. Knowing these can help you set up your site correctly.Updating Name Servers
Updating name servers is vital for domain control. Name servers hold your DNS records and guide your domain’s traffic. To update them in Namecheap, log into your account. Go to ‘Domain List’ and click ‘Manage’ next to your domain. Choose ‘Custom DNS’ if you’re using third-party servers. Enter the new name server details. Save your changes to ensure they take effect. This connects your domain to the right hosting provider.Testing Your Website
After uploading your website to Namecheap, testing is crucial. It ensures everything works as intended. This step verifies functionality and security. It’s important to address any issues promptly. Let’s explore key areas to focus on.
Checking Site Functionality
Visit each page of your website. Make sure all links work properly. Test forms to see if they submit data correctly. Check images and videos for proper loading. Ensure your website looks good on mobile devices. Functional testing helps maintain a user-friendly experience.
Ensuring Security Measures
Security is vital for a safe website. Verify your SSL certificate is active. It ensures data encryption. Check for any vulnerable plugins or themes. Update them to the latest versions. Use strong passwords for all accounts. Protect your site from unauthorized access.
Troubleshooting Common Issues
Uploading a website to Namecheap can sometimes be challenging. Users often face issues that can hinder the process. Understanding and resolving these common problems can smoothen your website upload experience. This section will guide you through troubleshooting frequent issues.
Resolving Dns Problems
DNS issues often affect website accessibility. Start by checking your DNS settings. Ensure your domain points to the correct server IP address. Verify that your Namecheap DNS settings match your hosting provider’s requirements. Incorrect DNS configurations can lead to website downtime.
Use Namecheap’s DNS management tools to update records. Enter accurate IP addresses and server information. Test your DNS changes using online tools like DNS Checker. This confirms that your website is accessible globally.
Fixing Upload Errors
Upload errors can disrupt the website launch. Check your internet connection first. A stable connection is crucial for successful uploads. Ensure your files are in the correct format. Namecheap typically supports standard web formats like HTML, CSS, and JavaScript.
File size can also cause upload issues. Compress large files if necessary. Use file transfer tools like FTP clients for smoother uploads. Monitor file permissions and server settings. They often affect the upload process.
If issues persist, consult Namecheap support. They provide expert guidance for troubleshooting upload errors. Their support team can help identify and fix complex problems. This ensures your website is live without further delays.

Credit: www.youtube.com
Frequently Asked Questions
How Do I Transfer A Website To Namecheap?
To transfer a website to Namecheap, initiate the transfer process from your current registrar. Unlock the domain and obtain the authorization code. Submit the code on Namecheap’s transfer page. Confirm the transfer via email. Monitor the transfer status in your Namecheap account for completion.
How Do I Connect My Namecheap Domain To My Website?
Log into Namecheap. Go to “Domain List” and click “Manage” next to your domain. Navigate to “Advanced DNS” tab. Add or edit A Record and CNAME Record to match your web host’s settings. Save changes and allow time for DNS propagation.
Your domain should now connect to your website.
How To Transfer A Website To A Domain Name?
To transfer a website to a domain, update DNS settings to point to your hosting server. Ensure files are uploaded to the server and configure settings through the control panel. Verify the domain is correctly pointing by checking propagation. Consult your hosting provider’s support for specific guidance.
How To Make A Website Secure On Namecheap?
Secure your Namecheap website by installing an SSL certificate, enabling two-factor authentication, and regularly updating software. Use strong passwords, backup data, and implement a firewall. Monitor for suspicious activity and ensure secure hosting. Follow these steps to protect your site effectively.
Conclusion
Uploading your website to Namecheap is simple and straightforward. Follow the steps carefully to ensure a smooth process. Check each setting before finalizing. Keep your login details handy for quick access. Regularly update your site for better performance. Monitor your site’s traffic for insights.
With practice, managing your site becomes easier. Remember, patience is key. Enjoy watching your website go live. Share it with friends and family. Engage with your audience for growth. Celebrate your success. Happy hosting!


