
Transferring your domain from Namecheap to GoDaddy can seem daunting at first. However, with the right guidance, you can make this transition smoothly and efficiently.
Whether you’re looking to consolidate your domains under one provider for easier management or simply exploring better features, moving your domain doesn’t have to be a headache. Imagine the peace of mind knowing everything is in one place, backed by GoDaddy’s robust services.
In this guide, we’ll walk you through the entire process step-by-step, ensuring you don’t miss a beat. By the end of this article, you’ll have the confidence to transfer your domain effortlessly, saving time and avoiding potential pitfalls. Stick with us, and let’s make this transfer a breeze for you.

Credit: www.youtube.com
Preparing For Domain Transfer
Transferring a domain from Namecheap to GoDaddy involves a few straightforward steps. First, unlock your domain at Namecheap and obtain the authorization code. Then, initiate the transfer process on GoDaddy by entering the code, and confirm the transfer through email.
Transferring your domain from Namecheap to GoDaddy might seem like a daunting task, but with a bit of preparation, it can be a smooth process. Whether you’re seeking better features or pricing, preparing for a domain transfer is crucial. It’s like packing for a move; you want to ensure everything is in order before the big day. Let’s dive into the essential steps you need to take to prepare for this transition. ###Check Domain Eligibility
Before initiating the transfer, ensure your domain is eligible. Domains must be at least 60 days old and not locked to be transferred. You can find this information in your Namecheap account under domain settings. If your domain is locked, simply unlock it by toggling off the domain lock option. It’s a quick step that ensures your domain is ready for transfer. Have you ever tried moving a locked suitcase? It’s frustrating. Checking eligibility saves you from this hassle. Make sure your domain isn’t involved in any disputes or held under special registration conditions. This simple check can save you a lot of time and headaches later. ###Backup Domain Data
Backing up your domain data is like creating a safety net. You never know when you might need it. Start by saving all important information linked to your domain, such as DNS records and website content. This can be done by exporting your DNS settings and downloading your website files from your hosting account. Imagine losing a treasured photo album during a move. That’s what losing domain data feels like. By having backups, you ensure nothing goes missing in the transfer. You’ll have peace of mind knowing that you can restore your website swiftly if any issues arise. As you prepare for your domain transfer, ask yourself: Are all the steps clear? Do you have all necessary information backed up? Preparing thoroughly can make the difference between a smooth transfer and a chaotic one. So take the time to ensure every detail is in check.Unlocking Your Domain
Transferring a domain from Namecheap to GoDaddy is straightforward. First, unlock your domain and obtain the authorization code. Then, initiate the transfer process on GoDaddy, entering the code to seamlessly move your domain.
Unlocking your domain is a critical step in transferring your domain from Namecheap to GoDaddy. This process ensures your domain is free for transfer. It helps in making the transition smooth and efficient. Understanding how to unlock your domain will save you time and effort. Let’s dive into the essential steps.Access Domain Settings
First, log into your Namecheap account. Navigate to the “Domain List” section on the dashboard. Find the domain you wish to transfer. Click the “Manage” button next to your domain. This action will take you to the domain settings page. Here, you can make necessary changes to your domain settings.Disable Domain Lock
Domains are usually locked for security reasons. To transfer, you must disable this lock. On the domain settings page, locate the “Domain Lock” section. You will see a toggle switch or button. Click it to disable the domain lock. Confirm the changes if prompted. Your domain is now ready for transfer. These simple steps ensure your domain is unlocked and prepared for a successful move to GoDaddy.Obtaining Authorization Code
Get the authorization code to start transferring your Namecheap domain to GoDaddy. Log into your Namecheap account, select your domain, and find the authorization code under the domain settings. This code is crucial for a smooth transfer process.
Obtaining an authorization code is crucial when transferring a domain. This unique code ensures the security of your domain during the transfer process. It acts like a password, proving ownership and allowing the movement between registrars. Let’s dive into how you can request and ensure the delivery of your authorization code from Namecheap.Request Auth Code From Namecheap
Log into your Namecheap account. Navigate to the ‘Domain List’ section. Find the domain you wish to transfer. Click ‘Manage’ next to the chosen domain. Look for the ‘Sharing & Transfer’ tab. Click on it. Here, you will find the option to request your authorization code. Click ‘Auth Code’. The system will generate the code for you.Ensure Code Delivery
Check your registered email address. Namecheap will send the code there. Ensure your email is up-to-date in your account settings. Sometimes, emails may land in the spam folder. Check there if you don’t see the email. If you still can’t find it, contact Namecheap support. They can help resend the code. Once you have it, you’re ready for the next transfer steps.Initiating Transfer On Godaddy
Transferring a domain from Namecheap to GoDaddy involves a few straightforward steps. Unlock the domain at Namecheap and obtain the transfer code. Then, initiate the transfer on GoDaddy using this code to complete the process smoothly.
Transferring a domain from Namecheap to GoDaddy is a simple process. It involves a few clear steps. This guide will help you start the transfer on GoDaddy. Follow these steps to ensure a smooth transition.Log Into Godaddy Account
Begin by accessing your GoDaddy account. Use your username and password to log in. Once logged in, locate the “Domain” section. This area contains all your domain management tools. It’s essential for starting the transfer process.Enter Domain Details
Next, find the option to transfer a domain. You will need to enter the domain name you want to transfer. Make sure to type it correctly to avoid errors. After entering the domain name, follow the on-screen instructions. This will guide you through the required steps. By completing these actions, you will initiate the transfer on GoDaddy.Completing Domain Transfer
Transfer your Namecheap domain to GoDaddy by unlocking it in your Namecheap account. Obtain the authorization code and initiate the transfer on GoDaddy’s website. Follow the prompts to complete the process smoothly.
Transferring a domain from Namecheap to GoDaddy can seem daunting, but completing the transfer is easier than you might think. Once you’ve initiated the process, the final steps are crucial to ensure your domain is securely moved to its new home. Here’s how to wrap up the transfer with confidence.Verify Transfer Status
The first thing you should do is check the status of your domain transfer. This will give you peace of mind that everything is moving smoothly. Log into your GoDaddy account and navigate to the “Pending Transfers” section. Here, you’ll find a list of domains currently being transferred. Look for any alerts or notifications. If you see a message indicating that your domain transfer is stuck or needs additional information, act quickly to resolve these issues. Have you ever been waiting for something important and felt the urge to check your phone every few minutes? That’s the same feeling you might get while waiting for your domain transfer. Frequent checks can keep you informed and ready to address any issues.Confirm Domain Ownership
Once the transfer is complete, confirming domain ownership is essential. GoDaddy will usually send an email or notification confirming that the domain has been successfully transferred to your account. Double-check your account details to ensure the domain is listed under your ownership. This step is crucial to avoid any ownership disputes or technical hiccups down the road. Isn’t it satisfying to see your domain listed under your name? That sense of ownership is empowering, knowing you’ve successfully managed a technical task. What if you don’t receive a confirmation email? Check your spam folder or contact GoDaddy support for assistance. They can quickly verify your domain status and help resolve any issues. Completing the domain transfer involves a series of straightforward steps. By verifying the transfer status and confirming your ownership, you ensure a smooth transition to GoDaddy. So, why wait? Take these steps now and enjoy the benefits of a successful domain transfer.
Credit: punchsalad.com
Post-transfer Tasks
After transferring a Namecheap domain to GoDaddy, update DNS settings to ensure smooth website operation. Verify domain transfer completion and check domain settings for accuracy. Adjust domain privacy settings to protect personal information.
Transferring your domain from Namecheap to GoDaddy is a significant milestone, but the journey doesn’t end there. Once the transfer is complete, there are crucial post-transfer tasks you need to tackle. These tasks ensure your domain functions smoothly and aligns with your online goals. After all, you’ve invested time and effort into your website, and you want it to shine without a hitch. Whether you’re a seasoned webmaster or a newbie, these tasks require your attention.Update Dns Settings
Imagine you’ve just moved into a new house. You wouldn’t keep your old address on your mail, would you? Similarly, once your domain lands at GoDaddy, updating your DNS settings is vital. DNS settings direct where your domain points and how it interacts with the internet. It’s like setting your new address for digital communication. Log into your GoDaddy account and navigate to the DNS management area. You’ll find options to add or modify records. Make sure your settings reflect your current hosting environment. It’s a straightforward process, but if you skip it, your site might not load properly. Think of DNS as the switchboard of your website; keeping it updated ensures seamless connectivity.Check Domain Functionality
After updating the DNS, it’s time to check if everything works as expected. Visit your website and navigate through various pages. Do you notice any broken links or missing images? These hiccups can happen during a transfer. Consider using online tools to test your site’s speed and responsiveness. A quick check can save you from potential downtime or poor user experience. You might have a moment of doubt, thinking, “Is everything really in place?” Testing your domain functionality answers this question. It’s better to catch and fix issues now rather than discovering them through frustrated visitors. Engaging in these post-transfer tasks might seem tedious, but they are necessary for a smooth transition. Have you ever faced unexpected challenges after a domain transfer? Share your experiences in the comments below. Your insights could help someone else avoid similar pitfalls.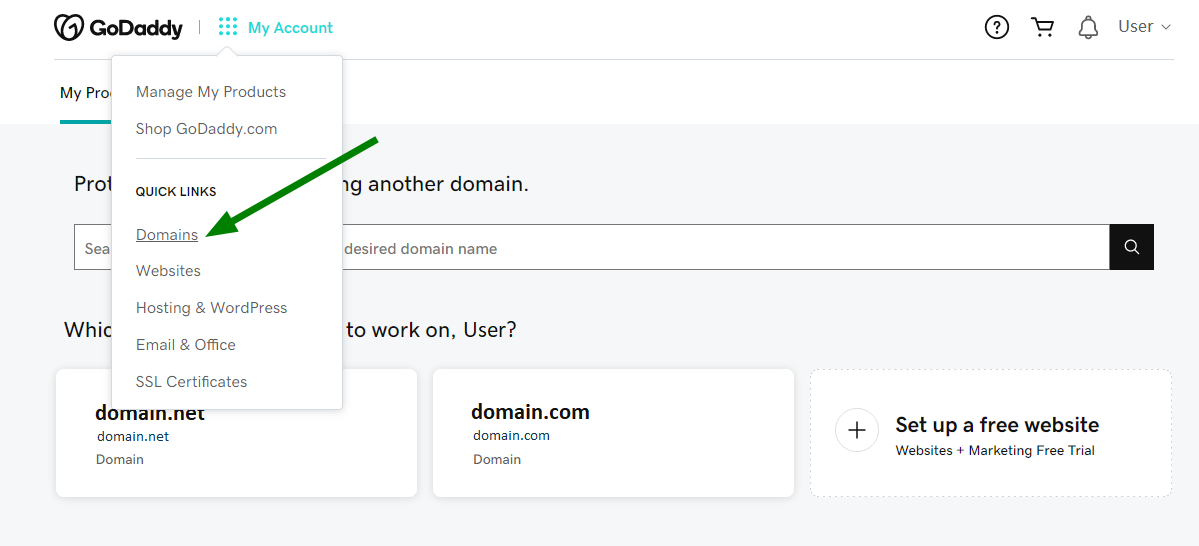
Credit: www.namecheap.com
Frequently Asked Questions
How Do I Transfer My Namecheap Domain To Godaddy?
Unlock your NameCheap domain and get the authorization code. Initiate the transfer process on GoDaddy using this code. Follow GoDaddy’s instructions to complete the transfer. Ensure domain privacy settings allow for the transfer. Confirm the transfer through the email sent by GoDaddy.
Is Namecheap Affiliated With Godaddy?
NameCheap is not affiliated with GoDaddy. They are separate companies providing domain registration services. Both offer unique features and pricing. Choose based on your specific needs and preferences. Always compare services to find the best fit for your requirements.
How Long Does It Take To Transfer A Domain Namecheap?
Transferring a domain to NameCheap typically takes 5-7 days. The process starts after you confirm the transfer request. Ensure your domain is unlocked and the authorization code is ready. Monitor your email for updates throughout the transfer. Completion times may vary based on your current registrar’s policies.
How Do I Transfer My Domain Name From One Website To Another?
Unlock the domain at your current registrar. Obtain the transfer authorization code. Initiate the transfer with the new registrar. Confirm the transfer via email. Wait for the transfer to complete.
Conclusion
Transferring a domain from Namecheap to GoDaddy is straightforward. Follow each step carefully. Double-check your details. Ensure your domain is unlocked. Keep your authorization code handy. Check your emails for transfer updates. Patience is key during the process. Enjoy more features with GoDaddy.
Remember, managing domains should be stress-free. Properly transferring your domain helps. Now, explore new possibilities with your domain. Feel confident in your online journey. Stay informed and connected. Your domain transfer is complete. Share your experience with others. Good luck with your website’s future!


