
Transferring your domain from GoDaddy to Namecheap can feel like a daunting task. But don’t worry—you’re not alone in this, and it’s easier than you might think!
Whether you’re looking for better pricing, improved customer service, or more robust features, moving your domain can be a smart move. Imagine finally getting the most out of your domain management without breaking a sweat. In this guide, we’ll walk you through the entire process step-by-step, ensuring you have everything you need to make a seamless transition.
Stick around, and you’ll soon discover how effortless it can be to switch your domain to a new home. Let’s dive in and make your domain transfer as smooth as possible!
Credit: www.namecheap.com
Preparing For Domain Transfer
Transferring a domain from GoDaddy to Namecheap requires careful planning. Proper preparation ensures a smooth transition. It minimizes downtime and keeps your website secure. Before starting the transfer, follow these steps to prepare.
Verify Domain Eligibility
First, ensure your domain is eligible for transfer. Check the registration date. Domains must be at least 60 days old. Confirm there are no active disputes or holds. Your domain should not be locked. Disable any privacy protection services. This allows Namecheap to access necessary information.
Gather Account Information
Collect your GoDaddy account details. You will need your account username and password. Note the domain name you wish to transfer. Obtain the EPP code from GoDaddy. This code is crucial for the transfer process. It is also known as the transfer authorization code. Ensure your contact information is up-to-date. Correct details are vital for a successful transfer. Double-check your email address. Namecheap will send notifications during the transfer.

Credit: m.youtube.com
Unlocking Domain On Godaddy
Moving a domain from GoDaddy to Namecheap involves unlocking the domain on GoDaddy. Access your account dashboard to find domain settings. Change the status to “unlocked” to prepare for transfer. Follow the simple steps to ensure a smooth transition.
Unlocking your domain on GoDaddy is a crucial step. It allows you to transfer your domain to Namecheap smoothly. This process is simple and essential for a successful domain move. Here’s how you can unlock your domain on GoDaddy.Access Domain Settings
To begin, log into your GoDaddy account. Once logged in, navigate to the “My Products” section. Here, you’ll see a list of your domains. Find the domain you wish to transfer to Namecheap. Click on “Manage” next to it. This will take you to the domain settings page. It’s important to ensure you’re in the right section. This is where you’ll make necessary changes.Disable Domain Lock
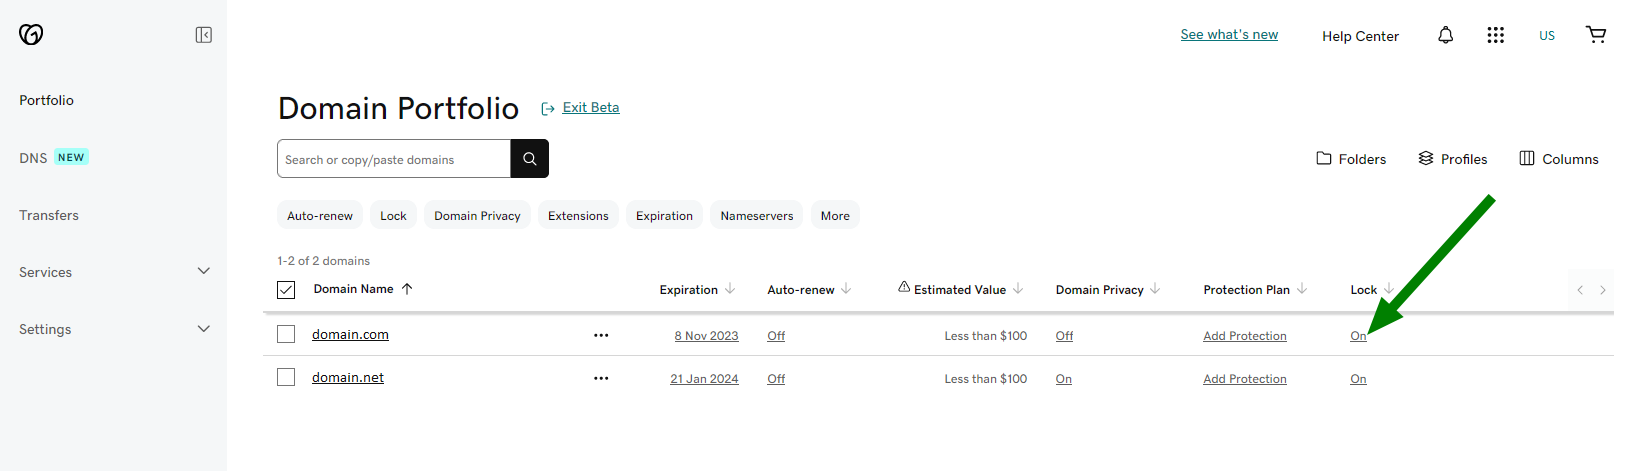
On the domain settings page, locate the “Domain Lock” section. This feature keeps your domain secure. It prevents unauthorized transfers. But for a transfer, it needs to be disabled. Click on the toggle to turn off the domain lock. You may need to confirm this change. Once disabled, your domain is ready for transfer. Remember, unlocking is temporary. After transferring, consider re-enabling it for security.Obtaining Authorization Code
To transfer a domain from GoDaddy to Namecheap, securing the authorization code is crucial. This code, also known as the EPP code, is necessary for initiating the domain transfer. Access it in your GoDaddy account settings under the domain management section.
Obtaining an authorization code is a vital step in transferring your domain. This code acts as a security measure, ensuring that only authorized users can transfer the domain. Without it, the transfer process cannot proceed. Let’s dive into how to get this crucial code from GoDaddy.Request Transfer Code
Log into your GoDaddy account. Head to the domain settings. Locate the option labeled “Get Authorization Code” or “Transfer Domain.” This section might vary slightly based on your account version. Click the option and follow the prompts. An email with your code will be sent to the registered email address. Ensure this email address is up-to-date to avoid issues.Save Code For Use
Once you receive the email, open it promptly. Inside, you’ll find the authorization code. Copy this code carefully. Store it in a safe place, like a secure document or password manager. You’ll need this code during the transfer process to Namecheap. Double-check the code for any errors to ensure a smooth transition. Following these steps helps secure your domain transfer. The authorization code is essential for moving your domain efficiently.Initiating Transfer On Namecheap
Transferring a domain from GoDaddy to Namecheap might seem complex. But with the right steps, it becomes simple. Initiating the transfer is an essential part of the process. This phase involves beginning the transfer on Namecheap’s platform. Here’s a detailed guide to help you through.
Log Into Namecheap Account
First, access your Namecheap account. Enter your username and password. If you don’t have an account, create one. Registration is quick and straightforward. Once logged in, navigate to the dashboard. The dashboard is the starting point for initiating transfers.
Enter Domain Details
Next, locate the domain transfer page. You’ll need to enter your domain details here. Type in the domain name you wish to transfer. Ensure accuracy to avoid errors. The system will verify the domain’s transfer eligibility. Follow the prompts to proceed with the transfer.
Completing Transfer Process
Completing the domain transfer process from GoDaddy to Namecheap is essential. This step ensures your domain moves smoothly to its new home. There are several steps in this process. Each step requires careful attention. Follow these steps to avoid any issues during the transfer.
Confirm Transfer Request
After initiating the transfer, you will receive an email. This email contains a transfer confirmation link. Click the link to approve the transfer. This step is crucial. It verifies that you want to move your domain. Without this, the transfer cannot proceed. Ensure your email information is up-to-date.
Monitor Transfer Progress
Once you confirm the transfer, the process begins. You can track the progress through your Namecheap account. This section shows all ongoing transfers. Keep an eye on this area. Transfers usually take 5-7 days to complete. If you notice any issues, contact support immediately. Monitoring helps prevent unnecessary delays.
Verifying Domain Transfer
Moving a domain from GoDaddy to Namecheap requires verification. Ensure your domain is unlocked, and obtain the authorization code. Confirm the transfer in your Namecheap account to complete the process smoothly.
Moving your domain from GoDaddy to Namecheap can seem daunting, but verifying the transfer is a crucial step that ensures everything proceeds smoothly. You don’t want to face unexpected roadblocks, right? A successful verification process keeps your domain safe and sound during its journey to a new home. Let’s dive into the essential steps to verify your domain transfer, focusing on details that will save you time and potential headaches.Check Domain Status
Before you initiate the transfer, make sure your domain is in good standing. Is it unlocked? An unlocked domain is ready for the move. Check if your domain is eligible for transfer; it must be at least 60 days old and not recently renewed. These are basic requirements, yet they’re often overlooked. Review the contact details associated with your domain. Are they accurate? If not, update them. This ensures you receive important notifications during the transfer.Update Dns Settings
Updating DNS settings can prevent downtime during the transfer. You wouldn’t want your website to become unreachable, would you? Ensure that your DNS records are correct and reflect your current hosting setup. This might seem tedious, but it keeps your site live while the domain moves. Consider setting a lower TTL (Time to Live) value temporarily. This allows DNS changes to propagate faster, ensuring a seamless transition. — With these steps, you’re not just moving a domain; you’re safeguarding your online presence. Have you ever found yourself in the middle of a domain transfer and realized you missed a crucial step? Double-checking these aspects can save you from such a scenario.Troubleshooting Common Issues
Transferring a domain from GoDaddy to Namecheap involves a few straightforward steps. First, unlock your domain in GoDaddy’s settings. Next, get the authorization code from GoDaddy to use in Namecheap. Finally, initiate the transfer process on Namecheap by entering the code and following instructions.
Moving your domain from GoDaddy to Namecheap can be a seamless process if done correctly. However, like any technical task, it may come with its own set of challenges. Understanding these common issues can save you time and frustration. Here are some practical solutions to ensure a smooth transfer.Failed Transfer Reasons
A failed domain transfer can be frustrating, but knowing the reasons can help you resolve it quickly. One common reason is incorrect authorization codes. Make sure you have the correct EPP code from GoDaddy. Another issue could be domain lock status. Domains often have a lock status for security, preventing transfers. Verify that your domain is unlocked in your GoDaddy account settings. Check the domain’s contact information. If your email is outdated, you won’t receive necessary notifications, hindering the transfer process. Update any incorrect contact details before initiating the transfer.Resolving Transfer Errors
Encountering transfer errors is common, but they can be resolved with some patience. If you face authorization issues, double-check the EPP code. Mistakes in this code are a frequent cause of transfer problems. Sometimes, the domain may be within a 60-day transfer lock due to recent registration or contact information changes. In such cases, you need to wait until the lock period is over. Ensure your domain’s privacy protection is turned off during the transfer. Privacy settings can block Namecheap from accessing the necessary details to complete the transfer. Temporarily disabling it can help facilitate the process. Have you encountered any other challenges when transferring domains? Sharing your experiences could help others in similar situations. Remember, persistence is key, and with these solutions, you’re well-equipped to tackle common domain transfer issues.
Credit: www.youtube.com
Frequently Asked Questions
Can You Transfer A Domain From Godaddy To Namecheap?
Yes, you can transfer a domain from GoDaddy to Namecheap. Start by unlocking your domain at GoDaddy. Obtain your domain’s authorization code. Initiate the transfer process on Namecheap. Follow the instructions provided by both registrars. Ensure domain eligibility for transfer.
Complete the process within a few days.
How Do I Move A Domain Out Of Godaddy?
Unlock your domain in GoDaddy account settings. Obtain the authorization code. Initiate the transfer with your new registrar. Approve the transfer email. Wait for the transfer to complete.
How Do I Move My Domain To Namecheap?
To transfer your domain to Namecheap, unlock it at your current registrar. Obtain the authorization code. Initiate the transfer on Namecheap’s website. Enter the authorization code when prompted. Confirm the transfer via email.
Can I Transfer My Website From Godaddy To Another Host?
Yes, you can transfer your website from GoDaddy to another host. Backup files and databases first. Update domain settings with the new host’s information. Ensure DNS settings point to the new server. Contact your new host for specific transfer instructions.
Keep your website’s downtime minimal during the transfer.
Conclusion
Moving your domain to Namecheap is straightforward. Follow the steps carefully. First, unlock your domain on GoDaddy. Then, get the authorization code. Initiate transfer at Namecheap. Paste the code there. Wait for confirmation. It’s simple. Secure your domain with ease.
Enjoy better management options. Namecheap offers user-friendly controls. No stress involved. Your website stays safe and accessible. Transition smoothly. Check your email regularly. Be patient during the process. You’ll soon see results. This guide simplifies domain transfer. Happy domain managing!


