
Are you looking to secure your website and protect your visitors’ data? Installing an SSL certificate is a crucial step, and if you’re using Namecheap’s cPanel, you’re in the right place.
Understanding how to install an SSL certificate might seem daunting at first, but it’s easier than you think. By following a few straightforward steps, you can enhance your website’s security, boost its credibility, and even improve your search engine rankings.
In this guide, we’ll walk you through the process, ensuring you have all the knowledge you need to get your SSL certificate up and running smoothly. Stick with us, and you’ll soon see how simple it is to enhance your online presence with this essential security feature.

Credit: www.youtube.com
Benefits Of Ssl Certificates
Installing SSL certificates in cPanel at Namecheap enhances website security. It protects user data from hackers. This installation also boosts trust and search engine rankings.
Installing an SSL certificate in cPanel Namecheap is not just a technical task; it’s a crucial step towards securing your website and enhancing user trust. SSL certificates encrypt the data exchanged between your users and your server, protecting sensitive information from prying eyes. But beyond security, SSL certificates offer several benefits that can significantly impact your website’s performance and credibility.Enhanced Security
One of the primary advantages of SSL certificates is the enhanced security they provide. When you visit a website secured with SSL, you might notice the padlock icon in the browser’s address bar. This icon signifies that your connection is secure. For websites handling personal information, like credit card details, SSL is indispensable. It encrypts data during transmission, ensuring that hackers can’t intercept it. Have you ever hesitated to enter your credit card details on a site without the padlock icon? Your users likely feel the same.Improved Seo Rankings
Google favors secure websites. In fact, SSL certificates are part of Google’s ranking algorithm. Websites with SSL certificates are given a slight edge in search engine results. This means that installing an SSL certificate might boost your website’s visibility. Imagine searching for a topic and clicking on the first few results. Sites that secure their data often appear higher up, making them more likely to be visited.Increased Customer Trust
Trust is a valuable commodity online. An SSL certificate is a powerful tool for building trust with your audience. When users see that your site is secure, they are more likely to engage with your content, sign up for newsletters, and make purchases. Consider your own online shopping experiences. Would you buy from a site that doesn’t ensure your data’s safety? Probably not. SSL certificates reassure visitors that you value their privacy.Protection Against Phishing
Phishing attacks are a common threat online. They trick users into giving away their personal information by mimicking trusted websites. SSL certificates help combat phishing by verifying that a website is legitimate. When you install an SSL certificate, you’re not just securing data; you’re also showing users that your site is authentic. This added layer of verification can deter cybercriminals from targeting your site.Competitive Edge
In the digital marketplace, standing out is essential. SSL certificates give you a competitive edge by signaling professionalism and a commitment to security. If two businesses offer the same product, but only one has a secure connection, which would you choose? The secure site, of course. By installing an SSL certificate, you’re not just protecting data; you’re also setting yourself apart from competitors. Consider these benefits and ask yourself: Can you afford not to have an SSL certificate? As you think about it, remember that your website’s security and credibility are at stake. Make the choice that not only protects your users but also elevates your site’s reputation.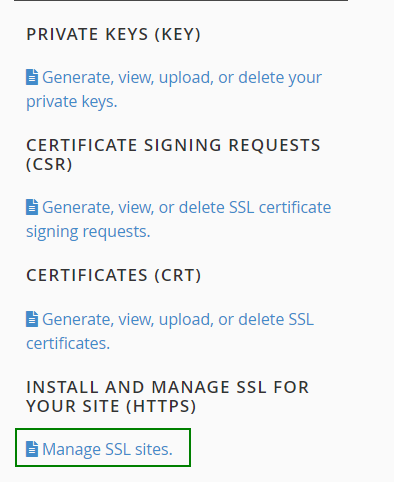
Credit: www.namecheap.com
Types Of Ssl Certificates
Choosing the right SSL certificate is crucial for website security. There are several types, each serving different needs. Understanding these types helps in making an informed choice.
Domain Validated (dv) Certificates
Domain Validated certificates offer basic encryption. They are easy and quick to obtain. These certificates verify only the domain’s ownership. Ideal for small websites or blogs.
Organization Validated (ov) Certificates
Organization Validated certificates provide a higher level of security. They confirm the organization’s identity. These are suitable for businesses needing extra trust.
Extended Validation (ev) Certificates
Extended Validation certificates offer the highest level of trust. They display a green address bar in browsers. Perfect for e-commerce sites that handle sensitive data.
Wildcard Ssl Certificates
Wildcard certificates cover multiple subdomains. They save time and money by securing all subdomains with one certificate. Ideal for businesses with several subdomains.
Multi-domain Ssl Certificates
Multi-Domain certificates protect several domains. Useful for businesses managing multiple sites. They simplify the SSL management process.
Unified Communications (ucc) Ssl Certificates
UCC certificates are designed for Microsoft Exchange and Office Communications. They secure multiple domains and host names. Suitable for businesses using these services.
Preparation Before Installation
Installing an SSL certificate in cPanel Namecheap requires preparation. This ensures a smooth installation process. Proper preparation minimizes errors and downtime. Follow these steps to set the stage for success.
Gather Necessary Information
Before installation, collect all needed details. Find your domain name and SSL certificate keys. Have your cPanel login credentials handy. This includes your username and password. Keep a copy of the SSL certificate email from Namecheap. Store all this information in a secure place. This preparation step saves time and stress.
Backup Your Website
Backing up your website is crucial. Create a full backup of your site data. Use cPanel’s backup feature for this task. Save the backup file to your computer or cloud storage. This ensures you can restore your site if issues arise. Regular backups protect against data loss. Maintain peace of mind throughout the installation process.
Accessing Cpanel
Easily install an SSL certificate in cPanel from Namecheap by logging in and navigating to the ‘SSL/TLS’ section. Follow the prompts to upload your certificate files. Ensure a secure connection for your website visitors.
Accessing cPanel is your gateway to managing your website’s technical features, including the installation of an SSL certificate. If you’re using Namecheap as your hosting provider, getting into cPanel is straightforward but crucial for enhancing your site’s security. Let’s walk through the steps to ensure you’re on the right path. ###Login To Your Namecheap Account
First things first, you need to access your Namecheap account. Open your web browser and go to the Namecheap website. Enter your username and password. If you’re anything like me, remembering passwords can be a challenge, so consider using a password manager to keep things simple. Once logged in, you’ll be directed to your dashboard. It’s like the control center of your web hosting universe. Look for the “Account” section on the top-right corner. ###Navigate To Cpanel
Now that you’re in your account, the next step is to find cPanel. In your dashboard, locate the “Domain List” on the left sidebar. Find the domain for which you want to install the SSL certificate. Click on the “Manage” button next to it. You’ll see several tabs; go to the “Hosting” tab. Here, you’ll find the “Go to cPanel” button. Click it, and voilà, you’re in! Navigating to cPanel isn’t just a step; it’s a skill. Once you get familiar with it, managing your website becomes much easier. Do you find navigating these interfaces a breeze or a bit of a challenge? Remember, accessing cPanel is a vital part of managing your site’s security and features. By understanding these steps, you’re setting a solid foundation for your website’s SSL installation.Generating Csr
Creating a CSR is essential for installing an SSL certificate in cPanel via Namecheap. Start by accessing your cPanel account, then navigate to the “SSL/TLS” section to generate the CSR, which is a crucial step in securing your website.
When you are setting up an SSL certificate with Namecheap in cPanel, generating a Certificate Signing Request (CSR) is a crucial step. It’s like creating a digital fingerprint that your SSL certificate will use to secure your website. But what exactly is a CSR, and how do you generate one? Let’s dive into the details to ensure you’re on the right track.Understanding Csr
A CSR is a block of encoded text that contains information about the domain you want to secure. It includes your organization’s details and public key, which will be used to create your SSL certificate. Think of it as a formal request for a digital passport for your website. When generating a CSR, accuracy is key. The information you enter should be precise because it will be visible in the certificate. Incorrect details can lead to security warnings for visitors.Steps To Generate Csr
Generating a CSR in cPanel with Namecheap involves a few simple steps. Let’s break it down: 1. Log into Your cPanel Account Navigate to the security section. Look for the SSL/TLS option, which is where you’ll manage your certificates. 2. Select ‘Generate, view, upload, or delete SSL certificates’ This option allows you to handle everything related to SSL certificates, including CSR generation. 3. Click on ‘Generate a New Certificate Signing Request (CSR)’ Here’s where you’ll input your details. Fill out fields like domain name, city, state, country, and email. Be as accurate as possible. 4. Submit the Form After entering the required information, submit the form. Your CSR will be generated, which you can then use to request an SSL certificate from Namecheap. 5. Save the CSR and Private Key After generation, make sure to save the CSR and private key securely. You’ll need the CSR for the SSL certificate request, and the private key for installation. Have you ever wondered why SSL is so important? It’s not just about encryption. It’s about trust. Your visitors need to feel safe when navigating your site. By properly generating a CSR, you’re taking the first step in building that trust. Remember, the CSR is the foundation of your SSL installation process. It’s where your security journey begins. So, take your time to get it right and ensure your website is protected with the level of security it deserves.Installing Ssl Certificate
Installing an SSL certificate in cPanel with Namecheap boosts website security. It encrypts data, ensuring safe communication between your site and users. This process might seem technical, but with simple steps, it’s manageable. You will ensure your website is secure and trusted by visitors.
Uploading Certificate Files
First, access your Namecheap account. Navigate to the SSL certificates section. Download your certificate files. Next, log in to your cPanel. Find the “SSL/TLS” option and click on “Manage SSL sites.” Use the “Browse” button to upload your certificate files. Select the appropriate domain for the SSL installation. Ensure that all files are correctly uploaded.
Activating Ssl In Cpanel
After uploading, activate the certificate in cPanel. Go to the “SSL/TLS” manager again. Select “Manage SSL sites” from the options. Choose your domain from the list. Paste the certificate code into the text box. Click the “Install Certificate” button to activate. Check the status to confirm it’s active.
Your SSL certificate is now installed. Your website is secure and ready.
Verifying Installation
After installing an SSL certificate in cPanel via Namecheap, verifying the installation is crucial. This ensures your website’s security and credibility. Visitors feel secure knowing their data is protected. Verification involves checking the SSL status and testing website security. It’s a simple process that guarantees your website is safe and trustworthy.
Check Ssl Status
Begin by checking the SSL status. Navigate to your cPanel dashboard. Find the “SSL/TLS” section. Select “Manage SSL sites”. Here, you can see all installed certificates. Ensure your domain is listed with a valid certificate. The certificate should not be expired. If everything appears correct, your SSL is active. This step confirms your SSL is installed correctly.
Testing Website Security
Next, test your website’s security. Use online SSL tools like SSL Labs. Enter your domain in the tool. It will analyze your SSL configuration. Look for an “A” grade or higher. This indicates strong security. Check for common vulnerabilities. Ensure your site redirects from HTTP to HTTPS. This guarantees all pages are secure. Testing helps maintain a secure environment for users.
Troubleshooting Common Issues
Installing an SSL certificate in cPanel through Namecheap can be tricky. First, access your cPanel account. Then, navigate to the SSL/TLS section. Follow the prompts to upload your certificate. Ensure every step is completed to secure your site effectively.
Installing an SSL certificate on your Namecheap cPanel can sometimes feel like a tricky puzzle. While the process is generally straightforward, encountering issues is common and can be frustrating. But don’t worry, you’re not alone! Many users face these challenges, and with a bit of guidance, you can solve them efficiently. Let’s dive into troubleshooting some common issues you might face during the installation.Resolving Installation Errors
Installation errors are like unexpected detours on your journey to secure your website. They might arise due to incorrect certificate files or mismatched domain names. Double-check that the certificate matches your domain precisely and that you’ve uploaded the right files. A simple mistake can cause an error. For instance, uploading a wrong key file or missing a step in the process could lead to installation failure. Are you sure you followed each step carefully? Reviewing each step can help you identify and fix the error. If the error persists, consider reaching out to Namecheap support. Their team is familiar with these hiccups and can guide you through a solution. It’s a good reminder that sometimes seeking help can be the fastest way to solve tech puzzles.Addressing Mixed Content Warnings
Mixed content warnings can be like a surprise guest at your website party. They occur when some resources on your site, like images or scripts, are still loading over HTTP instead of HTTPS. This can undermine your website’s security and scare away visitors. To fix this, scan your website for any links or resources still using HTTP. You might have overlooked some elements on your pages. Updating these links to HTTPS ensures everything on your site is secure. You can use browser developer tools to identify mixed content. Have you tried inspecting your site using these tools? They can pinpoint exactly where the HTTP requests are happening. It’s a neat trick that saves time and ensures comprehensive security. Facing installation errors or mixed content warnings is part of the SSL journey. With these tips, you can tackle these issues head-on and enjoy a fully secured website. What other challenges have you faced while installing SSL certificates? Your experiences could offer valuable insights to fellow readers.Tips For Ssl Management
Installing an SSL certificate in Namecheap’s cPanel involves a few simple steps. Access the SSL/TLS Manager, then generate a CSR code. After purchasing, complete the certificate activation. Finally, upload and install the certificate in cPanel to secure your website.
Securing your website with an SSL certificate is crucial for safeguarding sensitive information and building trust with your visitors. However, managing SSL certificates efficiently can be daunting without the right tips. Understanding how to keep your SSL certificates in check will ensure your website remains secure and up-to-date. Let’s dive into some practical tips for SSL management that will make your life easier.Renewal And Expiry
Keeping track of SSL certificate expiry dates can often slip through the cracks. Ensure you have a reminder system in place. It could be as simple as setting calendar alerts a month before the expiration date. Many SSL providers, like Namecheap, offer automatic renewal options. This is a lifesaver if you’re prone to forgetfulness. Make sure to verify the email associated with your account to receive timely notifications. Have you ever wondered what happens if your SSL certificate expires? It can cause your website to display security warnings to visitors, damaging your credibility. Avoid this mishap by staying on top of your renewal dates.Monitoring Certificate Health
How often do you check the health of your SSL certificates? Regular monitoring ensures they are functioning properly and haven’t been compromised. Use online tools to scan your certificates for vulnerabilities. These tools can alert you to potential issues, such as weak encryption or misconfigurations. Addressing these promptly can prevent security breaches. Implementing a monitoring routine doesn’t have to be complex. Even setting a monthly check-in can significantly enhance your website’s security posture. By proactively managing your SSL certificates, you ensure a smoother and safer experience for your users. What steps will you take today to improve your SSL management?
Credit: www.youtube.com
Frequently Asked Questions
How To Install Ssl Certificate In Namecheap Cpanel?
Log into Namecheap cPanel, select “SSL/TLS Manager,” then “Generate, view, upload, or delete SSL certificates. ” Upload your certificate file and activate.
How Do I Install Ssl Certificate In Cpanel?
Log into cPanel and go to the “SSL/TLS” section. Click “Install and Manage SSL for your site. ” Select your domain, paste the certificate files, and click “Install Certificate. ” Ensure proper propagation by checking HTTPS access to your site.
How To Install An Ssl Certificate Step By Step?
To install an SSL certificate, first, generate a CSR from your server. Purchase an SSL certificate from a trusted provider. Submit the CSR to the provider for validation. After validation, download the certificate files. Install the certificate on your server, and finally, configure your website to use HTTPS.
How To Install Auto Ssl In Cpanel?
Log into cPanel, navigate to “SSL/TLS Status,” select domains, and click “Run AutoSSL. ” Ensure AutoSSL is enabled in WHM.
Conclusion
Installing an SSL certificate in cPanel with Namecheap is straightforward. Follow the steps to secure your website effectively. Ensure your site’s safety by implementing these instructions diligently. A secure connection builds trust with your visitors. Protect their data and yours too.
Regular updates and checks keep your certificate valid. Troubleshooting any issues early prevents disruptions. Keep your website running smoothly and securely. With this guide, you now have the tools needed. Enhance your site’s security today. Enjoy peace of mind with a properly installed SSL certificate.
Your visitors will thank you for it.


