
Are you ready to unlock the full potential of your online presence by seamlessly connecting your GoDaddy domain to Namecheap hosting? If you’ve been feeling overwhelmed by the technical jargon or the fear of missteps, you’re in the right place.
Understanding how to point your domain correctly is crucial for ensuring your website runs smoothly and is accessible to your audience. Imagine the relief of knowing that your website is not only live but also functioning at its best. This guide will walk you through the process step-by-step, using simple and clear instructions.
By the end of this post, you’ll have the confidence and knowledge to make this transition effortlessly. Stick with us, and let’s turn this daunting task into a simple, manageable process.
Domain And Hosting Basics
Understanding the basics of domain and hosting is crucial for website management. Domains act as your site’s address on the internet. Hosting stores your site’s files and data. Both elements work together to make your site accessible online. Knowing how to connect them enhances your site’s performance.
Understanding Domain Names
Domain names are unique web addresses. They represent your site on the internet. They are easy to remember and usually end with .com, .net, or .org. Registering a domain is the first step in creating a website. It involves selecting a name that fits your brand and checking its availability. After registration, your domain becomes your online identity.
Introduction To Web Hosting
Web hosting involves storing your website’s files on a server. This server makes your site accessible on the internet. Hosting providers offer various plans. These plans include different features like storage space and bandwidth. Namecheap hosting is known for reliability and affordability. It supports various applications, making it suitable for different websites. Choosing the right hosting plan ensures your site runs smoothly.
Credit: www.namecheap.com
Preparing Your Domain
Easily point your GoDaddy domain to Namecheap hosting by updating DNS settings. Access your GoDaddy account, then modify nameservers to match those provided by Namecheap. This simple process ensures your domain directs visitors to your Namecheap-hosted site seamlessly.
Preparing your domain is the first and essential step in pointing your GoDaddy domain to Namecheap hosting. It’s like ensuring you have the right tools before building something great. Without this preparation, you might encounter unexpected roadblocks. But don’t worry; with the right guidance, you’ll breeze through this process. Let’s dive into what you need to do, starting with accessing your GoDaddy account.Logging Into Godaddy Account
First things first, you need to access your GoDaddy account. Head over to the GoDaddy website and click on the “Sign In” button. Enter your username and password. If you’re like me, you may have forgotten your credentials at least once. In that case, use the “Forgot Password” link to reset it. Ensure you’re using a secure network to protect your login details. Once logged in, navigate to the “My Products” section. This is where you can find all the domains you own.Checking Domain Status
Before making any changes, it’s crucial to check the status of your domain. Is it active and in good standing? Sometimes, domains may expire or face issues without you realizing it. Click on your domain name to access its settings. Look for any alerts or notices that might indicate a problem. Ensure your domain is not locked, as this could prevent changes from being applied. If everything looks good, you’re ready to move to the next step. Remember, preparation is key. Have you ever rushed into a task only to find you missed a crucial step? By taking a moment to prepare your domain, you’re setting the stage for a smooth transition to Namecheap hosting.Accessing Dns Settings
Change DNS settings to point your GoDaddy domain to Namecheap hosting. Access GoDaddy account and locate DNS management. Enter Namecheap’s DNS details to finalize the setup.
Accessing the DNS settings is a crucial step. It connects your GoDaddy domain with Namecheap hosting. This process involves managing DNS records. These records direct your domain to the correct hosting server. Understanding how to access and modify these settings is vital. Let’s dive into the steps.Navigating To Dns Management
Start by logging into your GoDaddy account. Once logged in, head to the domain manager. Look for the domain you want to point. Click on it to open the domain settings. In these settings, find the DNS management section. This section holds the key to altering your domain’s DNS records.Identifying Key Dns Records
In the DNS management area, you’ll see several records. The main ones are A, CNAME, and MX records. The A record points your domain to an IP address. This is where Namecheap’s hosting server details come in. CNAME records are used for subdomains. They point to another domain name. Lastly, MX records are for email. They direct email traffic to the right server. Ensure you have the correct Namecheap details at hand. You’ll need to modify these records to point your domain correctly. Adjusting these records will connect your GoDaddy domain to Namecheap hosting seamlessly.
Credit: www.youtube.com
Changing Name Servers
Pointing your GoDaddy domain to Namecheap hosting involves changing name servers. First, log into your GoDaddy account. Locate your domain and update its DNS settings with Namecheap’s name servers. This directs your domain to Namecheap, enabling hosting management.
Changing your name servers might sound technical, but it’s a straightforward process that can make a world of difference in your website’s performance. If you’re looking to point your GoDaddy domain to Namecheap hosting, this is a crucial step. The right name servers ensure your domain and hosting work together seamlessly, and the best part is, you can do it all in just a few steps. ###Finding Namecheap Name Servers
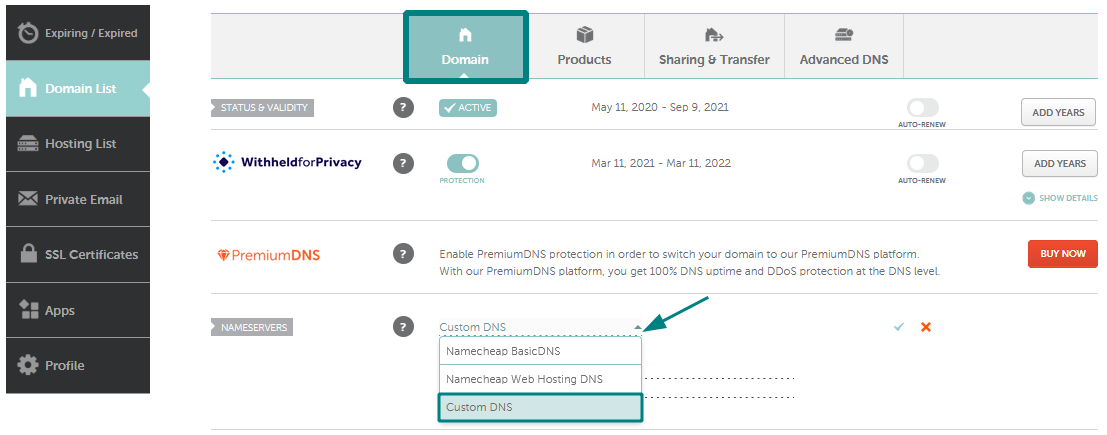
Start by logging into your Namecheap account. Once you’re in, navigate to your Domain List, which is your control center for all your domains. Click on “Manage” next to the domain you’re looking to connect. Here, you’ll find the Namecheap name servers you need. They’re usually listed under the “Namecheap BasicDNS” or “Custom DNS” settings. Make a note of these; they often look something like `dns1.namecheaphosting.com` and `dns2.namecheaphosting.com`. These are the keys to linking your domain to your hosting. ###Updating Godaddy Name Servers
Now, let’s move over to your GoDaddy account. Once logged in, click on “My Products” and find your domain. Click on “DNS” or “Manage DNS” next to it. Here comes the critical part—updating your name servers. You’ll see a section labeled “Nameservers” with an “Edit” button. Click it, then choose “Custom” to add the Namecheap name servers you just noted. Enter them in the fields provided and save your changes. It’s that simple. By doing this, you’re telling the internet world where to find your site. Have you ever wondered how a few clicks can connect your domain to a global audience? This is it. Remember, changes might take a few hours to propagate fully. You can check back later to ensure everything is running smoothly. If you face any hurdles, both GoDaddy and Namecheap offer reliable support to assist you.Verifying Domain Connection
Connecting your Godaddy domain to Namecheap hosting requires updating DNS settings. Access your Godaddy account, locate the domain’s DNS settings, and input Namecheap’s nameservers. This ensures your domain points correctly, allowing visitors to access your site hosted on Namecheap.
Verifying that your domain is correctly pointed from GoDaddy to Namecheap Hosting is a crucial step. You’ve gone through the setup, and now it’s time to ensure everything is aligned. This verification process will confirm that your website is live and accessible.Checking Propagation Status
Once you’ve updated the DNS settings, it might take some time for the changes to propagate globally. You might wonder, “How do I check this?” There are online tools available, such as DNSChecker.org, that provide insights into the propagation status. Simply enter your domain name, and these tools will show if the DNS records have updated worldwide.Troubleshooting Common Issues
Sometimes, things don’t go as smoothly as planned. If your domain isn’t connecting, don’t panic. First, double-check if you’ve entered the correct Namecheap nameservers in your GoDaddy account. A simple typo can cause a lot of frustration. Have you waited long enough for the DNS changes to take effect? It can take up to 48 hours, though it’s usually faster. Patience is essential here. If issues persist, consider reaching out to support teams at GoDaddy or Namecheap. They’re there to help you and can often resolve issues quickly. Remember, even experienced users run into hiccups, and it’s all part of the process.Configuring Namecheap Hosting
Configuring Namecheap Hosting is a crucial step in ensuring your website runs smoothly after pointing your GoDaddy domain to Namecheap. If you’re not tech-savvy, don’t worry! Many people have been in your shoes, and with a bit of guidance, you’ll have your site up and running in no time. Let’s walk through some easy steps to get your Namecheap hosting configured correctly.
Accessing Namecheap Cpanel
First things first, you need to access your Namecheap cPanel. Think of cPanel as the cockpit of your website, where you control everything. Log into your Namecheap account and look for the ‘cPanel’ link under your hosting package. Click it, and you’ll be taken to a dashboard filled with options. It’s like opening a toolbox filled with all the tools you need to build your website.
If you’re feeling a bit lost, don’t worry. Many people find the cPanel interface intimidating at first. But once you start clicking around, you’ll find it’s much simpler than it seems. Remember, every button is there to help you—not to confuse you.
Setting Up Website Files
Once you’re in cPanel, your next task is setting up website files. This is where the magic happens. You can use the ‘File Manager’ to upload files directly to your server. It’s as easy as dragging and dropping files from your computer into the File Manager.
Think of File Manager as your website’s filing cabinet. Keeping it organized will save you headaches down the line. Create folders for images, scripts, and stylesheets to keep everything tidy. This organization will help you find things quickly when you need to make updates or solve problems.
As you upload your files, ask yourself: Are these files ready to go live? Double-check them for errors, as even small mistakes can cause big problems. Being thorough now will make your life easier later.
Don’t be afraid to experiment a little and learn by doing. You might stumble upon a new feature that could be useful for your site. And if you ever get stuck, remember that Namecheap support is just a message away. They are there to help you succeed. So dive in, have fun, and make your website shine!
Testing Your Website
Easily connect your Godaddy domain to Namecheap hosting by updating your DNS settings. Access your Godaddy account, find your domain, and change the nameservers to those provided by Namecheap. This ensures your website’s domain is correctly pointed to your hosting service.
Testing your website is a crucial step. It ensures everything runs smoothly after pointing your GoDaddy domain to Namecheap hosting. This phase involves verifying website functionality and checking DNS configurations. Follow these steps to make sure your website performs optimally.Checking Website Functionality
First, load your website on different devices. Check how it appears on desktops, tablets, and smartphones. Test navigation links to confirm they direct users to the right pages. Look for any broken links or missing images. Verify that forms and buttons work as expected. Ensure that your site’s speed is satisfactory. Users expect quick load times. A slow website can deter visitors.Ensuring Proper Dns Configuration
Confirm DNS settings are correct. Check that your domain points to the right IP address. Use online tools to verify DNS records. Ensure the A and CNAME records are set up properly. These records should direct traffic to your Namecheap hosting. If changes were recent, allow some time for DNS propagation. This process can take up to 48 hours. Be patient and check again if needed.
Credit: www.youtube.com
Tips For Smooth Transition
Navigate domain settings smoothly by accessing your GoDaddy account to update DNS details. Enter Namecheap’s hosting server addresses to ensure correct linkage. Double-check entries to avoid misconfigurations and verify connection for seamless transition.
Transitioning your domain from GoDaddy to Namecheap hosting can feel like navigating a maze. But fear not, with the right tips, you can ensure a smooth transition without any hiccups. Whether you’re a business owner or a blogger, you want your site to be accessible at all times. Let’s dive into some practical advice to make this process as seamless as possible.Avoiding Common Mistakes
Mistakes during domain transfer can lead to headaches. One common error is forgetting to update your DNS settings promptly. Always double-check that your DNS settings on Namecheap match the ones on GoDaddy. Another pitfall is overlooking the renewal dates. Ensure your domain isn’t close to expiry during the transition. This prevents any unwanted surprises.Ensuring Minimal Downtime
Downtime can affect your site’s traffic and credibility. To minimize it, plan the transition during low traffic hours. Communicate with your audience beforehand. Let them know about possible downtime and reassure them it’s temporary. Test your site thoroughly after the transfer. Check if all pages load correctly and ensure functionalities work as expected. — Have you ever transferred a domain and faced unexpected issues? Consider this an opportunity to learn. These tips are designed to help you avoid common pitfalls and maintain your site’s integrity during the transfer process.Frequently Asked Questions
How To Point Domain From Godaddy To Namecheap?
Change GoDaddy’s nameservers to Namecheap’s. Log in to GoDaddy, select your domain, and update nameservers. Use Namecheap’s nameservers provided in your account. Ensure DNS records are correctly set up in Namecheap to avoid any downtime.
How To Connect Godaddy Hosting To Namecheap Domain?
To connect GoDaddy hosting to Namecheap domain, update Namecheap DNS settings. Use GoDaddy’s nameservers provided in your hosting account. Access Namecheap dashboard, navigate to domain list, then DNS settings. Enter GoDaddy nameservers and save changes. Allow propagation time for DNS update completion.
How Do I Point A Domain To Namecheap Hosting?
Change your domain’s nameservers to Namecheap’s. Go to your domain registrar, access DNS settings, and input the Namecheap nameservers. Save changes. Wait for DNS propagation to complete.
How Do I Point My Godaddy Domain To Host?
Log in to GoDaddy. Go to “My Products” and select your domain. Click “DNS” and choose “Manage Zones. ” Edit A Record with your hosting IP address. Save changes. Your domain will point to your host.
Conclusion
Connecting your GoDaddy domain to Namecheap hosting is simple. Follow the steps carefully. Update the DNS settings. Patience is key. Changes might take some hours to reflect. Once done, enjoy a seamless experience. Your site will be live. Troubleshooting? Check settings or seek support.
This process enhances your website’s performance. Now, you have better control and management. Hosting and domain are in sync. Feel confident in managing your online presence. Enjoy the benefits of reliable hosting. Your website journey just got easier. Keep exploring and learning.
Happy hosting!


