
Are you ready to take your online store to the next level? Connecting your domain from Namecheap to Shopify can give your business a professional edge and help establish your brand identity.
But if you’ve been staring at tech jargon and complicated steps, don’t worry—you’re not alone. Many entrepreneurs like you want to create a seamless shopping experience without getting bogged down by technical details. In this guide, you’ll discover a straightforward, step-by-step process to link your Namecheap domain with your Shopify store.
No confusing tech talk, just simple instructions to get your store up and running smoothly. Imagine the thrill of seeing your custom domain live, driving traffic, and boosting your credibility. Stay with us, and by the end of this article, you’ll have the confidence and knowledge to make it happen effortlessly. Ready to transform your online presence? Let’s dive in!
Credit: www.namecheap.com
Setting Up Your Namecheap Account
Connecting your Namecheap domain to Shopify starts with setting up your account. This step is crucial for managing your domain settings. It ensures your online store runs smoothly on Shopify. You need access to your Namecheap account to make necessary changes. Follow these steps to get started.
Logging Into Namecheap
First, log into your Namecheap account. Use your registered email and password. If you forget your password, use the recovery option. This will help you access your account quickly. Once logged in, you’ll see the dashboard. It’s your control center for managing domains.
Locating Your Domain
After logging in, locate your domain. It’s listed on the dashboard. Click on “Domain List” to see all registered domains. Find the domain you want to connect to Shopify. You can use the search bar for faster results. Clicking on the domain name will bring up its settings.
Credit: www.namecheap.com
Preparing Your Domain For Transfer
Moving your domain from Namecheap to Shopify requires preparation. Before you start, ensure your domain is ready for transfer. This involves two main steps. Both are crucial for a smooth transition.
Unlocking Your Domain
First, you need to unlock your domain. Log into your Namecheap account. Go to the “Domain List” section. Find the domain you want to transfer. Click on “Manage” next to it. Look for the “Domain Lock” option. Turn it off to unlock your domain. This step is necessary for transferring your domain. Without unlocking, you cannot proceed with the transfer.
Disabling Domain Privacy
Next, disable the domain privacy feature. This feature hides your contact details. It is essential to disable it for the transfer. Go back to the “Domain List” section. Click on “Manage” for your domain. Find the “Domain Privacy” setting. Turn it off. Disabling privacy lets Shopify access essential information. This step ensures a successful transfer.
Configuring Dns Settings
Easily connect your Namecheap domain to Shopify by adjusting DNS settings. Access your Namecheap account, then update DNS records to point to Shopify. This simple process ensures your domain directs visitors to your Shopify store efficiently.
Configuring DNS settings is crucial when connecting your Namecheap domain to Shopify. It ensures your domain points correctly to your Shopify store. This process involves accessing your domain’s DNS settings and making necessary changes. Proper configuration guarantees your website is accessible to your customers.Accessing Dns Settings
First, log in to your Namecheap account. Once logged in, navigate to the “Domain List” section. Find the domain you want to connect to Shopify. Click on “Manage” next to the domain name. This opens the domain management page. Here, locate the “Advanced DNS” tab. This tab allows you to access DNS settings.Adding Cname And A Records
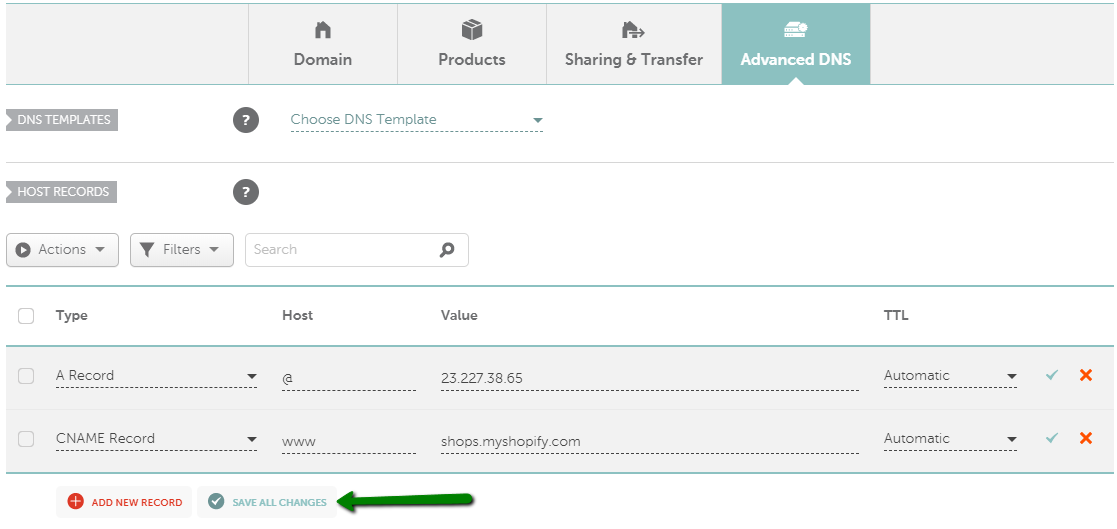
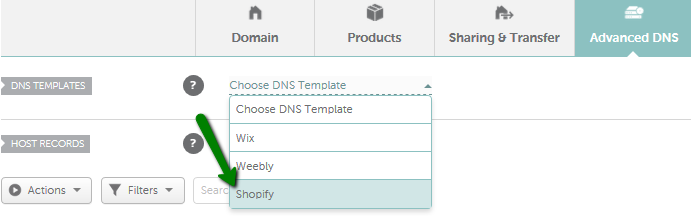
Now, it’s time to add the necessary records. Under the “Advanced DNS” tab, you’ll see an option to add new records. Start with the CNAME record. Set the host as “www” and the value to “shops.myshopify.com”. Next, add the A record. Set the host as “@” and the value to Shopify’s IP address. Save your changes to update the DNS settings. This configuration connects your domain to Shopify.Connecting Domain To Shopify
Connecting your domain from Namecheap to Shopify is straightforward. It lets you brand your online store with a custom domain. Follow simple steps to ensure your domain points correctly to Shopify. This section will guide you through the process smoothly.
Accessing Shopify Admin
Log into your Shopify account. Find the admin dashboard on the left side. Click on “Settings” to proceed. From there, choose “Domains” to access domain settings. This is where you will connect your Namecheap domain.
Entering Domain Information
In the “Domains” section, select “Connect existing domain.” Enter your Namecheap domain name accurately. Double-check for any spelling errors. Click “Next” to continue. Shopify will guide you through verifying your domain.
Follow the instructions for DNS settings. Ensure the A Record points to Shopify’s IP address. Update the CNAME Record to Shopify’s domain. Save changes on your Namecheap account. Allow some time for DNS propagation. Your domain should soon point to your Shopify store.
Verifying Domain Connection
Connecting a domain from Namecheap to Shopify involves a few simple steps. Begin by accessing your Namecheap account and locating your domain settings. Update the DNS settings to point to Shopify’s servers. This process ensures your website is correctly linked and ready for online business.
When you connect your Namecheap domain to Shopify, verifying the domain connection is a crucial step. This ensures that your customers can access your store without any hiccups. You might think the process is daunting, but it’s simpler than it seems. Let’s dig into the details and ensure your domain connection is seamless.Checking Connection Status
Once you’ve connected your domain, you need to verify that it’s set up correctly. Head over to your Shopify admin panel. Navigate to Settings and then click on Domains. Your domain should be listed there, showing a status of “Connected” if everything is working well. If it says “Not Connected,” don’t panic. This just means there’s a small glitch, like a DNS setting that needs adjustment. Give it some time; sometimes, changes take up to 48 hours to propagate. Refresh the page after a while, and check again.Troubleshooting Common Issues
Facing issues with the domain connection? You’re not alone. Common problems include incorrect DNS settings or propagation delays. Make sure your Namecheap DNS settings point to Shopify’s servers: the CNAME should be set to shops.myshopify.com, and the A Record should be 23.227.38.65. If you’re still facing issues, clear your browser cache or try accessing your site from a different device. This can help rule out local caching problems. Additionally, you can use online tools like WhatsMyDNS.net to check if DNS changes have propagated globally. Have you ever spent hours trying to fix a simple error, only to realize it was a tiny oversight? Double-checking each step can save you from similar frustrations. If problems persist, Shopify’s support team is just a click away and they’re always ready to help. Does everything seem intimidating? Remember, every expert was once a beginner. Take one step at a time, and soon you’ll be managing your domain like a pro.
Credit: help.shopify.com
Frequently Asked Questions
How Do I Connect My Domain To My Shopify Website?
To connect your domain to Shopify, log into your Shopify admin. Go to “Settings,” click “Domains,” then “Connect existing domain. ” Follow the prompts to enter and verify your domain. Update your DNS settings with your domain provider to point to Shopify.
Ensure your domain is set as the primary domain.
How Do I Verify Domain Ownership On Shopify Namecheap?
Verify domain ownership by adding Shopify’s TXT record in Namecheap’s DNS settings. Access Namecheap’s dashboard, select your domain, and update DNS records. Save changes and confirm ownership on Shopify. Ensure records match exactly to avoid verification issues.
How Do I Transfer My Domain To Shopify?
To transfer your domain to Shopify, unlock your domain and obtain the authorization code. Access Shopify’s admin, select “Domains,” then “Connect existing domain. ” Enter your domain, follow the prompts, and confirm the transfer. Ensure your contact information is up-to-date for verification.
Should I Connect My Domain To Shopify?
Connecting your domain to Shopify enhances brand credibility and provides a seamless shopping experience. It boosts SEO by using a custom domain. This integration simplifies management and strengthens brand identity, making it an excellent choice for online businesses.
Conclusion
Connecting your Namecheap domain to Shopify is a straightforward process. Follow each step carefully. Ensure your DNS settings are correct. Remember, patience is key during propagation. Check your Shopify store after linking your domain. Verify that your website displays correctly.
This process boosts your online presence. It helps customers find your store easily. A connected domain builds trust and credibility. Your store looks professional with a custom domain. With these steps, you’re set for success. Now, focus on your store’s growth.
Happy selling on Shopify!


