
Are you looking to boost your website’s security and credibility? Obtaining an SSL certificate is a crucial step in that process.
With Namecheap, getting an SSL certificate is not only affordable but also straightforward. You might be wondering how to navigate this process without any technical hassle. Well, you’re in the right place! In this guide, we’ll break down the steps you need to take to secure your website with an SSL certificate from Namecheap.
Imagine the peace of mind you’ll have knowing that your visitors’ data is protected and your site is trusted by browsers. Plus, an SSL certificate can improve your site’s search engine rankings. So, if you’re ready to take your website to the next level, read on! We’ll make sure you have all the information you need to get started quickly and easily.
Credit: www.namecheap.com
What Is An Ssl Certificate?
An SSL Certificate secures online data by encrypting information. Obtain one from Namecheap easily. Visit their website, choose an SSL plan, and follow the purchase steps. Protect your website and enhance visitor trust with this essential security measure.
Securing your website with an SSL certificate is crucial in today’s digital age. But what exactly is an SSL certificate? An SSL (Secure Sockets Layer) certificate is a digital certificate that authenticates a website’s identity and enables an encrypted connection. Think of it as a digital passport for your site, ensuring safe and secure communication between the user’s browser and your server. Without it, sensitive information like credit card details, personal data, and login credentials could be at risk.Importance Of Ssl Certificates
SSL certificates are not just a technical requirement but a trust signal. When users see the padlock symbol in the address bar, they know their data is safe. This can significantly boost your credibility and customer confidence. Search engines like Google favor secure sites. Having an SSL certificate can improve your search ranking. It’s a simple step that can lead to more visibility and traffic. Online shoppers are becoming more security-conscious. An SSL certificate can be the difference between a completed sale and an abandoned cart. Would you enter your credit card details on a site that doesn’t look secure?How Ssl Certificates Work
SSL certificates work through a process called encryption. When a user visits your site, the SSL certificate encrypts the data exchanged between their browser and your server. This means any information sent is scrambled into an unreadable format. Once the data reaches its destination, the SSL certificate decrypts it. This ensures that even if data is intercepted, it cannot be read by unauthorized parties. It’s a seamless process that happens behind the scenes, keeping your users’ data safe. The process begins with an SSL handshake, where the server and browser establish a secure connection. This handshake is quick, often completing in milliseconds, ensuring a smooth browsing experience for the user. Investing in an SSL certificate is investing in your site’s security and reputation. Have you secured your site yet?Benefits Of Using Namecheap For Ssl
Choosing the right SSL certificate provider is crucial. Namecheap stands out for several reasons. It offers reliable, secure services with great customer support. The benefits of using Namecheap for SSL are numerous. The platform provides affordable pricing and a variety of options.
Affordable Pricing
Namecheap is known for its budget-friendly prices. It offers SSL certificates that fit different budgets. Even premium options are competitively priced. You can secure your website without breaking the bank. Many users find Namecheap’s pricing attractive.
Variety Of Options
Namecheap provides a wide range of SSL certificates. Whether you need basic or advanced security, Namecheap has you covered. Options include Domain Validated, Organization Validated, and Extended Validation certificates. This variety ensures every website finds the perfect match. Easy selection helps users meet their specific needs.
Choosing The Right Ssl Certificate
Securing your website is crucial. An SSL certificate protects data and builds trust. But choosing the right one can be confusing. Namecheap offers various options to suit different needs. Understanding these options helps make an informed decision.
Types Of Ssl Certificates
Different types cater to different security needs. Domain Validated (DV) certificates offer basic encryption. They are great for personal blogs or small sites. Organization Validated (OV) certificates provide higher assurance. They verify your business identity, ideal for e-commerce sites. Extended Validation (EV) certificates offer the highest level of security. They turn the browser bar green, showing users your site is secure. Multi-domain certificates cover multiple domains. Wildcard certificates secure unlimited subdomains. Choose based on your site’s specific requirements.
Factors To Consider
Consider your site’s purpose. Is it a personal blog or a business site? Determine your budget. Higher validation levels cost more. Consider the number of domains you need to cover. Think about the level of trust your users require. Security needs differ between simple blogs and complex e-commerce platforms. Evaluate the customer support offered. Namecheap provides reliable support for SSL certificates. Make sure the certificate matches your site’s needs.
Steps To Purchase An Ssl Certificate On Namecheap
Purchasing an SSL certificate from Namecheap is straightforward. Start by logging into your account and selecting SSL from the main menu. Choose the SSL type, add to cart, and follow the checkout process.
Purchasing an SSL certificate on Namecheap is straightforward. This guide breaks it into simple steps. Follow these steps to secure your website efficiently. ###Creating An Account
Start by visiting the Namecheap website. Look for the “Sign Up” button at the top right. Click it to create a new account. Fill in your details carefully. Choose a strong password. Confirm your email address by clicking the link sent to your inbox. This step sets up your account for further actions. ###Navigating The Ssl Section
Log into your Namecheap account. Find the main menu on the homepage. Hover over the “Security” tab. Select “SSL Certificates” from the dropdown menu. This section lists all SSL options available. It helps to understand the types of SSL certificates offered. ###Selecting Your Ssl Certificate
Browse through the SSL certificates. Consider your website’s needs. Choose based on security level and budget. Click “Add to Cart” next to your preferred option. Review your selection in the cart. Proceed to checkout by following the on-screen prompts. Complete your purchase using the payment method you prefer.Activating Your Ssl Certificate
Activating your SSL certificate with Namecheap ensures your website’s security. It’s a crucial step in safeguarding online data. Once you purchase an SSL certificate, activation follows. This process involves validation and installation. Both are necessary for your SSL certificate to function properly. Let’s explore these steps in detail.
Completing Domain Validation
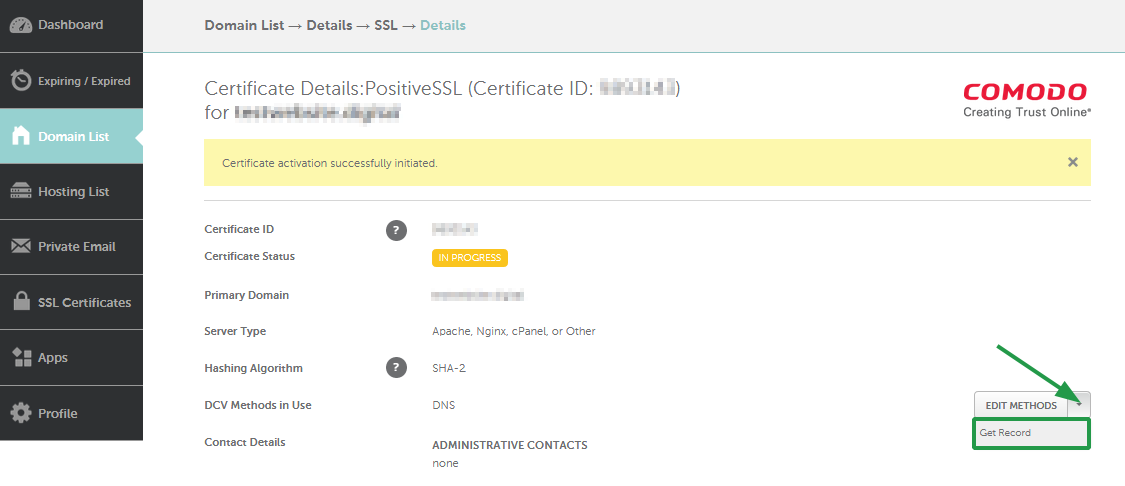
Domain validation verifies your ownership of the domain. Namecheap offers easy validation methods. Choose email validation for a simple process. You’ll receive an email with a validation link. Click the link to confirm domain ownership. Ensure the email address is correct before proceeding.
Another method is DNS-based validation. It requires adding a specific DNS record. This record proves you control the domain. Namecheap provides instructions for this. Follow them carefully to complete validation. Once validated, your certificate proceeds to the next step.
Installing The Ssl Certificate
After validation, it’s time to install the SSL certificate. First, download the certificate files from Namecheap. Log into your hosting account or server. Locate the SSL/TLS settings section. Begin the installation process there. Upload the certificate files as guided.
Some hosting services offer automated installation. Check if your provider supports this. If manual installation is needed, follow the steps closely. This ensures the SSL certificate is properly configured. Finally, test your website to confirm HTTPS activation. Ensure your site displays the secure padlock icon.
Troubleshooting Common Issues
Easily solve common SSL certificate issues with Namecheap by checking domain validation and certificate installation steps. Ensure correct DNS settings and server configurations to avoid errors. Proper troubleshooting helps secure your site quickly and efficiently.
Troubleshooting common issues with your SSL certificate can feel like deciphering a complex puzzle. But with a little patience and guidance, you can resolve most problems swiftly. Whether you’re facing verification hiccups or installation errors, understanding the root cause can make all the difference. ###Verification Problems
Verification problems are a common hurdle when obtaining your SSL certificate from Namecheap. You might receive an email asking for confirmation, but what if it gets lost in your inbox? Always check your spam or junk folder; emails can sometimes end up there unexpectedly. Ensure that the WHOIS information for your domain matches the details you’ve provided during the SSL certificate request. A mismatch can halt the process. If you’re unsure, you can use online tools to verify your WHOIS information before proceeding. ###Installation Errors
Installation errors often arise from incorrect server settings or file placements. Did you know that even a small typo in the certificate file can cause issues? Double-check the file paths and ensure that all necessary files are in the correct directories. Are you using a web server like Apache or Nginx? Each server type has specific steps for SSL installation. Refer to Namecheap’s detailed guides tailored for different server environments. This can save you hours of frustration and ensure your site is secure. Have you encountered any unexpected challenges while setting up your SSL certificate? Share your experiences and solutions in the comments below to help others navigate similar hurdles.Renewing Your Ssl Certificate
Renewing your SSL certificate with Namecheap is simple. Visit their website and log into your account. Choose the certificate you want to renew, follow the steps, and complete the payment. This process ensures your website remains secure and trustworthy for visitors.
Renewing your SSL certificate with Namecheap is a crucial step to maintaining your website’s security. Without a valid SSL certificate, browsers may flag your site as unsafe, leading to loss of visitors and trust. As you approach the renewal period, it’s essential to understand the steps and tips for a seamless transition.Understanding Renewal Process
Renewing your SSL certificate with Namecheap is straightforward. Log into your Namecheap account and navigate to the “SSL Certificates” section. Here, you’ll see a list of your SSL certificates with their expiration dates. Click on the “Renew” button next to the certificate you want to update. Follow the on-screen instructions to complete the renewal process. Ensure your domain validation is up to date, as this might be required during renewal. Have you ever missed a deadline because you thought you had more time? Don’t let that happen with your SSL renewal. Keep an eye on your certificate’s expiration date to avoid service interruptions.Tips For Timely Renewal
Set a reminder for your SSL certificate renewal at least a month before it expires. This gives you ample time to address any unexpected issues. Automate reminders using calendar apps or Namecheap’s notification system to stay ahead. Consider enabling auto-renewal if you prefer a set-it-and-forget-it approach. This feature ensures your SSL certificate renews without manual intervention, reducing the risk of downtime. Remember, an expired certificate can harm your website’s credibility. Regularly check your SSL status and ensure everything is up to date. How would you feel if your favorite website suddenly became insecure? Protect your visitors by keeping your SSL certificate current. Stay proactive and informed to maintain your website’s security and trustworthiness.
Credit: www.namecheap.com

Credit: www.youtube.com
Frequently Asked Questions
How Do I Get An Ssl Certificate From Namecheap?
Purchase an SSL certificate from Namecheap’s website. Choose the desired SSL type and follow the checkout process. After purchasing, configure the SSL using your domain information. Complete the domain verification process. Download and install the SSL certificate on your web server to activate it.
How Do I Get An Ssl Certificate?
Purchase an SSL certificate from a trusted Certificate Authority (CA) like DigiCert or Let’s Encrypt. Follow their instructions to validate your domain. Install the certificate on your web server. Ensure it is correctly configured to secure your website.
How Much Is An Ssl Certificate On Namecheap?
SSL certificates on Namecheap start at $5. 98 per year. Prices vary based on certificate type and features. Check Namecheap’s website for detailed pricing and options to find the best fit for your needs. Secure your website with affordable SSL certificates today.
How Do I Download My Ssl Certificate?
Log in to your hosting account. Locate the SSL certificate section. Click “Download” to save your SSL certificate. Follow the instructions provided by your hosting provider for installation. Ensure you have the correct permissions to access and download the certificate.
Conclusion
Securing your website is crucial. Namecheap makes getting an SSL certificate easy. Follow the steps outlined to protect your site. Choose the right SSL type for your needs. Complete the purchase and installation process smoothly. This adds trust to your site.
Customers feel safe when browsing. Boost your site’s credibility with SSL. Now, your site is secure and reliable. Visitors can browse confidently. Keep your data safe and secure. Namecheap’s SSL certificates are affordable and effective. Start protecting your website today.
Ensure peace of mind for you and your visitors.


