
Are you looking to host your own website but feeling overwhelmed by the technical details? You’re not alone.
Navigating the world of web hosting can be daunting, but it doesn’t have to be. If you’ve chosen Namecheap as your hosting provider, you’re already on the right track to getting your website online quickly and affordably. Namecheap is known for its user-friendly interface and reliable service.
In this guide, I’ll walk you through the entire process step-by-step, ensuring you feel confident and in control. By the end of this article, you’ll have your website up and running smoothly. Ready to dive in? Let’s make hosting your website on Namecheap a breeze!

Credit: www.youtube.com
Choosing The Right Hosting Plan
Choosing the right hosting plan is crucial for your website’s success. Namecheap offers various options to suit different needs. Understanding these options will help you make an informed choice.
Shared Hosting Options
Shared hosting is ideal for beginners. It’s affordable and easy to manage. Your website shares server resources with others. This keeps costs low. Namecheap offers different shared hosting plans. Each plan provides a balance of features and price. You can start with the cheapest option and upgrade later.
Vps And Dedicated Servers
VPS hosting offers more control. It provides dedicated resources on a shared server. Suitable for growing websites with higher traffic. Namecheap’s VPS plans come with various configurations. You can choose based on your needs. Dedicated servers offer maximum control. They are best for large sites. You’ll have your own server resources. This guarantees better performance.
Comparing Features And Prices
Compare hosting plans based on features and prices. Shared hosting is cost-effective but limited. VPS offers flexibility at a moderate price. Dedicated servers are costly but powerful. Consider your website’s requirements. Look at storage, bandwidth, and support options. Namecheap provides detailed comparisons for each plan. This helps you select the best fit for your needs.
Credit: www.namecheap.com
Domain Registration Process
The domain registration process is your first step in hosting a website on Namecheap. Choosing the right domain sets the tone for your online presence. It is essential to ensure your domain name is unique and memorable. This guide covers how to check domain availability, register your domain, and set up domain privacy on Namecheap.
Checking Domain Availability
Begin by checking if your desired domain name is available. Namecheap offers a handy tool for this. Enter your preferred name in the search bar. The tool will show if your choice is available. If not, it suggests alternatives. This helps in finding the perfect fit for your brand.
Registering A Domain With Namecheap
Once you find an available domain, proceed to registration. Click on the “Add to Cart” button next to your chosen name. Follow the prompts to create an account. Fill in necessary details like name, email, and payment method. Review your order and confirm your purchase. Your domain is now registered.
Setting Up Domain Privacy
Domain privacy protects your personal information. Namecheap offers this service during the registration process. Select the privacy option in your cart. This hides your contact details from public databases. It enhances security and reduces spam. Your online identity stays safe.
Setting Up Your Hosting Account
Setting up your hosting account on Namecheap is a straightforward process. It’s essential to get the basics right to ensure your website runs smoothly. This section will guide you through creating a Namecheap account, accessing your hosting dashboard, and configuring account preferences. Let’s dive into each step.
Creating A Namecheap Account
First, visit Namecheap’s website. Look for the sign-up button at the top corner. Click it to start creating your account. Fill in your personal details like name and email address. Choose a strong password. Agree to their terms and conditions. Once done, click the create account button.
Accessing Your Hosting Dashboard
Log in to your Namecheap account with your credentials. After logging in, navigate to the dashboard. It’s your control center for managing your hosting. Explore the various options available. You’ll find sections for domains, hosting, and security.
Configuring Account Preferences
Visit the settings section within your dashboard. Here, you can customize your account preferences. Set your language, time zone, and notification settings. Ensure your contact information is correct. Regularly update your password for security.

Credit: www.youtube.com
Uploading Website Files
Hosting a website on Namecheap involves uploading your site files to their servers. First, log into your Namecheap account. Next, access the cPanel dashboard. Finally, use the File Manager to upload your website files.
Uploading your website files is a crucial step in bringing your site to life on the internet. Whether you’re launching a personal blog or a business site, knowing how to efficiently upload your files ensures your site is accessible and organized. Namecheap offers user-friendly tools to make this process seamless. Let’s dive into some practical methods to upload your website files using Namecheap. ###Using Ftp To Transfer Files
FTP, or File Transfer Protocol, is a reliable way to transfer large amounts of data. To use FTP, you’ll need an FTP client like FileZilla, which is free and easy to use. After installing FileZilla, enter your Namecheap FTP credentials. Typically, these include your domain name, FTP username, and password. Once connected, you can drag and drop your website files from your computer to the server. Think of FTP as your virtual moving truck. You can transport files quickly and efficiently, ensuring they arrive at their online destination intact. Have you ever considered how much time you could save by using FTP for bulk uploads? ###Utilizing Namecheap’s File Manager
Namecheap’s File Manager is a straightforward tool available in the cPanel. It’s perfect for those who prefer a browser-based solution without the need for additional software. Access the File Manager by logging into your Namecheap account and navigating to cPanel. Once there, click on File Manager under the “Files” section. You can upload files individually or in batches by selecting the “Upload” option. This tool is ideal for quick edits or small uploads. Remember the time I had to update a single image on my site? The File Manager made it a breeze without firing up any external apps. ###Organizing Your Website Structure
Proper organization of your website files is key to maintaining a clean and efficient site structure. Start by creating folders for different sections of your website, such as images, CSS files, and scripts. Ensure your main HTML files are in the root directory. This way, your website loads correctly when users enter your domain name. You wouldn’t want your homepage to throw a 404 error because the file is buried in the wrong folder, right? Consider keeping a backup of your original files on your local machine. This practice saved me once when I accidentally deleted a critical file on the server. It’s a simple step that can prevent headaches down the road. By understanding these methods, you can upload your website files to Namecheap with ease. Each method has its unique advantages, so choose the one that aligns with your needs. How will you ensure your website is organized and accessible to your audience?Configuring Dns Settings
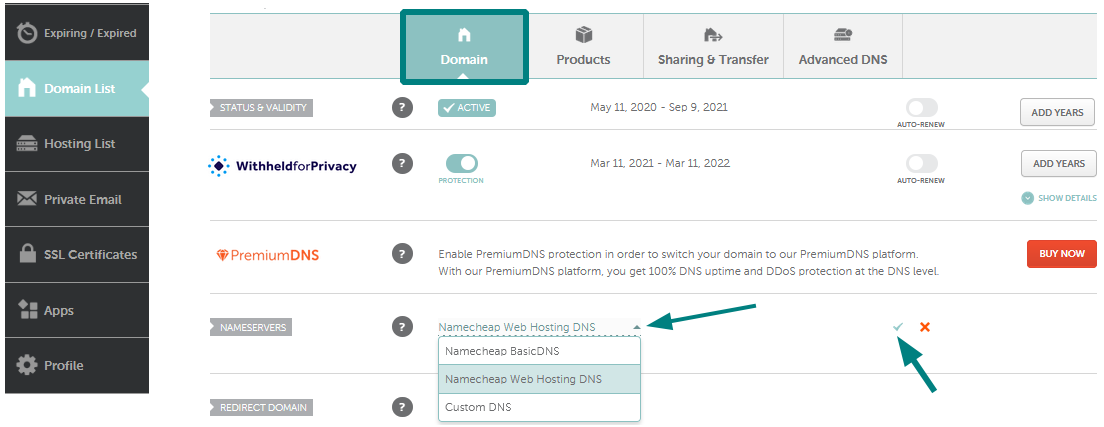
Setting up DNS settings on Namecheap is essential for hosting a website. First, access your Namecheap account and navigate to the Domain List. Next, select your domain and find the DNS settings option to configure the nameservers. Save changes to ensure your website is properly hosted.
Configuring DNS settings is a crucial step when hosting a website on Namecheap. This process ensures that your domain is correctly connected to your hosting service, allowing visitors to access your site seamlessly. Misconfigurations can lead to downtime or misdirected traffic, so it’s essential to get it right. Let’s break down the steps to ensure your DNS settings are configured correctly.Understanding Dns Basics
DNS, or Domain Name System, acts like a phone book for the internet. It translates your domain name into an IP address that computers use to identify servers. Imagine trying to call a friend without knowing their number. Understanding DNS helps you ensure your website is always reachable. When you register a domain with Namecheap, they automatically provide DNS settings. You can modify these settings to point your domain to different services. Familiarize yourself with terms like A records, CNAME, and MX records. This knowledge will empower you to make informed changes.Pointing Domain To Hosting
Once you’ve understood the basics, the next step is pointing your domain to your hosting service. Navigate to Namecheap’s dashboard and locate your domain list. Click on ‘Manage’ next to the domain you wish to connect. In the DNS settings, you’ll need to update the Name Servers. Replace the default Namecheap nameservers with those provided by your hosting service. This tells your domain where to find your website’s files. Double-check these entries to avoid errors that could lead to downtime.Testing Dns Propagation
After updating your DNS settings, it’s crucial to test DNS propagation. This process can take a few hours to a couple of days, depending on various factors. To check if your domain is correctly pointing to your hosting, use online tools like ‘Whatsmydns.net’. Enter your domain, and the tool will show DNS records from various locations worldwide. This helps confirm that the changes have taken effect globally. If you encounter issues, revisit your DNS settings to ensure everything is configured correctly. Have you ever waited impatiently for DNS changes to propagate? It’s a test of patience. But knowing how to check propagation can ease that waiting period. Remember, configuring DNS settings is a critical skill for any website owner. By understanding, pointing, and testing, you ensure your site is accessible and live.Installing Ssl Certificates
Installing SSL certificates is a crucial step in ensuring your website’s security and building trust with your visitors. SSL certificates encrypt the data between your website and its users, keeping sensitive information safe from prying eyes. Whether you’re new to website hosting or a seasoned pro, understanding how to install SSL certificates on Namecheap is essential.
Choosing The Right Ssl Type
Selecting the right SSL certificate is the first step. Namecheap offers various types, such as Domain Validated (DV), Organization Validated (OV), and Extended Validation (EV) certificates. Each type serves different needs, depending on your security requirements and the level of trust you wish to establish with your users.
If you’re running a personal blog, a DV certificate might suffice. However, if you’re managing an e-commerce site, consider an OV or EV certificate for enhanced security and customer trust. Ask yourself: What level of security does my website need?
Installing Ssl Via Namecheap
Once you’ve chosen the right SSL, it’s time to install it. First, log into your Namecheap account and navigate to the ‘SSL Certificates’ section. Here, you’ll find options to purchase and manage your certificates.
After purchasing, you’ll need to generate a Certificate Signing Request (CSR) from your hosting provider. This step is crucial as it helps create a secure connection. Namecheap provides detailed instructions, making the process straightforward and user-friendly.
Upload the CSR to Namecheap, and they’ll issue your SSL certificate. You’ll receive an email with further instructions, guiding you through the final steps of installation.
Verifying Ssl Installation
Verification ensures that your SSL certificate is working correctly. You can use online tools like SSL Shopper or Qualys SSL Labs to check your SSL setup. These tools will provide a detailed report, highlighting any potential issues.
Ensure that your website loads with HTTPS in the browser’s address bar. Look for the padlock icon, which indicates a secure connection. If you’re having trouble, revisit the installation steps or contact Namecheap’s support team for assistance.
Have you ever visited a website without the padlock icon and hesitated to proceed? That’s the level of trust an SSL certificate provides. Make sure your visitors feel secure by verifying your SSL installation.
Managing Website Performance
Managing website performance is crucial for providing a seamless user experience and maintaining your site’s reputation. If you’ve chosen Namecheap as your hosting provider, optimizing your website’s performance can make all the difference. Imagine visiting a website that takes forever to load or crashes when you need it most. You wouldn’t stick around, right? Let’s dive into some practical steps to ensure your website runs smoothly and efficiently.
Optimizing Load Times
Load times are the first impression your website makes. A slow-loading site can frustrate visitors and drive them away. Start by compressing images and minimizing code. Large image files can bog down your site, but tools like TinyPNG can help reduce their size without losing quality.
Also, consider lazy loading for images. This means images only load when they come into view, speeding up the initial page load. Test your site’s speed with tools like Google PageSpeed Insights to identify specific areas for improvement.
Monitoring Website Traffic
Understanding how visitors interact with your site is vital for performance management. Use analytics tools like Google Analytics to track traffic patterns. Are visitors leaving after viewing just one page? Are they spending time on specific sections?
Analyzing this data helps you make informed decisions. Maybe a particular page needs more engaging content or a smoother navigation path. Regularly check these metrics to adapt your strategies and improve your site’s performance.
Utilizing Caching Solutions
Caching can dramatically enhance your site’s speed. It stores versions of your web pages so they load faster for returning visitors. Namecheap provides easy-to-use caching options through their cPanel.
Enable browser caching to store static files like images and scripts. This reduces server load and speeds up access for users. It’s a simple step that can significantly boost your website’s performance.
Have you ever noticed how your favorite websites are quick and responsive? That’s the result of optimized load times, insightful traffic monitoring, and effective caching. Are you ready to turn your Namecheap-hosted site into one of those favorites?
Troubleshooting Common Issues
Hosting a website on Namecheap can be straightforward. Yet, you might encounter some issues. Troubleshooting these common problems ensures your site runs smoothly. Let’s explore how to resolve frequent issues with DNS, file uploads, and server downtime.
Resolving Dns Errors
DNS errors can disrupt website access. Start by checking your DNS settings in Namecheap’s dashboard. Ensure your domain points to the correct server. Double-check the DNS records for accuracy. Incorrect records can lead to errors.
Clear your browser cache after updating DNS settings. This helps to see recent changes. If the problem persists, contact Namecheap support. They can provide specific guidance tailored to your setup.
Fixing File Upload Problems
File upload issues can halt progress. First, verify your internet connection stability. A weak connection can cause interruptions. Check the file size restrictions on Namecheap. Uploading large files may need adjustments in settings.
Use an FTP client for more control over uploads. It can handle larger files better. Ensure your permissions are correctly set. Incorrect permissions can block file uploads. Contact support if issues remain unresolved.
Addressing Server Downtime
Server downtime affects website accessibility. Start by checking Namecheap’s status page. This shows if there are ongoing issues. Verify your hosting plan’s uptime guarantee. Ensure your plan meets your needs.
Optimize your website for better performance. Reduce heavy scripts and images. This decreases load on the server. Consider upgrading your hosting plan if downtime persists. Namecheap support can assist with plan recommendations.
Frequently Asked Questions
How To Host A Website From Namecheap?
Sign up for Namecheap. Choose a hosting plan. Register a domain or use an existing one. Set up your website using Namecheap’s tools. Upload your website files via cPanel or a website builder. Ensure DNS settings point to Namecheap servers.
Your site is now live.
Is Namecheap Good For Web Hosting?
Namecheap offers reliable and affordable web hosting services. Their plans include features like free SSL, domain privacy, and 24/7 support. Users appreciate their user-friendly interface and uptime guarantee. Namecheap is a good choice for personal and small business websites.
Does Namecheap Have A Website Builder?
Yes, Namecheap offers a website builder called “EasyWP. ” It’s user-friendly and ideal for beginners. You can create professional websites without coding. EasyWP provides various templates and customization options. This makes it simple to design your website efficiently.
Does Namecheap Domain Come With Hosting?
Namecheap domains do not include hosting by default. Hosting services are available for purchase separately. You can choose from various hosting plans according to your needs. Combining domain and hosting enhances website management and performance.
Conclusion
Hosting a website on Namecheap is simple and affordable. Follow the steps we discussed. Register your domain. Choose a hosting plan that suits your needs. Navigate through Namecheap’s user-friendly interface. With practice, you can manage your site efficiently. Don’t forget to check for updates regularly.
Keep your website secure and optimized. Namecheap offers reliable customer support if you need help. Hosting your site doesn’t have to be complicated. Start today and make your online presence felt. Whether for business or personal use, Namecheap is a good choice.
Your website journey begins with Namecheap.


