
Are you ready to launch your own website, but feeling stuck on the technical steps? Connecting your Namecheap domain to Hostinger hosting might seem daunting, but it’s actually a straightforward process that can be done in just a few steps.
Imagine the satisfaction of seeing your website live, knowing you accomplished it all on your own. In this guide, you’ll learn exactly how to bridge the gap between your domain and hosting service, unlocking the door to your online presence.
We’ve broken down the process into simple, manageable steps to ensure you can follow along with ease. Stick with us and you’ll have your domain connected in no time, paving the way for your site to shine on the web.
Domain Registration Basics
Understanding the basics of domain registration is crucial when you’re setting up your website. It’s the first step in establishing your online identity. Without a domain, your site won’t have a home on the web. It’s like owning a piece of digital real estate. But how do you choose the right domain and set it up properly?
Choosing The Right Domain
Your domain name is more than just a web address. It’s your brand’s first impression. Think of it as your online business card. You want something memorable and easy to spell. Shorter is usually better.
Consider using keywords related to your business. This can help with SEO, making it easier for potential visitors to find you. Avoid numbers and hyphens; they can confuse people typing your URL.
Have you ever found the perfect domain, only to discover it’s already taken? It happens more often than you think. Try creative alternatives or different extensions like .net or .org.
Namecheap Account Setup
Setting up your Namecheap account is straightforward. You’ll need a valid email address and payment method. Once registered, you can manage your domains from your dashboard.
After purchasing your domain, you’ll receive a confirmation email. Always check for this email to ensure your domain is secured. It’s your ticket to starting the setup process.
Navigate the dashboard to update DNS settings, which is essential for connecting your domain to Hostinger hosting. This might sound technical, but Namecheap offers easy guides to help you through it.
Have you ever wondered why you need to manage DNS settings? They are the backbone of how your domain communicates with your hosting provider. Without proper setup, your site won’t function correctly.
By grasping these basics, you’re laying a solid foundation for your website’s success. Don’t rush through these steps; your domain is your identity, and precision matters.
Hostinger Hosting Essentials
Are you ready to connect your Namecheap domain to Hostinger hosting? Before diving into the technical details, understanding the essentials of Hostinger hosting will make your journey smoother. Hostinger offers a range of features and services that cater to both beginners and seasoned webmasters. From affordability to user-friendly interfaces, Hostinger provides a solid foundation for your website.
Selecting A Hosting Plan
Choosing the right hosting plan is crucial. Hostinger offers various plans tailored to different needs. Are you planning to host a personal blog or a business website? The options range from shared hosting to VPS and cloud hosting. Analyze your requirements and pick a plan that suits your budget and goals.
Imagine you’re launching a small business website. A shared hosting plan could be your best bet. It’s cost-effective and offers sufficient resources for a growing site. If scalability is your focus, consider VPS or cloud hosting for more control and flexibility.
Take a moment to explore the features included in each plan. Look for essentials like SSL certificates, daily backups, and uptime guarantees. These are vital for maintaining a secure and reliable website. Selecting a plan is not just about the price; it’s about finding a balance between cost and functionality.
Hostinger Account Creation
Once you’ve selected a plan, the next step is setting up your Hostinger account. The process is straightforward. Visit Hostinger’s website and click on the ‘Sign Up’ button. Fill in your details, choose a payment method, and complete the registration.
Have you ever felt overwhelmed by complex sign-up processes? Hostinger makes it simple with a user-friendly interface. No need for technical expertise. Just follow the prompts, and you’ll have your account ready in no time.
After registration, verify your email to activate your account. This ensures you’re ready to start configuring your hosting environment. With your Hostinger account set up, you’re one step closer to connecting your Namecheap domain and bringing your website to life.
Now, pause for a moment and think about the significance of this step. How does it feel to have laid the groundwork for your online presence? Setting up an account is not just a formality; it’s the start of your journey into the digital world.
Dns Configuration
Linking a Namecheap domain to Hostinger hosting involves updating DNS settings. First, access Namecheap’s dashboard to locate your domain. Next, modify the nameservers to Hostinger’s provided details, ensuring seamless connection. This process helps direct web traffic efficiently.
Configuring your DNS settings might sound technical, but it’s a crucial step in connecting your Namecheap domain to your Hostinger hosting account. Think of DNS as the internet’s address book. It translates your domain name into an IP address that computers can understand. Without proper DNS configuration, your website won’t function correctly. Let’s dive into the essential steps for a seamless setup. ###Accessing Namecheap Dns Settings
First, log in to your Namecheap account. Once inside, navigate to the “Domain List” on the left sidebar. Find your domain and click the “Manage” button next to it. You’ll see a dashboard with various options for your domain. Look for the “Advanced DNS” tab. This is where you can modify DNS settings to point your domain to your hosting provider. Adjusting DNS settings might seem daunting at first. I remember hesitating before making my first change, but it’s surprisingly straightforward. A few clicks and you’re on your way to having your domain and hosting in sync. ###Updating Nameservers
After accessing your DNS settings, you need to update your domain’s nameservers to point to Hostinger. Head to the “Nameservers” section within the same dashboard. You’ll typically see Namecheap’s default nameservers. To change them, select “Custom DNS” from the dropdown menu. This will allow you to input the nameservers provided by Hostinger. Copy the nameservers from your Hostinger account dashboard. They usually look like `ns1.hostinger.com` and `ns2.hostinger.com`. Paste them into the appropriate fields in Namecheap. Updating your nameservers tells the internet where to find your website files. It’s like giving directions to a friend who’s never been to your house before. Remember, DNS changes can take a few hours to propagate globally. So, don’t panic if your site doesn’t work right away. Patience is key here. Have you ever tried connecting a domain to a hosting provider before? If so, how did it go? If not, what’s holding you back from taking the plunge?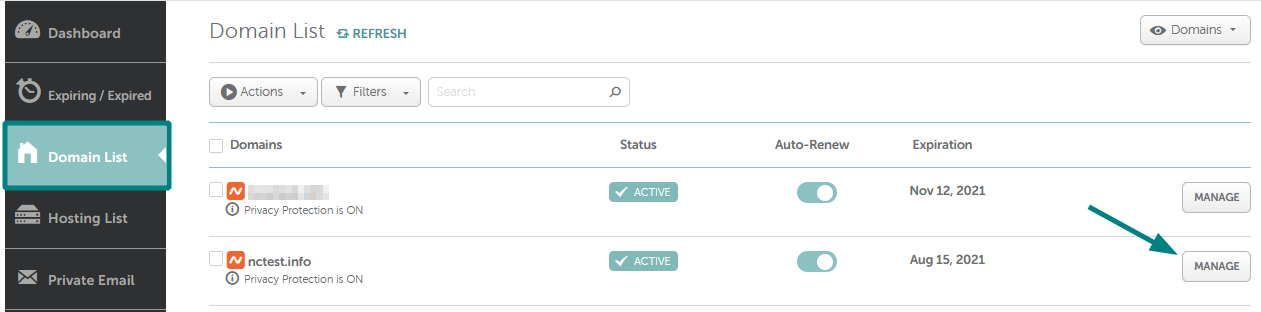
Credit: www.namecheap.com
Linking Domain To Hostinger
Connecting a Namecheap domain to Hostinger hosting involves updating DNS settings. First, log into your Namecheap account. Locate the domain list, select your domain, and find the “Manage” button. Update the nameservers to Hostinger’s. Save the changes, and your domain should connect shortly.
Linking your Namecheap domain to Hostinger hosting might sound like a daunting task, but it’s a straightforward process that anyone can tackle. This step is crucial for your website to go live, ensuring your domain points to the hosting service where your website files are stored. Let’s break it down into simple steps to make sure everything is connected properly.Adding Domain To Hostinger
First, log in to your Hostinger account. Navigate to the dashboard and locate the “Domains” section. Here, you’ll find an option to add a new domain. Enter your Namecheap domain name and follow the prompts to add it to Hostinger. If you’ve ever been puzzled by technical jargon, don’t worry—Hostinger guides you through each step. Ensure you’ve saved your changes, so your domain is successfully added. It’s like adding a new contact to your phone; once it’s in, you’re ready to connect.Checking Domain Connectivity
Once the domain is added, it’s time to ensure it’s connected correctly. Head over to the DNS settings in your Namecheap account. You need to update the nameservers to point to Hostinger’s servers. Typically, this involves entering two or more nameserver addresses provided by Hostinger. After updating, give it some time. Domain changes can take up to 48 hours to propagate. Check back periodically to see if your domain is pointing to your Hostinger account. You can use online tools to verify if your DNS changes have taken effect. Have you ever experienced a delay in seeing your website live? It’s a common occurrence, but patience is key. If the changes don’t reflect after two days, double-check your settings. This process ensures your domain is linked properly, setting the stage for your website to flourish. Connecting a domain may initially seem like a complex puzzle, but with the right steps, it becomes a manageable task. How does it feel to know you’re just a few clicks away from making your online presence official?Troubleshooting Common Issues
Connecting your Namecheap domain to Hostinger hosting is usually smooth. Sometimes, issues arise that need troubleshooting. This section covers common problems and their solutions. Follow these steps to ensure your domain connects seamlessly.
Dns Propagation Delays
DNS changes can take time to update across the internet. This delay is called DNS propagation. It usually lasts from a few hours to 48 hours. During this period, your domain might not connect. Be patient while waiting for the changes to take effect.
Check your DNS settings again if it takes longer. Ensure you entered the correct name servers. Use online tools to monitor DNS propagation status. These tools show when the update reaches various locations worldwide.
Resolving Connection Errors
Connection errors can occur due to incorrect DNS settings. Double-check your name server entries. Hostinger provides specific name servers you need to use. Ensure these are entered correctly on Namecheap.
Another cause might be caching issues. Clear your browser cache and DNS cache. This often fixes connection errors. Use the command prompt for DNS cache clearing. Type “ipconfig /flushdns” and press enter.
If issues persist, contact customer support. Both Namecheap and Hostinger have helpful support teams. Provide them with detailed information about the error. They can guide you through resolving the issue.
Security Measures
Connecting your Namecheap domain to Hostinger hosting involves ensuring robust security. It’s crucial to protect your website from potential threats. Implementing security measures safeguards your domain and hosting. This section covers essential practices for enhancing security.
Enabling Ssl Certificates
SSL certificates encrypt data between your site and visitors. They prevent unauthorized access to sensitive information. Hostinger offers free SSL certificates with their hosting plans. Activate SSL from your Hostinger control panel. This boosts trust among users and search engines.
Regular Security Checks
Conduct regular security checks to spot vulnerabilities. Use Hostinger’s security tools to scan your website. Identify and fix security issues promptly. Regular updates and audits minimize risks. Keep your website secure by staying vigilant.
Tips For Efficient Website Management
Linking a Namecheap domain to Hostinger hosting is simple. Start by logging into your Namecheap account. Update the DNS settings to point to Hostinger’s servers. Save changes and wait for them to propagate. Your site should connect smoothly, enhancing website management efficiency.
Managing a website efficiently is crucial for success, especially when connecting your Namecheap domain to Hostinger hosting. Whether you’re a seasoned pro or a beginner, understanding how to optimize your website management can save you time and headaches. Here are some practical tips to help you run your website smoothly and effectively.Utilizing Hostinger Tools
Hostinger provides an array of tools that can make your website management a breeze. Have you explored the control panel thoroughly? It’s packed with user-friendly features that help you manage domains, emails, and databases efficiently. One tool I found incredibly helpful is the Auto Installer. It allows you to add applications like WordPress with just a few clicks. This can save hours of manual setup and configuration, letting you focus on what matters most—building your site.Regular Backups
How often do you backup your website? If the answer isn’t “regularly,” you might be risking a lot. Hostinger offers automated backup options, making it easy to safeguard your data. Think of backups as your website’s insurance policy. They ensure that in case of a technical glitch or cyberattack, you can restore your site without losing valuable information. Always schedule regular backups, even if your site is new. Consider setting up weekly or even daily backups depending on how often you update your site. Having a reliable backup could be the difference between a minor inconvenience and a major disaster. By following these tips, you’ll be on your way to efficient website management, ensuring a seamless experience for both you and your visitors. What steps are you taking today to enhance your website’s management?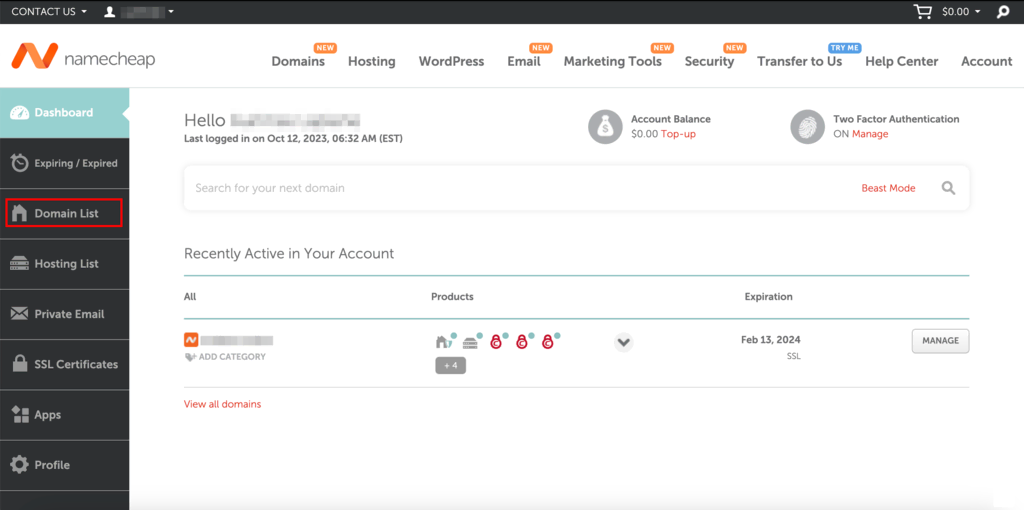
Credit: www.hostinger.com

Credit: www.youtube.com
Frequently Asked Questions
Can I Use Namecheap Domain On Hostinger?
Yes, you can use a Namecheap domain on Hostinger. Update the domain’s DNS settings to point to Hostinger’s servers. Follow Hostinger’s domain setup instructions for seamless integration. Enjoy your website hosting without any hassle!
How Do I Connect My Domain To Hosting Hostinger?
Log into your Hostinger account. Go to the ‘Domains’ section. Update DNS settings to Hostinger’s nameservers. Wait for propagation. Your domain is now connected to Hostinger hosting.
How To Connect Namecheap Domain To Hosting?
Log in to Namecheap, go to “Domain List,” select your domain, and click “Manage. ” Update DNS settings to your hosting provider’s nameservers. Save changes and wait for propagation.
How Do I Connect My Domain Name To My Hosting Account?
Log into your hosting account. Find DNS settings. Update domain’s nameservers to match hosting provider’s details. Save changes. Wait for propagation. Your domain connects to hosting successfully.
Conclusion
Connecting your Namecheap domain to Hostinger hosting is simple. Follow clear steps. First, access your Namecheap account. Change the domain’s nameservers to Hostinger’s. Then, log in to Hostinger. Add your domain to the hosting account. Wait for DNS propagation. This may take a few hours.
Once complete, your website goes live. It’s straightforward. You now have a fully functioning site. Always check settings for accuracy. Support is available if needed. Enjoy your new online presence!


