
Are you ready to launch your Shopify store but feeling stuck on how to connect your Namecheap domain? You’re not alone.
Many entrepreneurs find this step a bit daunting, but it’s actually simpler than you might think. Imagine the excitement of seeing your custom domain live and attracting customers. This guide is crafted to make the process seamless for you. We’ll walk you through each step with clear, easy-to-follow instructions.
By the end of this article, you’ll have the confidence to link your domain effortlessly and give your online store the professional look it deserves. Let’s dive in and turn that technical hurdle into a stepping stone for your business success!
Credit: www.namecheap.com
Benefits Of Connecting Namecheap To Shopify
Connecting your Namecheap domain to Shopify offers several advantages. It simplifies your online presence management. You can maintain brand consistency by aligning your domain name with your store. This connection enhances your store’s credibility and professionalism. Customers feel more confident when shopping on a branded domain.
Improved Branding
Integrating Namecheap with Shopify strengthens your brand identity. A custom domain reflects your brand’s uniqueness. It helps in building trust among your customers. Your store becomes more memorable with a personalized domain name.
Seo Benefits
A unique domain improves your store’s search engine visibility. Search engines favor branded domains over generic ones. It aids in achieving higher rankings in search results. This leads to increased traffic and potential sales.
Professional Appearance
A custom domain offers a professional look to your store. It distinguishes your business from competitors. Customers associate custom domains with established businesses. This perception boosts trust and credibility.
Easy Management
Managing your domain and store becomes seamless. Namecheap provides user-friendly domain management tools. Shopify’s integration simplifies website management. You save time with efficient domain handling.
Enhanced Security
Connecting Namecheap to Shopify enhances your store’s security. Namecheap offers robust domain protection features. This integration helps in securing customer data. A secure domain builds customer trust.
Preparing Your Domain
Connecting a Namecheap domain to Shopify is straightforward. First, log into your Namecheap account and find the domain list. Adjust the DNS settings to point to Shopify’s servers. This ensures your domain directs visitors to your Shopify store efficiently.
Preparing your domain is a critical step when connecting a Namecheap domain to Shopify. It’s like laying a strong foundation before building a house. You want everything to be perfect so your online store can thrive without hiccups. This phase involves ensuring your domain is ready for the transition, which includes checking domain availability and verifying ownership. Let’s dive into these essential tasks that set the stage for a seamless connection.Check Domain Availability
Before you can connect your Namecheap domain to Shopify, you need to ensure it’s available for use. Even if you’ve purchased the domain, it might be tied up with settings or services that could interfere with its transfer. Start by logging into your Namecheap account and navigating to the “Domain List” section. Here, you can see the status of your domain and whether it’s ready for connection. If your domain is set to auto-renew, you’re on the right track. This means it’s active and won’t expire unexpectedly. Make sure there are no pending actions or holds, which could delay the process.Verify Ownership
Verifying ownership is like having the keys to your digital property. It confirms that you have the right to make changes and connect your domain to Shopify. Head over to your Namecheap dashboard and access the domain management section. Look for the “Whois Contact Information” to ensure your details are up-to-date. Any discrepancies here might cause verification issues later on. A personal tip: double-check that the email address listed is one you actively use. Shopify might send verification emails, and you don’t want those going unnoticed in a forgotten inbox. Have you ever been locked out of an account because you forgot to update your contact info? Avoid that hassle by keeping your records current. This way, you’ll breeze through the verification process without stress. Once you’ve confirmed ownership, you’re ready to move forward with connecting your domain to Shopify. Each step you take now saves you from potential headaches in the future. Are you feeling more prepared to transform your domain into a thriving online store?Configuring Dns Settings
Connecting a Namecheap domain to Shopify requires configuring DNS settings. Access Namecheap’s dashboard, navigate to DNS settings, and add Shopify’s IP address to the A record. Ensure CNAME points to Shopify’s domain.
Configuring your DNS settings is a crucial step in connecting your Namecheap domain to Shopify. This process ensures that your domain points to your Shopify store, making it accessible to your customers. While it might seem daunting at first, it’s quite straightforward once you break it down into manageable steps.Access Namecheap Dashboard
To begin, log into your Namecheap account. You’ll find the dashboard offers a user-friendly interface. Look for the domain list section; it’s your go-to place for managing all your domains. Navigating through the dashboard is simple. Spot the domain you want to connect to Shopify and click on ‘Manage’. This takes you to a page where you can adjust settings specific to your domain. Have you ever felt overwhelmed by tech jargon? Namecheap makes it easy by providing intuitive options. You’ll find the DNS settings ready to be configured without needing to decode complex terms.Update Dns Records
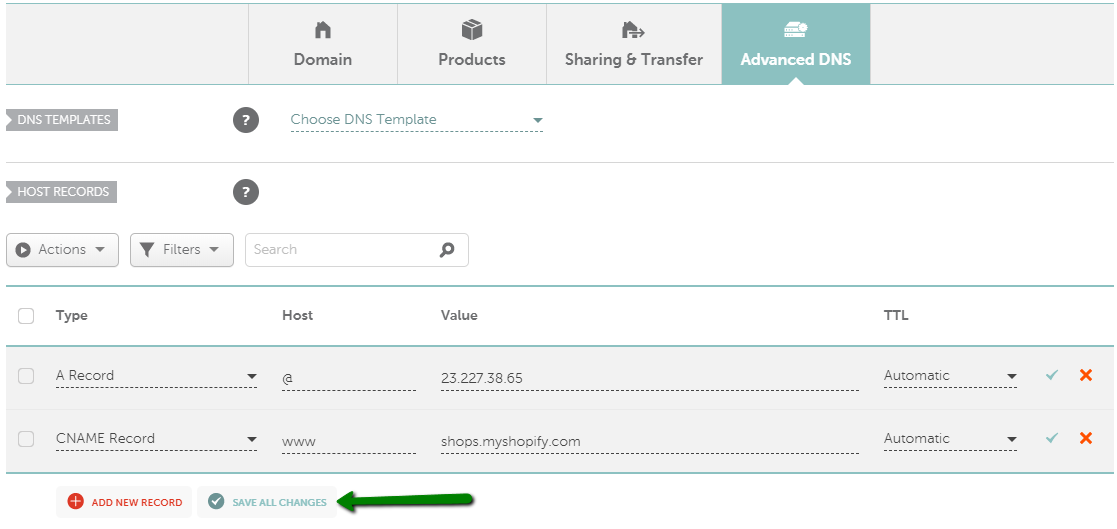
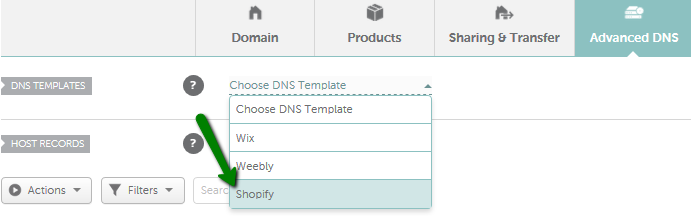
Next, let’s tackle updating your DNS records. It’s like giving your domain a new address so it knows where to find your Shopify store. Start with the ‘Advanced DNS’ tab. Here, you’ll add a couple of important records: an A Record and a CNAME Record. The A Record should point to Shopify’s IP address, while the CNAME Record should direct your domain to Shopify’s URL. As you update these records, ensure accuracy. A small typo can lead to connectivity issues. Take your time; it’s worth it to guarantee your domain directs visitors seamlessly to your store. Think of DNS settings as the GPS for your domain. Wouldn’t you want your customers to find you without a hitch? By updating your DNS records correctly, you’re setting up a direct path to your Shopify storefront.Configuring your DNS settings effectively can be the difference between a seamless user experience and a frustrating one. Are you ready to enhance your online presence and make your domain work for you? Dive into these steps and transform your setup with ease.
Credit: www.namecheap.com
Shopify Domain Setup
Connecting a Namecheap domain to Shopify is simple. First, log into your Namecheap account and access the Domain List. Then, change the DNS settings to point to Shopify’s servers. This ensures your domain links correctly to your Shopify store.
Setting up your Shopify domain is a crucial step to establishing your online presence. Having your domain connected properly ensures that customers can find your store effortlessly. Let’s dive into the process, ensuring your Namecheap domain is seamlessly integrated with your Shopify store.Add Domain In Shopify
Begin by logging into your Shopify admin panel. On the left sidebar, navigate to Online Store and then click on Domains. Here, you’ll see the option to Connect existing domain. Enter your Namecheap domain name in the given field. Click Next and Shopify will guide you through the DNS settings. It’s a straightforward process and Shopify provides clear instructions. Shopify will ask you to update the DNS records in your Namecheap account. This is where you point your domain to Shopify’s servers.Verify Domain Connection
After updating your DNS settings, you’ll need to verify the domain connection. Return to your Shopify admin panel under the Domains section. Shopify will check if the domain is properly connected. This may take a few minutes, so be patient. Once verified, you’ll see a confirmation message. If there are issues, Shopify will provide specific errors to address. Double-check the DNS records in Namecheap to ensure they’re correct. Making sure your domain is connected properly is key to running a successful Shopify store. It’s a simple yet powerful step that assures your customers that they’re in the right place. Have you connected your domain yet? It’s time to take the plunge and make your store stand out online.Troubleshooting Common Issues
Connecting a Namecheap domain to Shopify can occasionally present challenges. Ensure your DNS settings are correctly configured. Verify that your domain points to Shopify’s servers to avoid connectivity issues.
Connecting a Namecheap domain to your Shopify store can be a straightforward process, but occasionally, you might run into some hiccups. Understanding how to troubleshoot common issues can save you time and frustration. Whether you’re facing DNS propagation delays or incorrect DNS settings, knowing what to look for can make all the difference.Dns Propagation Delays
DNS propagation delays are often the first roadblock you may encounter. When you update your DNS settings, it can take time for the changes to spread across the internet. This process can last anywhere from a few hours to up to 48 hours. During this time, you might notice that your domain isn’t directing to your Shopify store as expected. It’s like waiting for a letter to be delivered across a vast network; it requires patience. Checking whether the DNS changes have propagated can be done using online tools like “What’s My DNS.” These tools allow you to see if different parts of the world recognize your new settings. Have you ever wondered why your friend overseas sees your website, but you don’t? DNS propagation delays could be the reason.Incorrect Dns Settings
Incorrect DNS settings can lead to your domain not connecting properly to Shopify. It’s crucial to ensure that you’ve entered the correct values in your Namecheap DNS settings. For Shopify, you typically need to set the “A Record” to Shopify’s IP address and the “CNAME Record” to “shops.myshopify.com.” Missing or mistyped entries can cause problems. Imagine entering a wrong phone number; you won’t reach the intended person. Similarly, incorrect DNS settings will misdirect your domain. Double-check your entries, and consider using Shopify’s guides or customer support if you’re unsure. Have you ever faced a stubborn issue that seemed impossible to fix? Sometimes, refreshing your settings or clearing your cache can resolve such stubborn issues. It’s a simple yet often overlooked step. Are you unsure if your DNS settings are correct? Utilize tools like “DNS Checker” to verify your entries. These tools provide a detailed view of what’s happening with your domain, offering insights that can pinpoint the problem. Connecting your Namecheap domain to Shopify should be a seamless experience. However, when issues arise, knowing how to troubleshoot them can make the process smoother and more enjoyable. What challenges have you faced in connecting your domain, and how did you overcome them?
Credit: help.shopify.com
Tips For Smooth Integration
Integrating your Namecheap domain with Shopify can be smooth with the right steps. Proper planning and execution ensure a seamless connection. Here are key tips to make the integration process easy and efficient.
Monitor Domain Status
Regularly check your domain’s status to avoid issues. Ensure the domain is active and not expired. Use Namecheap’s dashboard to track domain settings. Confirm that DNS settings point to Shopify. An active domain status ensures a smooth connection.
Use Shopify Resources
Shopify provides helpful resources for domain integration. Access their guides and tutorials for step-by-step instructions. These resources simplify the connection process. If you face challenges, consult Shopify’s support team. They offer expert advice to resolve issues promptly.
Frequently Asked Questions
How Do I Connect My Domain To My Shopify Website?
Connect your domain to Shopify by navigating to “Domains” in the admin panel. Click “Connect existing domain. ” Enter your domain name and follow the instructions for DNS settings. Verify the connection, and Shopify will guide you through the process.
Ensure DNS records are correctly set to complete integration.
How Do I Verify Domain Ownership On Shopify Namecheap?
Verify domain ownership on Shopify via Namecheap by adding a TXT record. Access your Namecheap account, navigate to Domain List, and select your domain. Click “Advanced DNS” and add the TXT record provided by Shopify. Save changes and wait for verification.
Should I Connect My Domain To Shopify?
Connecting your domain to Shopify can enhance your brand’s credibility. It helps improve SEO rankings and creates a seamless shopping experience for customers. Additionally, it strengthens brand identity and makes your online store more professional and trustworthy.
How Do I Register My Domain On Shopify?
To register your domain on Shopify, log into your Shopify account. Navigate to “Settings,” then “Domains. ” Click “Add Domain” and select “Buy new domain. ” Enter your desired domain name, complete the purchase, and follow the prompts to finalize the registration.
Your domain will be automatically connected to your store.
Conclusion
Connecting your Namecheap domain to Shopify is simple and rewarding. First, buy your domain from Namecheap. Then, adjust DNS settings to point to Shopify. Follow Shopify’s step-by-step guide for seamless integration. This connection boosts your store’s credibility and visibility. Your domain becomes your brand’s identity online.
Customers find you easily. A unique domain enhances trust and professionalism. Regularly check settings for optimal performance. Keep your domain and store updated. Now, your Shopify store is ready to reach the world. Enjoy the benefits of a personalized domain for your business growth!


