
Are you tired of juggling multiple email accounts? Imagine the convenience of having all your emails in one place.
By connecting your Namecheap email to Gmail, you can streamline your communication and boost your productivity. This simple integration ensures you never miss an important message. Think about it—no more switching between tabs or apps. Just a single, organized inbox where you can access everything you need.
Plus, with Gmail’s user-friendly interface and powerful features, managing your emails becomes a breeze. Wondering how to make this happen? The process is easier than you might think, and we’re here to guide you through each step. Stick around to learn how you can simplify your email management and make your digital life a whole lot easier.
Credit: www.namecheap.com
Setting Up Namecheap Email
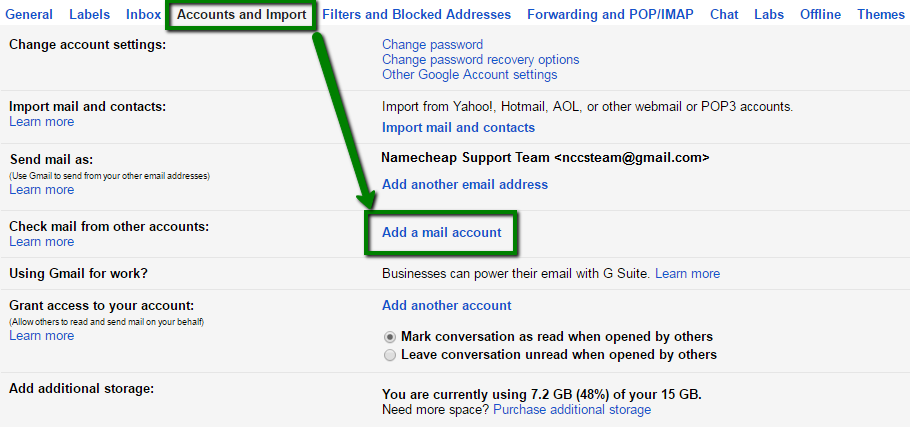
Connecting Namecheap Email to Gmail is simple. Access Gmail settings and add your Namecheap account under ‘Accounts and Import’. Follow the prompts to link the email seamlessly, allowing you to manage everything from one platform.
Setting up your Namecheap email is a straightforward process that opens doors to efficient communication. Whether you’re a small business owner or just looking to streamline your emails, connecting Namecheap email to Gmail can enhance your productivity. Dive into the simple steps needed to configure this setup, ensuring your emails are organized and easily accessible.Accessing Namecheap Dashboard
First, log into your Namecheap account. This is your control center for all things related to your domain and email settings. Once logged in, find the dashboard by clicking on your account name in the upper right corner. Do you see the “Domain List” option? Click on it. This will lead you to a page showing all your domains. Select the domain associated with the email you want to set up. Accessing the dashboard is the first step towards customizing your email experience.Creating Email Account
With your domain selected, locate the “Email” tab. This is where you’ll create your email account. Click on “Email Accounts” and choose “Create Email Account.” Here, you can specify the username and password for your new email account. Think about what you want your email to convey. A professional tone or a personal touch? Once you’ve decided, create the account and save the settings. This step is crucial; it shapes how others perceive your communication. Connecting your Namecheap email to Gmail takes these simple steps further. How will this integration improve your workflow?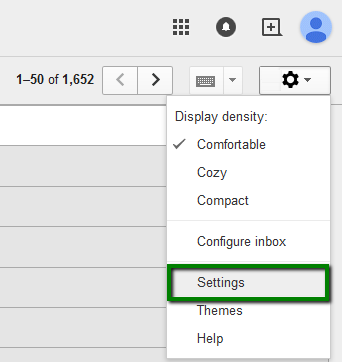
Credit: www.namecheap.com
Configuring Gmail For Namecheap Email
Connecting your Namecheap email to Gmail offers convenience. It allows you to manage emails from one place. This guide will help you configure Gmail for Namecheap email. Follow these steps to set it up smoothly.
Opening Gmail Settings
Start by logging into your Gmail account. Look for the gear icon at the top right. Click it to open the settings menu. Choose “See all settings” from the dropdown. This opens a new page with various options.
Scroll through the settings tabs. Look for the “Accounts and Import” tab. Click on it to access email account settings. This section helps you add and manage external email accounts.
Adding A New Email Account
Find the “Check mail from other accounts” option. Click “Add a mail account.” A pop-up window appears. Enter your Namecheap email address in the field provided. Click “Next” to proceed.
Choose “Import emails from my other account (POP3).” Enter the required server information. Include your Namecheap email server details. Enter the username and password for your Namecheap email. Tick “Leave a copy of retrieved messages on the server.” This ensures emails are stored in Namecheap too.
Click “Add Account.” Follow any additional prompts. Your Namecheap email is now connected to Gmail. Enjoy seamless access to all your emails.
Entering Namecheap Email Details
Connect Namecheap Email to Gmail by entering your email details in Gmail’s settings. This setup enables seamless email management. Enjoy a streamlined communication experience by integrating your Namecheap account with Gmail.
Entering the details for your Namecheap email in Gmail is crucial. It ensures smooth communication. Understanding the correct server and port settings is vital. It avoids errors and delays. This guide simplifies the process.Server Information
First, access your Namecheap email account settings. Locate the server information. You need the incoming and outgoing mail servers. The incoming server is often IMAP or POP3. Namecheap typically uses mail.yourdomain.com. The outgoing server is SMTP. It also uses mail.yourdomain.com. Confirm these details before proceeding.Port Settings
Now, focus on port settings. It’s important for secure connections. For IMAP, the port is usually 993. For POP3, use port 995. Both require SSL. The SMTP port is generally 465 or 587. These ports also need SSL. Ensure SSL is enabled for security. Double-check these settings in Gmail. It’s essential for proper functioning.
Credit: www.youtube.com
Testing The Connection
Connecting Namecheap Email to Gmail involves a few simple steps. Begin by accessing Gmail settings to add your Namecheap account. Follow the instructions to ensure a successful link and receive emails seamlessly.
Testing the connection between your Namecheap email and Gmail is a crucial step to ensure seamless communication. Have you ever sent an email, only to wait anxiously for a reply, wondering if it even reached the recipient? Connecting your Namecheap email to Gmail promises a smooth flow, but verifying that connection is essential. This stage determines if your emails land where they should or disappear into the digital ether. Let’s dive into the specifics of testing this connection.Sending A Test Email
The first action in testing the connection is sending a test email. You might be wondering, “Why not just wait for someone else to email me?” But taking proactive steps can save you time and potential headaches. Compose a simple email in Gmail and send it to your Namecheap email address. Ensure the email is straightforward. A subject like “Test Email” works well, and the body can be as simple as “Hello, this is a test.” Check both your Namecheap and Gmail inboxes to confirm receipt. If the email appears promptly, your connection is functioning correctly.Troubleshooting Common Issues
Sometimes, things don’t go as planned. If your test email doesn’t arrive, it’s time to troubleshoot. Is your Namecheap email correctly linked in Gmail settings? Double-check these settings to ensure accuracy. Consider whether spam filters might be blocking your emails. Emails can sometimes land in the spam folder, unnoticed. Reviewing these folders can reveal hidden messages. Think about the last time you faced a technical hiccup. How did you resolve it? Approach this situation with the same methodical mindset. If issues persist, reaching out to Namecheap or Gmail support could be your best bet. They often have solutions for common connectivity problems. Testing your connection might feel like an extra step, but it’s worth it for peace of mind. Are you ready to ensure your email setup is flawless?Managing Emails Efficiently
Managing emails efficiently is crucial for maintaining productivity. When connecting Namecheap Email to Gmail, organization is key. Gmail offers tools to streamline your inbox and enhance workflow. Learn to use labels and filters to manage emails better. These features help you stay organized and focused.
Organizing With Labels
Labels in Gmail are like folders. They help categorize emails. You can create labels for different topics or projects. For instance, create a label for work emails. Another for personal messages. This organization makes finding emails easier. To create a label, go to the Gmail sidebar. Click “More” and then “Create new label.” Name your label and hit “Create.” Now, you can assign emails to this label. It keeps your inbox neat and tidy.
Setting Up Filters
Filters automate email sorting. They help reduce manual work. You set conditions for emails. Gmail then sorts them based on these conditions. For example, move emails from a client to a specific label. Or, mark them as important. To set a filter, click the settings gear icon. Select “See all settings” and then the “Filters and Blocked Addresses” tab. Click “Create a new filter.” Enter criteria like sender or keywords. Choose actions like labeling or archiving. Save your filter to automate sorting.
Frequently Asked Questions
How Do I Link A Domain Email To Gmail?
To link a domain email to Gmail, access Gmail settings. Click “Accounts and Import,” then “Add a mail account. ” Enter your domain email address, choose import options, and complete the setup. Use your domain’s SMTP server details for sending emails.
This integrates your domain email with Gmail seamlessly.
Is Namecheap Email Pop Or Imap?
Namecheap email supports both POP and IMAP protocols. You can choose based on your email needs. IMAP syncs across devices, while POP downloads emails to your device. Configure your email client with the appropriate settings for seamless communication.
How Do I Integrate Email With Gmail?
To integrate email with Gmail, go to Gmail settings. Select “Accounts and Import. ” Add your external email using “Add a mail account. ” Follow the prompts to configure settings. Confirm with verification code if required. Your emails will be accessible within Gmail.
How Do I Sync My Cpanel Email To Gmail?
Open Gmail settings, click ‘Accounts and Import’, then ‘Add a mail account’. Enter your Cpanel email, follow prompts, select ‘Import emails from my other account’. Confirm with server details and password. Your Cpanel email will sync to Gmail.
Conclusion
Connecting Namecheap Email to Gmail is simple and efficient. This integration helps streamline your email management. Follow the outlined steps for a smooth setup process. Having all emails in one place saves time and reduces stress. It makes communication easier and more organized.
No more switching between different platforms. You can now enjoy a unified emailing experience. Keep your inbox tidy and your workflow seamless. Start using Gmail for all your Namecheap emails today. Simplifying your email routine can enhance productivity. Enjoy the benefits of a connected email system.


