
Are you ready to bring your online vision to life but feeling a bit stuck on the technical side? Connecting your Namecheap domain to GoDaddy hosting is a straightforward process, but it can seem overwhelming if you’re not familiar with the steps.
Don’t worry, though; you’re in the right place. This guide is tailored just for you. Imagine your website fully operational, reaching audiences, and showcasing your brand or business to the world. By following this easy-to-understand guide, you’ll gain the knowledge and confidence you need to seamlessly connect your Namecheap domain with GoDaddy hosting.
Let’s unlock the potential of your online presence together. Dive in and discover how simple it can be!

Credit: www.youtube.com
Domain And Hosting Basics
Understanding domain and hosting basics helps you manage your website better. A domain is your website’s address. Hosting is where your website lives. Both are essential for your online presence. They work together to make your site accessible to users.
Importance Of Domain And Hosting Connection
A strong connection between domain and hosting ensures your site runs smoothly. This link allows users to find your site easily. If the connection fails, your website may not load. A seamless connection boosts user experience and site performance.
Overview Of Namecheap And Godaddy Services
Namecheap and GoDaddy are popular for domain registration and hosting. Namecheap offers affordable domain options. It provides tools for managing your domain settings. GoDaddy offers reliable hosting services. It supports various hosting plans tailored to different needs.
Both platforms have user-friendly interfaces. They simplify domain and hosting management. This makes them ideal for beginners. Connecting Namecheap domains to GoDaddy hosting is straightforward. Each platform guides you through the process.
Account Preparation
Connecting a Namecheap domain to GoDaddy hosting requires a bit of account preparation. Ensuring your accounts are ready streamlines the process. This step-by-step guide will help. Follow these instructions to avoid any hitches.
Checking Domain Ownership On Namecheap
First, verify you own the domain on Namecheap. Log into your Namecheap account. Go to the “Domain List” section. Check the list for your domain name. Click on “Manage” next to your domain. This will take you to the domain settings page.
Ensure your contact information is up-to-date. Check the “Domain Contacts” section. Update details if needed. This ensures smooth communication. Proper ownership information is crucial.
Setting Up Godaddy Hosting Account
Create a GoDaddy hosting account if you don’t have one. Visit the GoDaddy website. Choose a hosting plan that suits your needs. Follow the instructions to set up your account. Provide the necessary payment details.
After setting up, access your GoDaddy account. Navigate to the “My Products” section. Ensure your hosting package is active. This is important for the next steps.
Once both accounts are set, you are ready. Proceed to connect your domain to hosting. This preparation will make the process easier.
Accessing Namecheap Domain Settings
Access Namecheap domain settings by logging into your account. Locate the “Domain List” section, click “Manage” next to your domain. Update DNS settings to point to GoDaddy hosting by entering the nameservers provided by GoDaddy. Save changes to ensure your domain connects properly.
Accessing Namecheap Domain Settings is the first step in connecting your domain to GoDaddy hosting. This process involves navigating through Namecheap’s user-friendly interface. It helps ensure your domain settings align with your hosting needs. Ensuring proper access to these settings is crucial for a seamless connection.Navigating To Domain List
Begin by logging into your Namecheap account. Once logged in, locate the dashboard. On the dashboard, find the “Domain List” tab. Click on it to view all your registered domains. This list displays each domain you own with Namecheap.Locating Dns Settings
After opening the Domain List, select the domain you wish to connect. Look for the “Manage” button next to your selected domain. Click on it to proceed to the domain’s settings page. On this page, find the “Advanced DNS” tab. Click on it to access the DNS settings. Here, you can manage DNS records and settings.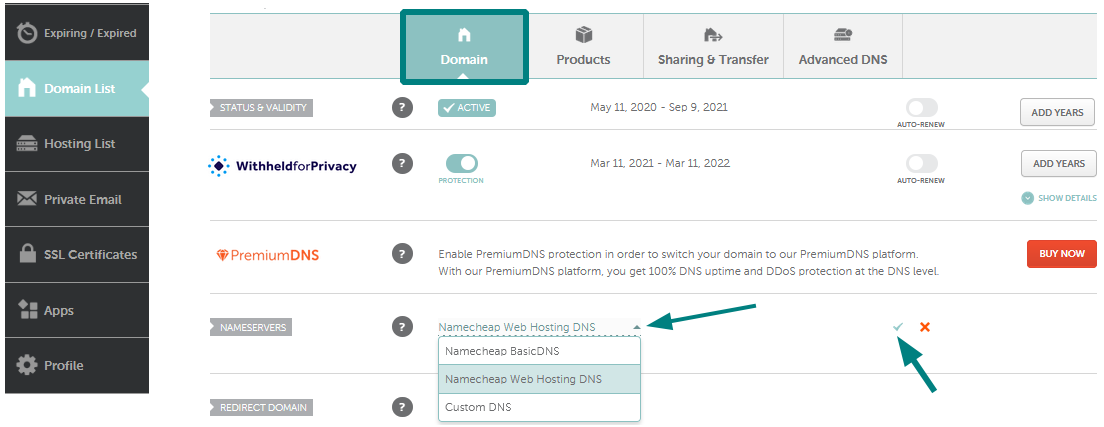
Credit: www.namecheap.com
Configuring Dns Records
Easily connect your Namecheap domain to GoDaddy hosting by configuring DNS records. Start by updating the Namecheap DNS settings. Point them to GoDaddy’s servers for seamless integration.
Connecting your Namecheap domain to GoDaddy hosting can feel like navigating a digital maze. But, once you understand how to configure DNS records, it becomes a straightforward task. These settings are crucial as they ensure your domain points to the correct hosting server, making your website accessible to the world. ###Understanding Dns Types
Before diving in, it’s important to know the different DNS record types you’ll encounter. A Records point your domain to an IP address, linking your website to the hosting server. CNAME Records are used for aliasing one domain to another, helpful for directing traffic from subdomains. MX Records manage email servers, ensuring your emails land in the right inbox. Each type has its specific role, and understanding them helps avoid errors. Are you familiar with these DNS types, or is this your first time configuring them? ###Entering Godaddy Nameservers
To connect Namecheap with GoDaddy, you need to input GoDaddy’s nameservers into your Namecheap account. Start by logging into your Namecheap dashboard and navigating to the ‘Domain List’. Click ‘Manage’ next to the domain you wish to connect. Find the ‘Nameservers’ section and select ‘Custom DNS’. Here, you will enter the nameservers provided by GoDaddy. Typically, they look something like `ns1.godaddy.com` and `ns2.godaddy.com`. After entering them, save your changes. Remember, DNS changes can take up to 48 hours to propagate. Have you experienced any delays in DNS propagation before, or has it always been smooth sailing?Finalizing Domain And Hosting Connection
Finalizing the connection between your Namecheap domain and GoDaddy hosting is crucial. This step ensures your website is live and fully accessible. Carefully follow each guideline to avoid common mistakes. The right setup guarantees optimal website performance.
Verifying Changes
After adjusting domain settings, verify changes have been saved correctly. Log into your Namecheap account. Check the DNS settings to confirm updates. Ensure that the nameservers point to GoDaddy. This step is essential for a successful connection. Misconfigurations can lead to downtime. Use tools like DNS Checker to confirm settings globally. This helps detect any inconsistencies across regions.
Propagation Time Considerations
Domain changes can take time to propagate. Typically, this process lasts 24 to 48 hours. During propagation, your website might face accessibility issues. This is normal and expected. Patience is key during this phase. Avoid making additional changes to DNS settings. Excessive alterations can complicate the propagation process. Once complete, your site should be stable and fully operational.

Credit: www.youtube.com
Troubleshooting Common Issues
Troubleshooting domain connections can be frustrating. Sometimes issues arise while connecting a Namecheap domain to GoDaddy hosting. These problems often involve DNS settings or other technical glitches. Knowing how to fix these issues is essential. Below, we explore common solutions.
Resolving Incorrect Dns Entries
Incorrect DNS entries can disrupt your domain connection. First, verify your DNS settings in your Namecheap account. Ensure you have entered the correct GoDaddy nameservers. These usually look like ns1.godaddy.com and ns2.godaddy.com. If the entries are wrong, update them immediately.
Changes to DNS settings might take time. Usually, it takes 24 to 48 hours to propagate. Patience is vital during this period. If the issue persists, clear your browser cache. Sometimes, a simple refresh can solve the problem.
Assistance From Support Teams
Sometimes self-troubleshooting isn’t enough. In such cases, reach out to support teams. Both Namecheap and GoDaddy have dedicated support teams ready to help. You can contact them through live chat or email. Provide all relevant details about your issue.
Explain the steps you’ve already taken. This helps the support team understand your problem better. They can guide you through a step-by-step resolution. Don’t hesitate to ask questions. Customer support is there to assist you.
Frequently Asked Questions
How To Connect Godaddy Hosting To Namecheap Domain?
Update Namecheap DNS settings to point to GoDaddy’s server IP. Access Namecheap, select your domain, then enter GoDaddy’s nameservers under DNS settings. Save changes. Wait for DNS propagation, usually within 24-48 hours, to complete the connection.
How Do I Connect My Domain To Godaddy Hosting?
Access your GoDaddy account. Go to “My Products” and select “Domain”. Choose “DNS” and update the “Nameservers” to GoDaddy’s. Save changes. Wait for DNS propagation.
How To Point Domain From Godaddy To Namecheap?
Access your GoDaddy account and select your domain. Navigate to DNS management and update the nameservers to Namecheap’s. Save changes and allow up to 48 hours for propagation.
How Do I Transfer My Namecheap Domain To Godaddy?
Unlock your Namecheap domain and get the authorization code. Initiate the transfer on GoDaddy’s website using the code. Follow GoDaddy’s instructions to complete the transfer. Ensure both domain and email are active throughout the process. Confirm the transfer via email to finalize.
Conclusion
Connecting your Namecheap domain to GoDaddy hosting is straightforward. Follow each step carefully. Double-check domain settings. Ensure DNS records match. Verify hosting account details. Test the connection by visiting your website. Troubleshoot any issues promptly. Seek support if challenges arise.
Keep your login credentials safe. Regularly update your domain information. Maintain your hosting account security. This process enhances your online presence. Enjoy a seamless experience. A well-connected domain boosts visibility. Your website is now ready for visitors. Stay proactive in managing your domain and hosting.
Happy website building!


