
Are you ready to launch your website but feeling overwhelmed about connecting your domain to your hosting account on Namecheap? You’re not alone.
This crucial step can feel daunting, but with the right guidance, it’s easier than you think. Imagine the satisfaction of seeing your website live, reaching audiences worldwide. It’s not just about setting up a site; it’s about creating a digital space where your ideas, products, or services can shine.
By the end of this guide, you’ll have the confidence and knowledge to seamlessly connect your domain to your hosting on Namecheap, ensuring your website is up and running without a hitch. Dive in, and let’s simplify this process together.
Domain Registration Basics
Understanding the domain registration process is crucial for establishing your online presence. It’s not just about picking a catchy name; it’s about ensuring your domain aligns with your brand and is easy for people to find. Whether you’re launching a blog, an e-commerce site, or a personal portfolio, the basics of domain registration set the foundation for your website’s success.
Choosing A Domain Name
Picking the right domain name is like choosing a first impression for your website. It should be memorable, easy to spell, and directly related to your content. Consider using keywords that describe your business or niche to help with search engine rankings.
Think about your audience. Would they remember the name easily? Test it out with friends or colleagues to see if it resonates. Avoid lengthy or complex names that could confuse potential visitors.
Keep an eye on availability. You might have the perfect name in mind, but it could already be taken. Tools like Namecheap’s domain search help you find available options quickly.
Registering With Namecheap
Once you’ve settled on a name, registering it with Namecheap is straightforward. Their platform is user-friendly, even if you’re new to domain registration. Simply search for your chosen name and follow the prompts to secure it.
You’ll need to provide some basic information, like your contact details. This information is crucial for managing your domain effectively and ensuring you receive important notifications.
Consider privacy protection options. Namecheap offers services like WhoisGuard to keep your contact information private, which can reduce spam and protect your identity.
Have you ever registered a domain before? If not, what worries you the most about the process? Overcoming these initial concerns can pave the way for a seamless experience. Remember, your domain is your online identity, so take the time to choose wisely and register securely.
Understanding Web Hosting
Understanding web hosting is crucial for anyone building a website. It serves as the foundation where your site’s files reside. Hosting connects your domain to the internet. Choosing the right hosting ensures your site runs smoothly. Let’s explore different hosting types and how to select the best plan.
Types Of Hosting Services
Hosting comes in various forms. Shared hosting is cost-effective. Your site shares resources with others. It’s best for small sites. Virtual Private Server (VPS) offers more control. It’s suitable for growing sites. Dedicated hosting provides an entire server. It’s ideal for high-traffic sites. Cloud hosting scales with demand. It’s flexible and reliable.
Selecting The Right Hosting Plan
Choosing the right plan depends on your needs. Consider your site’s size and traffic. Shared hosting works for small blogs. VPS is great for moderate traffic sites. Dedicated hosting handles heavy traffic. Check storage and bandwidth limits. Look for good customer support. Read reviews and get recommendations. Choose a plan that fits your budget.
Preparing For Domain Connection
Connecting your domain to hosting is a crucial step. It ensures your website goes live. Before beginning, preparation is key. This process is simple if you gather the right information. Accessing your Namecheap account is also essential. Let’s break down each step for clarity.
Gathering Necessary Information
Start by collecting essential details. You need your domain name and hosting details. Check your email for hosting account credentials. Locate the nameservers provided by your hosting service. These are usually included in your welcome email. Write down these details for quick access.
Accessing Namecheap Account
Log into your Namecheap account with your credentials. Navigate to the dashboard. This is where you’ll manage your domains. Find the domain you want to connect. Click on the domain name to access settings. Here, you’ll update nameservers to link your hosting.

Credit: www.youtube.com
Connecting Domain To Hosting
Learn how to connect your domain to hosting on Namecheap easily. Start by logging into your Namecheap account, then find the Domain List section. Update the DNS settings to point to your hosting provider’s servers.
Connecting your domain to your hosting account on Namecheap is a straightforward but crucial step in getting your website live. It’s like bridging a gap between your web address and the server where your site’s files are stored. Once you’ve purchased a domain and a hosting plan, the next logical step is to connect them, ensuring your visitors reach the right destination when they type in your URL. This process involves updating a few settings and verifying the connection, allowing your website to function seamlessly.Updating Dns Settings
To connect your domain to your hosting, you’ll first need to update the DNS settings. Think of DNS as a directory that guides browsers to your website. – Log in to your Namecheap account. – Navigate to the “Domain List” section and click “Manage” next to your domain. – In the “Nameservers” section, select “Custom DNS” from the dropdown menu. – Enter the nameserver details provided by your hosting provider. They usually look something like “ns1.yourhost.com” and “ns2.yourhost.com.” It’s as easy as filling out a form. Once updated, it may take a few hours for the changes to take effect globally.Verifying Domain Connection
After updating your DNS, it’s essential to verify that your domain is correctly connected to your hosting. You don’t want any surprises when you launch your site. – Visit your website by typing your domain in the browser. – Check if your hosting provider’s placeholder page appears. This indicates a successful connection. – Alternatively, use online tools like DNS checker to confirm that your DNS updates have propagated across the internet. Encountering issues? Double-check the nameservers or reach out to your hosting provider for help. Have you ever experienced the thrill of seeing your site live for the first time? It’s like watching your hard work come to life in real-time. Once your domain is properly connected, you’re all set to start building or uploading your website content. Are you ready to make your mark online?Troubleshooting Common Issues
Connecting a domain to hosting on Namecheap can be simple. Start by accessing your domain’s dashboard. Then, update the DNS settings to point to your hosting provider’s servers.
Connecting your domain to Namecheap hosting can sometimes feel like a puzzle. You’ve followed all the steps, but something just isn’t clicking. Let’s tackle some common issues you might face along the way. Whether it’s DNS propagation delays or connection errors, understanding these challenges can empower you to swiftly resolve them.Dns Propagation Delays
Have you ever wondered why your domain isn’t showing up immediately after you set it up? DNS propagation can take time. This is because DNS servers around the world need to update their records. Typically, it can take up to 48 hours for changes to reflect everywhere. While waiting, you might feel anxious, especially if you’re launching a new site. Patience is key here. You can check propagation status using tools like “Whatsmydns.net” to see if your changes are taking effect globally. If delays extend beyond 48 hours, double-check if your DNS settings are correct. Sometimes a simple typo can hold things back. Ensure that your Namecheap DNS settings match the ones provided by your hosting service.Resolving Connection Errors
Imagine you’ve waited for DNS propagation, yet your site still isn’t accessible. Connection errors are frustrating but often solvable with a few checks. First, ensure that your domain is pointing to the correct server IP address. If your site shows a “404 Error”, it might be due to incorrect file paths or missing files on the server. Check your file manager in Namecheap to ensure all necessary files are uploaded correctly. Sometimes, security settings can block connections. Review firewall settings both on your hosting and local network. Adjust them if necessary, to allow traffic to your site. Ask yourself: Have I checked every possible angle? This mindset can help uncover simple yet overlooked issues. Remember, even seasoned webmasters face these hiccups. To wrap things up, troubleshooting domain-to-hosting connections is a skill. The more you practice, the better you get. Have you faced any other challenges while connecting your domain to hosting? Share your experience below. Your insights might help others navigate their own issues!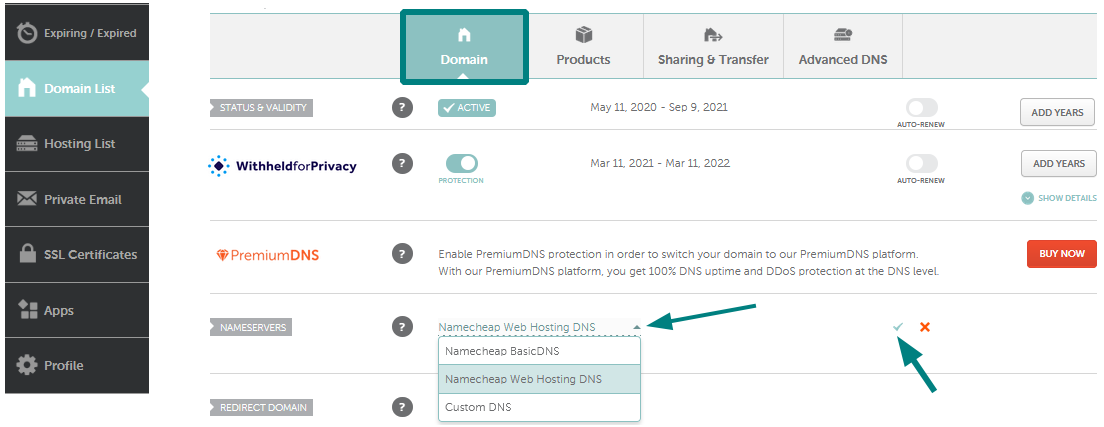
Credit: www.namecheap.com
Enhancing Domain Security
Enhancing domain security is vital for protecting your online presence. When you connect your domain to hosting on Namecheap, ensuring your domain is secure should be a top priority. It’s not just about keeping your website safe; it’s about building trust with your visitors. Let’s dive into some practical steps you can take to enhance your domain security.
Implementing Ssl Certificates
SSL certificates are essential for secure data transfer between your website and its visitors. Without SSL, data like passwords and credit card numbers can be intercepted by hackers. Namecheap makes it easy to add SSL certificates to your domain.
Consider your own online habits. Aren’t you more comfortable sharing information on websites with that little padlock icon in the address bar? That’s the power of SSL. Adding it to your domain not only secures your site but also boosts your search engine ranking.
To implement SSL, check Namecheap’s SSL options and choose one that fits your needs. Follow their easy-to-understand steps to activate it. You’ll notice a difference in visitor trust and website performance.
Setting Up Domain Privacy
Domain privacy protects your personal information from being visible in the public WHOIS database. Without it, anyone can see your contact details, potentially leading to spam or identity theft. Namecheap offers domain privacy services to keep your information safe.
Think about how you’d feel if your phone number or address was publicly accessible. Setting up domain privacy is a simple and effective way to maintain your privacy. It’s like having unlisted phone number in a directory.
When you register your domain with Namecheap, opt for their domain privacy protection. It’s a small step with huge benefits, safeguarding your identity and reducing unwanted contact.
Are you ready to bolster your domain security? These measures not only protect your site but also enhance your credibility. Your visitors will thank you, and you’ll enjoy peace of mind knowing your domain is secure.
Exploring Additional Features
Discover additional features by connecting your domain to hosting with Namecheap. Follow simple steps to link your domain effortlessly. Manage settings and streamline your online presence with ease.
Exploring additional features when connecting your domain to hosting with Namecheap can significantly enhance your website’s functionality and user experience. These features not only simplify web management but also offer you creative ways to manage your online presence. Whether you’re a beginner or a seasoned webmaster, understanding these options can make your digital journey smoother and more rewarding. ###Domain Forwarding
Domain forwarding is like giving your domain a shortcut to another location. Imagine you have multiple domain names, but you want them all to lead to your primary website. With Namecheap, you can easily set this up without any technical hassle. To get started, log into your Namecheap account and navigate to the domain list. Click on “Manage” next to your domain and select “Advanced DNS.” Here, you can add a new redirect rule that points your domain to a different URL. It’s a practical way to streamline your online presence and ensure your visitors reach the right destination without confusion. ###Subdomains Setup
Creating subdomains is an excellent way to organize your site and offer specialized content. Think of subdomains as branches of your main domain, each with a unique purpose or audience. To create a subdomain in Namecheap, go to your cPanel and find the “Subdomains” section. Enter the name of your subdomain, select the main domain, and specify the folder it should point to. For instance, you might want blog.yourdomain.com for your blog or shop.yourdomain.com for your online store. This organizational tool can help you tailor your content more effectively to meet different user needs. Have you ever wondered how these features could impact your site’s growth? They can not only improve user experience but also boost your SEO efforts. By using domain forwarding and subdomains wisely, you can create a seamless and engaging experience for your visitors. So, why not explore these options and see how they can enhance your digital strategy?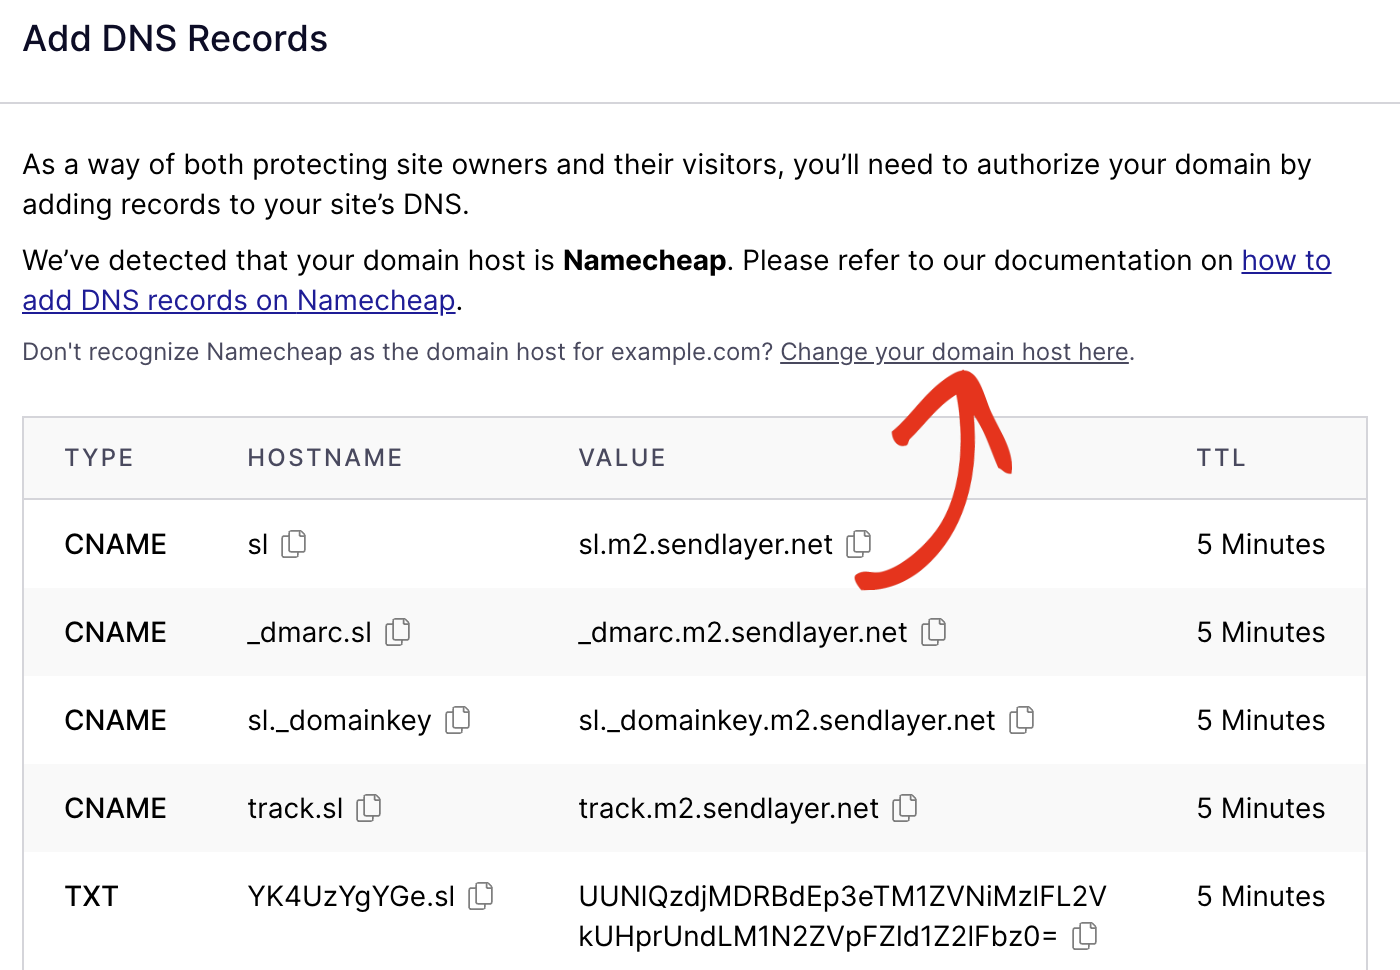
Credit: sendlayer.com
Frequently Asked Questions
How To Connect Domain To Hosting In Namecheap?
Log into Namecheap. Select “Domain List” and choose your domain. Click “Manage” then “Advanced DNS”. Add hosting nameservers in “Nameservers” section. Save changes to connect.
How Do I Link My Domain To My Hosting?
Access your domain registrar’s settings. Update DNS records to point to your hosting server’s IP address. Save changes. Verify connection through your hosting provider’s dashboard. Ensure DNS propagation completion, which might take up to 48 hours. Contact support if issues persist.
How Do I Add An Existing Domain To Namecheap Hosting?
Log into your Namecheap account. Go to the “Domain List” section. Select your domain, then click “Manage. ” Under the “Advanced DNS” tab, update the nameservers to Namecheap hosting nameservers. Save changes. Your domain is now added to Namecheap hosting.
Does Namecheap Domain Come With Hosting?
Namecheap domains do not include hosting. You need to purchase hosting separately. Namecheap offers various hosting plans. You can bundle domain registration with hosting for convenience. Explore their website for options and pricing.
Conclusion
Connecting your domain to Namecheap hosting is simple and straightforward. Follow the steps carefully to avoid errors. Always double-check your settings for accuracy. This ensures your website runs smoothly. Namecheap provides a user-friendly platform for beginners. Their support team is available if you need help.
Once connected, your domain and hosting work together seamlessly. Enjoy the process of building your online presence. With patience and practice, you’ll master the basics. Happy hosting with Namecheap!


