
Are you looking to expand your online presence without the hassle of buying a new domain? Creating a subdomain with Namecheap might be the perfect solution for you.
Whether you’re aiming to start a blog, launch a new section of your website, or test out some exciting ideas, a subdomain can help you do it all seamlessly. In this guide, you’ll discover how to create a subdomain in Namecheap step-by-step, using straightforward instructions that even beginners can follow.
You’ll learn how to leverage this powerful tool to enhance your website’s functionality and improve your site’s SEO performance. Get ready to unlock new possibilities for your web projects and take control of your online footprint. Let’s dive in and make your web presence more dynamic and versatile!

Credit: hostadvice.com
What Is A Subdomain?
A subdomain acts as an extension of your main website, helping organize content better. To create a subdomain in Namecheap, navigate to your domain management panel, find the subdomain section, and enter your desired name before saving the changes.
Creating a subdomain might sound technical, but it’s a straightforward process that opens new possibilities for organizing your website. Have you ever wondered how some websites have URLs like blog.example.com or shop.example.com? These are subdomains, and they serve as extensions of your primary domain. Understanding subdomains can be incredibly beneficial for your online presence, especially when you want to separate parts of your site, like creating a dedicated space for a blog or an online store. ### A subdomain is a prefix added to your main domain to create a distinct web address. It acts as a separate entity, yet remains connected to your primary domain. This means you can have different content, design, or even functionality on a subdomain without affecting the main site. Imagine you run a business website and want to add a blog. Instead of mixing blog posts with your main site content, you can create a subdomain like blog.yourbusiness.com. This keeps your content organized and easy for visitors to navigate. Subdomains can also be useful for testing new features or designs without disturbing your main website. When you’re ready, you can easily merge successful elements back into the primary site. ###Why Use A Subdomain?
A subdomain helps you manage different sections of your site more effectively. If you have diverse content or services, subdomains offer a practical way to segment them. For instance, if you have an e-commerce site, you could use a subdomain for your store, keeping it separate from your informational pages. This separation can enhance user experience, making it easier for visitors to find what they need. ###How Does It Affect Seo?
You might be concerned about how subdomains impact SEO. Subdomains are treated as separate sites by search engines. This can be an advantage if you want to target different keywords or audiences. However, managing multiple subdomains requires consistent SEO strategies for each. Ensure each subdomain has unique content and follows best SEO practices to maximize your search engine visibility. ###Common Uses For Subdomains
Subdomains are versatile and can be used for various purposes. Besides blogs and e-commerce, they’re great for hosting forums, support centers, or even language-specific versions of your site. For example, if you operate internationally, you might create a subdomain for each language, like en.yoursite.com for English and es.yoursite.com for Spanish. This approach provides a tailored experience for your diverse audience. ###Personal Experience
When I first created a subdomain for a blog, I was amazed at the organizational benefits. It allowed me to experiment with new layouts and plugins without fear of breaking my main site. This flexibility boosted my creativity and confidence in web management. Why not take a moment to think about how subdomains could improve your website? Whether it’s for better organization, testing, or expanding your reach, subdomains offer a practical solution.Benefits Of Using Subdomains
Creating subdomains on Namecheap enhances website organization and improves SEO. Separate content easily by categorizing sections. Manage services or languages under unique subdomains for streamlined navigation.
Creating subdomains can be a game changer for your website management. They offer a range of benefits that can help streamline your online presence and improve user experience. Whether you’re expanding your business or simply organizing your site better, subdomains can be a powerful tool in your digital toolkit. Let’s dive into the advantages of using subdomains and how they can benefit you. ###Enhanced Organization
Subdomains allow you to segment different parts of your website. Imagine having separate areas for your blog, store, and customer support. This compartmentalization makes navigation easier for visitors, enhancing their experience on your site. Do you have multiple services or products? A subdomain for each can clarify your offerings, making it simpler for users to find exactly what they need. ###Improved Seo
Using subdomains can positively impact your SEO strategy. By targeting specific keywords on different subdomains, you can attract varied audiences. This approach can boost your site’s visibility across multiple niches. Have you ever noticed that large websites often rank for different topics? Subdomains might be their secret weapon. ###Brand Expansion
Subdomains can help you grow your brand without cluttering your main site. Launch a new product line or service on a distinct subdomain while maintaining your brand identity. This separation can make marketing campaigns more focused. How often do you see new products overshadowed by existing ones? Subdomains can ensure each product gets its deserved spotlight. ###Cost-effective Solution
Creating subdomains is generally free and doesn’t require a new domain purchase. This is a cost-effective way to expand your online presence without breaking the bank. Have you considered the expenses of buying multiple domains? Subdomains offer a budget-friendly alternative. ###Technical Flexibility
Subdomains provide technical flexibility for your site. You can use different technologies or designs on each subdomain. This adaptability can accommodate diverse needs, such as a forum or a blog. Have you ever wanted to experiment with different platforms or tools? Subdomains might be your playground. Subdomains can transform the way you manage and present your website. They offer organization, SEO benefits, brand expansion, cost savings, and technical flexibility. Whether you’re a small business or a large corporation, leveraging subdomains can enhance your online strategy. Are you ready to make the most of subdomains?Preparing Your Namecheap Account
Setting up a subdomain in Namecheap involves logging into your account and navigating to the domain list. Click “Manage” next to your domain, select “Advanced DNS,” then add a new record under “Host Records. ” Fill in the subdomain details and save changes.
Preparing your Namecheap account is an essential step before you create a subdomain. This process ensures you have a smooth experience while setting things up. Don’t worry—it’s easier than you might think. ###Logging Into Namecheap
First, head to the Namecheap website. On the top right corner, you’ll see the “Sign In” button. Click it, and enter your credentials—your username and password. If you’ve forgotten your password, there’s an easy “Forgot Password?” link to help you reset it. Once logged in, you’ll be directed to your account dashboard, where all the magic happens. ###Accessing Domain List
After logging in, find the “Dashboard” on the left-hand side of your screen. Click on it, and you’ll see a list of options. Look for “Domain List” and click on it. This section showcases all your registered domains with Namecheap. It’s like a bird’s-eye view of your domain empire. Here, you’ll find the domain for which you want to create a subdomain. Why is this important? Accessing your Domain List is crucial because it’s the starting point for any changes you want to make to your domain settings. So, make sure you’re comfortable navigating this part of your account. If you’ve got multiple domains, you can use the search bar at the top to quickly locate the one you need. It’s a real time-saver, especially if you have an extensive list. Is your domain ready? Great! You’re all set to proceed with creating a subdomain. But remember, preparation is key, and having a streamlined account setup will save you headaches down the road.Navigating To Domain Settings
Accessing domain settings in Namecheap simplifies creating a subdomain. Start by logging into your Namecheap account. Then, navigate to the “Domain List” and click “Manage” next to your chosen domain.
Navigating to the domain settings in Namecheap is a simple process. This step is crucial to create a subdomain successfully. You need to access the domain settings to manage your domain features. Follow the steps carefully to avoid mistakes. The interface is user-friendly but requires attention.Finding Domain Settings
Log in to your Namecheap account. On the dashboard, look for the “Domain List” option. Click it to view all your domains. Each domain is listed with various management options. Spot the domain you need. Next to it, find the “Manage” button. Click it to access the domain settings. This button leads you to the control panel. Here, you can adjust your domain settings.Selecting The Correct Domain
Ensure you select the correct domain from your list. Look at the domain names carefully. Mistakes can affect other domains unintentionally. Double-check the domain name before proceeding. Once sure, click the “Manage” button next to it. This action takes you to the specific domain’s control panel. Now, you’re ready to create your subdomain.Creating A New Subdomain
Creating a new subdomain in Namecheap is a simple process. Subdomains allow you to organize your website better. They help in managing different sections or services. Understanding the process will make it easier for you.
Choosing Subdomain Name
The subdomain name should be simple and relevant. Think about the purpose of the subdomain. Use clear and concise words. Avoid long and confusing names. Remember, the subdomain is the part before your main domain. For example, in blog.example.com, “blog” is the subdomain.
Configuring Dns Settings
Configuring DNS settings is crucial. First, log in to your Namecheap account. Go to the “Domain List” section. Click “Manage” next to your domain. Find the “Advanced DNS” tab. Here, you can add a new record for your subdomain.
Select “CNAME Record” from the dropdown menu. Enter your subdomain name in the “Host” field. Point it to your desired destination in the “Value” field. Save your changes. Your DNS settings are now configured. It might take some time for changes to take effect.
Verifying Subdomain Creation
Creating a subdomain in Namecheap is a straightforward task. But verifying its creation ensures everything is set up correctly. This step confirms that your subdomain is accessible and working as intended. Verification involves checking DNS propagation and testing subdomain accessibility. These steps are crucial for seamless online presence.
Checking Dns Propagation
DNS changes need time to propagate across the internet. This process can take several hours. Use online tools to check DNS propagation status. Enter your subdomain to see if DNS records have updated worldwide. Propagation is complete when your subdomain appears active in all regions. Patience is key here. Refresh your check periodically.
Testing Subdomain Accessibility
After DNS propagation, test the subdomain’s accessibility. Open your web browser. Enter the subdomain URL in the address bar. See if the page loads correctly. Verify that the content displays as expected. If it doesn’t load, check your DNS settings again. Ensure no errors occurred during setup. Testing confirms your subdomain is live and reachable.
Troubleshooting Common Issues
Creating a subdomain in Namecheap can seem tricky. Start by logging into your Namecheap account. Navigate to the Domain List. Find your domain, select “Manage,” then choose “Advanced DNS. ” Add a new record with your desired subdomain name. Save changes and wait for propagation.
Creating a subdomain in Namecheap can be a straightforward process, but sometimes things don’t go as planned. You might encounter a few bumps along the way. Don’t worry; these common issues have solutions. Let’s delve into some typical problems and how you can effectively troubleshoot them.Addressing Dns Errors
DNS errors can feel daunting, but they’re often just a matter of settings. Double-check that your DNS records are correctly configured in the Namecheap dashboard. Ensure that the subdomain points to the correct IP address or server. Another common mistake is forgetting to allow time for DNS propagation. Changes in DNS settings can take up to 48 hours to spread across the internet. If your subdomain isn’t working immediately, give it some time before assuming there’s an issue. If you still face problems, clearing your browser cache or using a different browser might help. This ensures you’re not viewing an outdated version of your site.Resolving Access Problems
Access issues often arise when permissions are not correctly set. Ensure that your server permissions allow access to the subdomain. Check with your hosting provider if you’re unsure how to do this. Sometimes, you might encounter a 403 Forbidden error. This often means your web server is not configured to allow access to the subdomain directory. Make sure the directory exists and the server settings permit access. Have you ever tried accessing your subdomain from different devices? This can help identify if the issue is device-specific. If it works on one device but not another, the problem might be with the device settings rather than the subdomain itself. Troubleshooting can be frustrating, but it’s also an excellent way to learn more about how domains and hosting work. What’s the most challenging part you’ve encountered while setting up a subdomain? Let us know in the comments!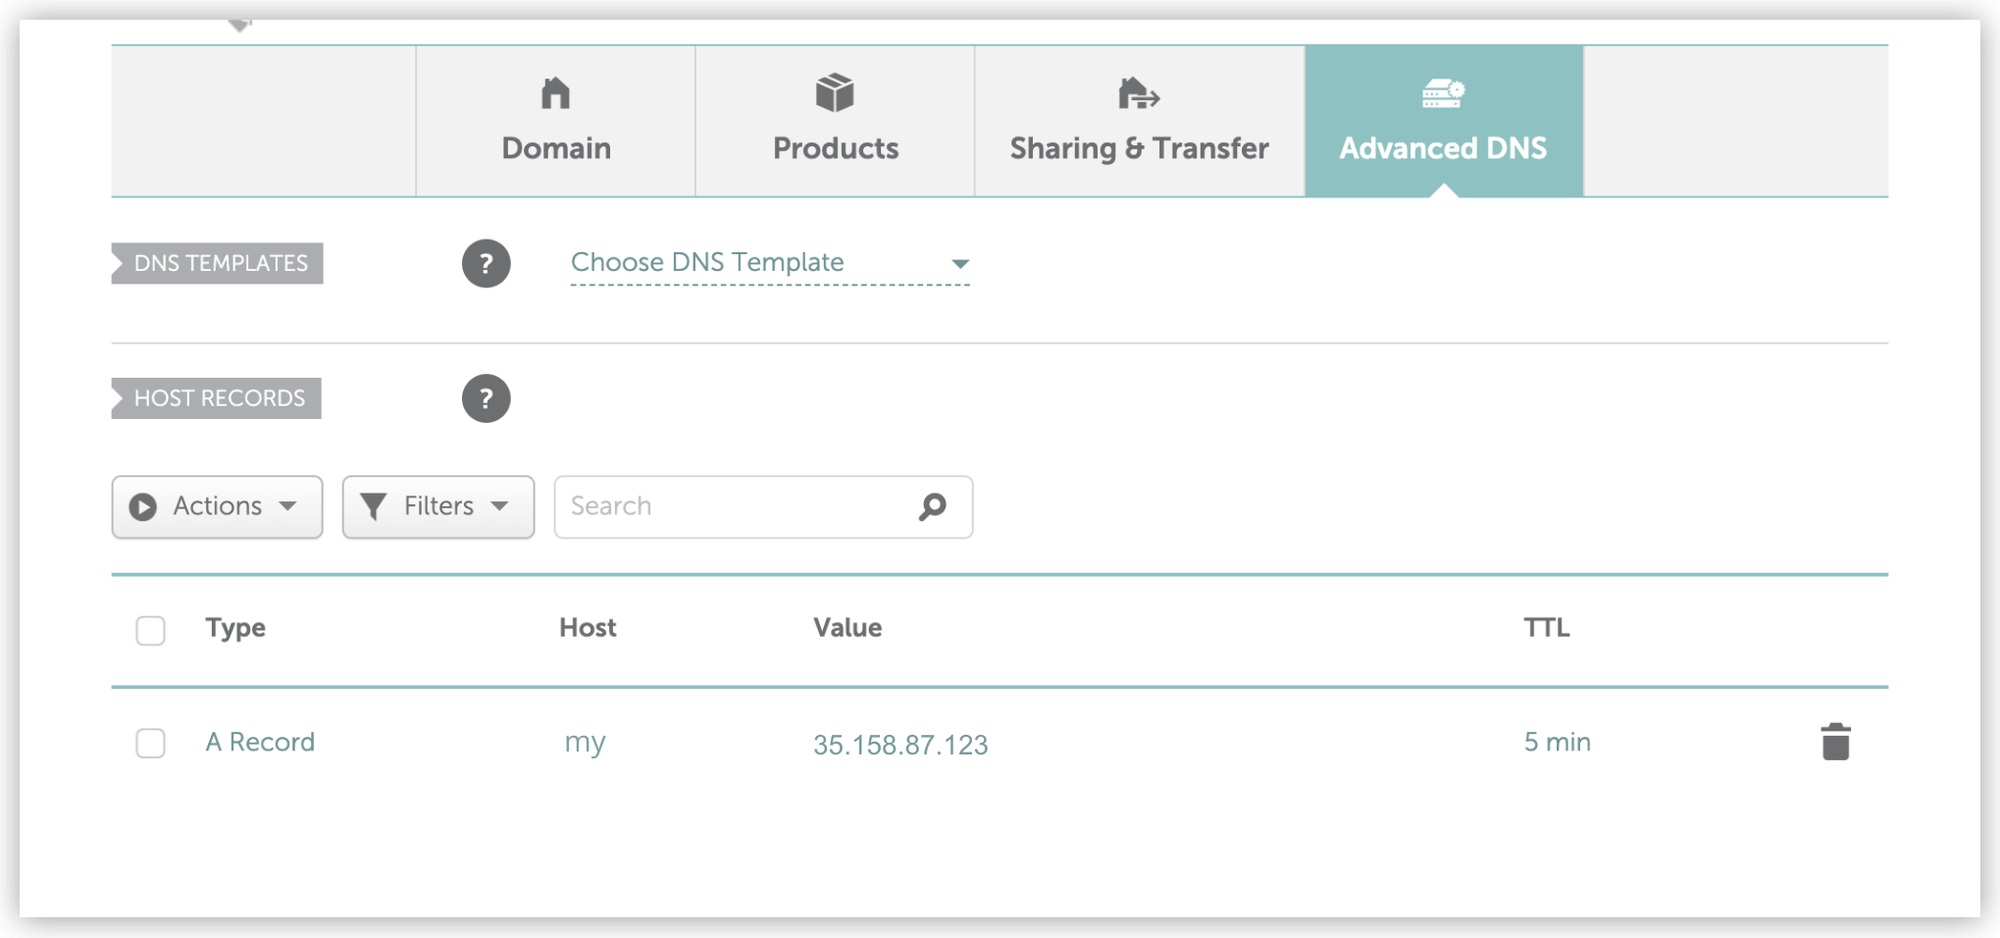
Credit: docs.softr.io
Tips For Effective Subdomain Management
Creating a subdomain in Namecheap enhances site organization. Access your Namecheap dashboard, select “Domain List,” and choose “Manage” next to your domain. Navigate to “Advanced DNS,” and add your desired subdomain under “Subdomain. “
Creating a subdomain in Namecheap is a straightforward process, but managing it effectively requires ongoing attention. It’s not just about setting it up; you need to ensure it remains a valuable part of your online presence. Whether you’re using a subdomain for a blog, a store, or a separate service, effective management will help you maintain its functionality and security.Regular Maintenance
Regular maintenance is crucial for keeping your subdomain running smoothly. Just like you wouldn’t leave your car without a check-up, your subdomain needs periodic evaluations. Schedule routine checks to ensure all links are working and the content is up to date. Consider setting reminders for these maintenance tasks. A simple calendar alert can save you from future headaches. Have you ever stumbled upon a broken link on a website? It’s frustrating, and you wouldn’t want your visitors experiencing the same.Security Considerations
Security should be a top priority for any subdomain. Make sure your subdomain is covered by SSL certificates. This not only secures data but also builds trust with your users. Think of your subdomain as a mini-fortress. Are your passwords strong enough to keep intruders out? Regularly update them and monitor any suspicious activity. Implement security plugins if your subdomain is part of a CMS like WordPress. These can offer additional layers of protection, keeping your site safe from potential threats. Effective subdomain management isn’t just about technicalities; it’s about ensuring your online presence is reliable and secure. Are your subdomains contributing positively to your brand? If not, consider these tips to improve their impact.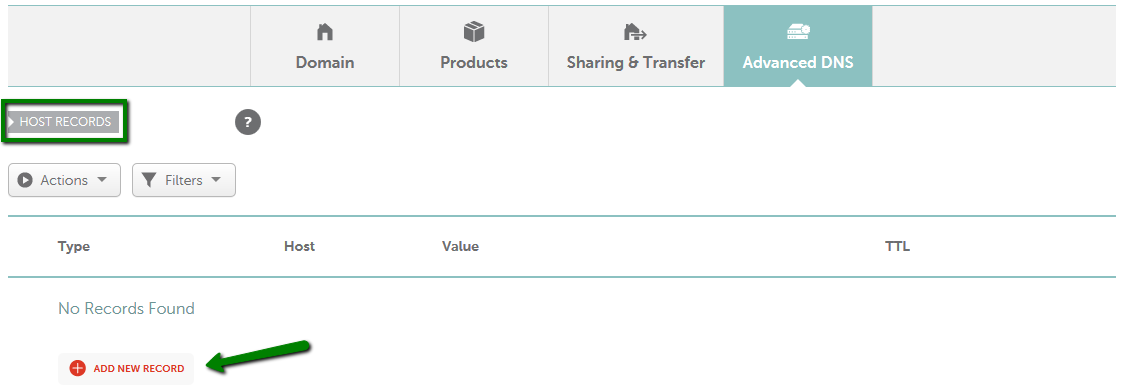
Credit: www.namecheap.com
Frequently Asked Questions
How To Create A Sub Domain On Namecheap?
Log into Namecheap, navigate to your Domain List, click “Manage” next to your domain. Select “Advanced DNS,” then click “Add New Record. ” Choose “CNAME Record,” enter your subdomain name, and specify the target URL. Save changes to create your subdomain efficiently.
How To Create A Sub Domain?
Log into your hosting account and access the domain management section. Select the option to create a subdomain, enter your desired name, and assign it to the main domain. Save your changes. Your subdomain is now ready for use.
Is Creating Subdomains Free?
Creating subdomains is usually free, depending on your hosting provider’s policy. Most web hosts offer free subdomains with their plans. Always check with your hosting provider to confirm any potential costs. Subdomains can be a cost-effective way to organize and manage your website’s content efficiently.
What Is A Sub Domain Of A Domain?
A subdomain is a part of a larger domain. It helps organize website content efficiently. For example, in “blog. example. com,” “blog” is the subdomain of “example. com. ” Subdomains function as separate sections, enhancing user experience and SEO. They can host blogs, stores, or other content types.
Conclusion
Creating a subdomain in Namecheap is straightforward. Start by logging into your account. Navigate to the Domain List. Choose your domain. Then, click on “Manage. ” Find the “Advanced DNS” tab. Next, add a new record. Fill in your subdomain details.
Save your changes. That’s it! Your subdomain is ready. It helps organize your website. Remember, practice makes perfect. Try it today! Understanding this process is crucial. It improves your site’s structure. And enhances user experience. Keep learning and experimenting. Your skills will grow.
Happy subdomain creating!


