
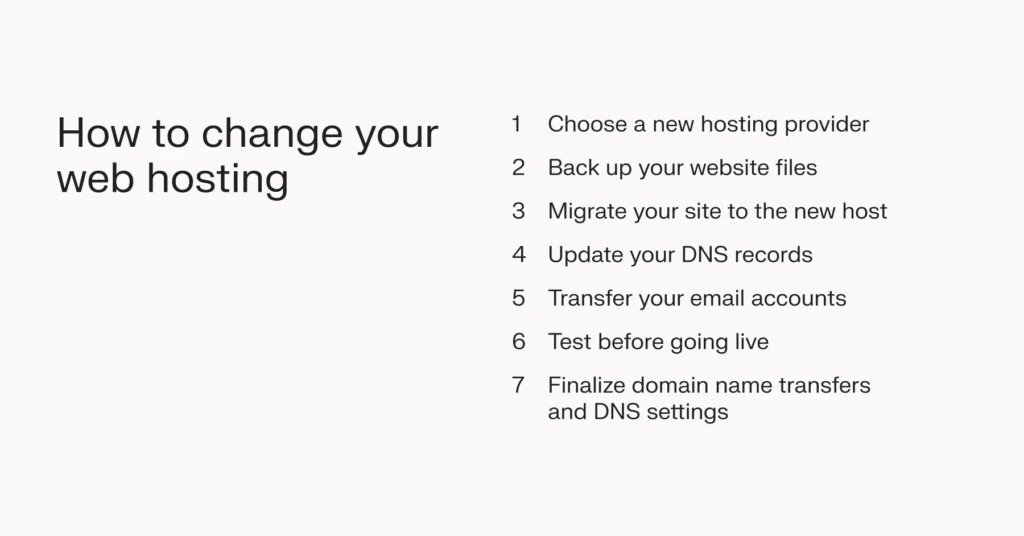
Are you ready to move your website to a new host but unsure how to change your domain name without losing traffic or causing downtime? Changing your domain name to a new host might sound tricky, but with the right steps, you can do it smoothly and keep your visitors happy.
In this guide, you’ll discover simple, clear instructions that make the process easy to follow—even if you’re not a tech expert. Keep reading, and you’ll learn how to protect your site’s reputation and ensure everything works perfectly on your new host.
Prepare For Domain Transfer
Preparing for a domain transfer is a key step in moving your website to a new host. It ensures the process goes smoothly without downtime or loss of data. Taking time to get ready helps avoid common errors and delays.
This preparation includes checking your domain’s eligibility, backing up your website data, unlocking the domain, and getting the authorization code. Each step is important for a successful transfer.
Check Domain Eligibility
Verify your domain is eligible for transfer. Domains usually cannot be moved within 60 days of registration or a previous transfer. Check the domain’s status in your current registrar’s dashboard. Ensure the domain is active and not expired. Confirm there are no holds or disputes on your domain.
Backup Website Data
Create a full backup of your website files and databases. Save copies on your computer or cloud storage. This prevents data loss during the transfer. Use your web host’s backup tools or manual methods like FTP and phpMyAdmin. Keep backups safe until the transfer completes.
Unlock Your Domain
Domains are often locked to prevent unauthorized transfers. Log into your current registrar account. Find the domain management settings. Turn off the domain lock or registrar lock option. This allows the new host to request the domain transfer.
Obtain Authorization Code
Request the authorization code, also called EPP code or transfer key. This code is required by the new registrar to start the transfer. It acts as a password for your domain. Usually, you can get the code from your current registrar’s control panel or support team. Keep the code private and ready for the next step.

Credit: newhelptech.wordpress.com
Choose A New Hosting Provider
Choosing a new hosting provider is a key step in changing your domain name to a new host. This choice affects your website’s speed, security, and uptime. Picking the right host ensures your site runs smoothly without interruptions. Focus on what fits your needs and budget.
Compare Hosting Plans
Look at different hosting plans side by side. Check the storage space, bandwidth, and support options. See if they offer shared, VPS, or dedicated hosting. Compare prices and what each plan includes. Choose a plan that matches your website size and traffic.
Review Domain Transfer Policies
Each host has rules for domain transfers. Read their policies carefully. Find out if they charge fees or have waiting periods. Check if they offer free transfer services. Make sure the process is simple and clear.
Purchase Hosting And Domain Transfer
Buy your chosen hosting plan first. Then start the domain transfer process. Follow the host’s instructions step by step. Keep your current domain active during the transfer. Confirm the transfer completes before canceling old services.
Initiate Domain Transfer
Initiating a domain transfer is the first key step to move your website to a new host. It starts with preparing your domain and making sure it is ready to leave the current registrar. This process requires attention to detail to avoid downtime or loss of control over your domain.
The transfer usually takes a few days but can be quicker with the right steps. Let’s break down how to start the domain transfer smoothly.
Start Transfer With New Host
Begin by logging into your new hosting account. Find the domain transfer option in their control panel. Enter the domain name you want to transfer. The new host will check if the domain is unlocked and eligible for transfer. This step triggers the transfer process and prepares the new host to manage your domain.
Enter Authorization Code
Request an authorization code (also called EPP code) from your current registrar. This code is a security key needed to approve the transfer. Enter this code in the new host’s transfer form. Without the code, the transfer cannot proceed. Keep the code safe and only share it with your new host.
Confirm Transfer Request
Check your email for a confirmation message from your current registrar. This email asks you to approve the transfer request. Confirming this request is vital to complete the transfer. After confirmation, the domain moves to the new host. Monitor your email for updates on the transfer status.
Update Domain Name System (dns)
Updating the Domain Name System (DNS) is a key step when changing your domain to a new host. DNS acts like an address book for the internet. It tells browsers where to find your website. Without updating DNS, visitors may still reach your old host. This can cause confusion and lost traffic. You must point your domain to the new host’s servers. This process includes changing nameservers, waiting for DNS to spread, and testing your website.
Change Nameservers To New Host
Start by logging into your domain registrar account. Find the section to manage your domain’s nameservers. Replace the old nameservers with the new ones from your hosting provider. Nameservers look like ns1.example.com and ns2.example.com. Save the changes. This step directs your domain to the new host.
Verify Dns Propagation
DNS changes do not happen instantly. They need time to spread worldwide. This process is called DNS propagation. It can take up to 48 hours but often less. Use free online tools to check if your domain points to the new host. Enter your domain name and see the results from multiple locations.
Test Website Functionality
Once DNS updates propagate, test your website. Visit your domain in different browsers and devices. Check if all pages load correctly. Test forms, images, and links. Make sure your email services work if linked to your domain. Confirm everything runs smoothly on the new host.
Manage Email And Ssl Certificates
Managing your email accounts and SSL certificates is crucial when changing your domain to a new host. These elements keep your communication safe and ensure your website stays secure. Missing this step can cause email disruptions and security warnings for visitors.
Proper handling of emails and SSL certificates helps maintain trust with your audience. It also avoids downtime and data loss during the transfer.
Migrate Email Accounts
Start by backing up all your email data. Export emails, contacts, and settings from the old host. Check if your new host supports the same email system, like IMAP or POP3.
Set up email accounts on the new host with the same usernames. Import your backed-up data into these accounts. Update your domain’s MX records to point to the new host. This directs emails to your new server.
Allow time for DNS changes to spread, usually up to 48 hours. During this, emails might arrive at either old or new host. Test sending and receiving emails to confirm the migration worked well.
Install Ssl On New Host
Secure your site with an SSL certificate on the new host. Check if your new hosting provider offers free SSL, like Let’s Encrypt. If not, transfer your existing SSL certificate or buy a new one.
Generate a Certificate Signing Request (CSR) from the new host’s control panel. Use this to obtain or move your SSL certificate. Install the certificate through your hosting dashboard or ask support for help.
After installation, verify SSL is active by visiting your website with “https://”. Look for a padlock symbol in the browser address bar. This confirms your site is secure and trusted.
Credit: www.liquidweb.com
Troubleshoot Common Issues
Changing your domain name to a new host can bring some issues. Knowing how to fix these common problems saves time and stress. Troubleshooting helps keep your website running smoothly during the move.
Address Transfer Delays
Domain transfers take time. Delays happen due to registrar policies or locked domains. Check if your domain is unlocked before starting the transfer. Verify your contact email is correct for confirmation messages. Sometimes, waiting 24 to 48 hours solves the delay.
Resolve Dns Errors
DNS errors cause website downtime. These happen if DNS records are not updated properly. Double-check your new host’s DNS settings. Clear your browser cache and flush DNS on your computer. Use online tools to test if DNS changes have spread globally.
Contact Support When Needed
Support teams help fix stubborn issues. Reach out to your old or new host support if problems persist. Provide clear details about your issue to get faster help. Most hosts have chat, email, or phone options for support.
Credit: www.rebeladmin.com
Frequently Asked Questions
How Do I Transfer My Domain To A New Host?
To transfer your domain, unlock it at your current registrar. Get the authorization code, then initiate transfer at the new host. Confirm the transfer via email. The process can take up to 7 days.
Will My Website Go Down During Domain Transfer?
No, your website usually stays online if you keep your old hosting active. Update DNS settings after transfer to avoid downtime. Plan the transfer carefully to ensure seamless website availability.
How Long Does Domain Transfer To A New Host Take?
Domain transfer typically takes 5 to 7 days. Some transfers can complete faster, depending on the registrars. Ensure you approve all confirmation emails promptly to speed up the process.
Do I Need To Change Dns Settings After Transfer?
Yes, update your DNS settings to point to the new host’s servers. This step is crucial to direct traffic to your new hosting environment. DNS propagation can take up to 48 hours.
Conclusion
Changing your domain name to a new host is easier with clear steps. Take your time and follow each step carefully. Backup your website files to keep data safe. Update your domain settings to point to the new host. Test your site after moving to ensure all works well.
This process helps keep your website running smoothly and avoid downtime. Stay patient and double-check each action to prevent errors. Moving your domain can be simple with the right approach and care.


