
Imagine unlocking a new level of organization and flexibility for your website. That’s what creating a subdomain in Namecheap can do for you.
Whether you’re looking to separate different sections of your site, manage multiple projects, or simply streamline your online presence, subdomains offer a simple yet powerful solution. You might be wondering how to get started, or perhaps you’re concerned about technical hurdles.
Don’t worry—you’re in the right place. This guide will walk you through each step, making it easy for you to create a subdomain in Namecheap without breaking a sweat. With clear instructions and useful tips, you’ll have everything you need to enhance your website’s functionality and user experience. Curious to see how it’s done? Keep reading to discover the secrets of subdomains and transform the way you manage your online space.
What Is A Subdomain?
Understanding subdomains is crucial for effective website management. A subdomain serves as an extension of your main domain. It’s used to organize or segment different parts of your site. This allows you to manage content separately. For example, blog.example.com and shop.example.com are subdomains of example.com.
A subdomain is a prefix added to your primary domain name. It helps create a separate section on your website. This section can have its unique content and purpose. Subdomains are often used for blogs, stores, or forums. They provide a way to categorize information efficiently.
Subdomains are a powerful tool for web management. They can enhance user experience and site navigation. Creating a subdomain is straightforward with Namecheap. It involves a few simple steps.
Subdomains offer several advantages. They help organize content neatly. This organization improves user navigation. Subdomains can also enhance your site’s SEO. Separate sections often rank better in search results. They make it easier to target specific audiences.
Subdomains allow testing new ideas without affecting the main site. You can experiment with layouts or features. This makes them ideal for development purposes. Using subdomains can streamline site management. They provide a clear structure to your website.
Examples Of Subdomains
Many popular websites use subdomains effectively. News sites might use sub.example.com for articles. Ecommerce sites often use shop.example.com for online stores. Educational platforms may use learn.example.com for courses.
Subdomains can cater to various needs. They can host forums or community pages. Businesses use them for support sections. Subdomains are versatile and adaptable. They fit many different purposes and industries.
Credit: www.namecheap.com
Benefits Of Using Subdomains
Subdomains offer unique advantages for website management and organization. They help in segmenting content, enhancing SEO, and improving user experience. By creating a subdomain, you can efficiently manage different parts of your website. Discover how they can benefit your web strategy.
1. Enhanced Seo Opportunities
Subdomains can target specific keywords for different topics. They help in ranking for niche content. This can improve your site’s visibility on search engines. Managing SEO campaigns becomes easier with subdomains.
2. Improved Site Organization
Subdomains help in dividing your website into distinct sections. Each section can have its own purpose or audience. This makes navigation simpler for users. It helps in keeping content organized and accessible.
3. Streamlined User Experience
Users can find relevant information faster with subdomains. Each subdomain can offer a unique focus or service. This can enhance user satisfaction and engagement. A streamlined experience often leads to repeat visits.
4. Brand Differentiation
Subdomains can highlight different aspects of your brand. They allow for specialized branding within your main domain. This can attract diverse audiences to your site. It also helps in building a broader brand identity.
5. Testing And Development
Subdomains provide a safe space for testing new ideas. They allow for experimentation without affecting the main site. This is crucial for development and innovation. Testing on subdomains can lead to better final products.
Prerequisites For Creating A Subdomain
Creating a subdomain in Namecheap requires a registered domain and account. Access the Namecheap dashboard, locate your domain, and configure DNS settings to add your subdomain. Ensure your domain’s DNS is set to Namecheap’s servers for smooth setup.
Creating a subdomain in Namecheap requires a few key steps. Before diving in, ensure you have certain essentials in place. These prerequisites help you set up your subdomain smoothly.Domain Registration
First, you need a registered domain. Without a domain, you can’t create a subdomain. Ensure your domain is active and registered with Namecheap. This acts as the parent domain for your subdomain.Access To Namecheap Account
Next, ensure you have access to your Namecheap account. You need to log in to manage your domain settings. Without access, you won’t be able to create or configure the subdomain. Make sure your login credentials are correct and up-to-date. “`
Credit: hostadvice.com
Step-by-step Subdomain Creation
Creating a subdomain in Namecheap is straightforward. Access your Namecheap account, navigate to the Domain List, and select “Manage” next to your domain. Under the Advanced DNS tab, add a new record. Choose “Subdomain” and enter your desired name. Save changes to finish.
Creating a subdomain in Namecheap might seem like a daunting task, but with a clear roadmap, you can accomplish it quickly. A subdomain is a part of your main domain, allowing you to organize your website into different sections. Whether you’re setting up a blog, an online store, or a customer service portal, subdomains can help manage your web presence effectively. Let’s dive into the step-by-step process, ensuring your journey is smooth and straightforward. ###Log Into Namecheap
Your first step is logging into your Namecheap account. It’s like opening the door to your online asset management. Use your credentials to access the dashboard. Familiarize yourself with the interface if you haven’t been here in a while. ###Navigate To Domain List
Once logged in, head over to the “Domain List” section. This is where all the magic happens. You’ll find this option on the left-hand side of the dashboard. It’s your hub for managing domains, offering a clear view of all the domains you own. ###Select Domain
From the domain list, select the domain where you want to add the subdomain. Clicking on it will open options specific to that domain. Think of it as picking the right branch to grow your new subdomain leaf. ###Access Domain Management
After selecting your domain, navigate to the “Domain Management” section. Here, you’ll find various tools and settings. Look for the DNS settings tab, as this is where you’ll configure your subdomain. Have you ever wondered how many subdomains you can create? The answer lies within these settings. Creating a subdomain is not just a technical task; it’s a strategic decision for your web presence. Consider how this new subdomain will serve your audience. Will it provide a new service or enhance user experience? By following these steps, you’re not only adding a subdomain but also expanding the possibilities of your digital footprint.Configuring Dns Settings
Create a subdomain in Namecheap by accessing the domain list in your account. Select “Manage” next to your domain, then navigate to the “Advanced DNS” tab. Add a new record with the desired subdomain name, and point it to your server’s IP address.
Configuring DNS settings for a subdomain in Namecheap can feel a bit like navigating a maze. But once you know the steps, it’s like riding a bike—straightforward and almost second nature. I remember my first time; I felt a mix of excitement and apprehension. But trust me, with a little guidance, you’ll have your subdomain up and running in no time. So, let’s dive into the essentials of configuring those DNS settings. ###Locate Dns Settings
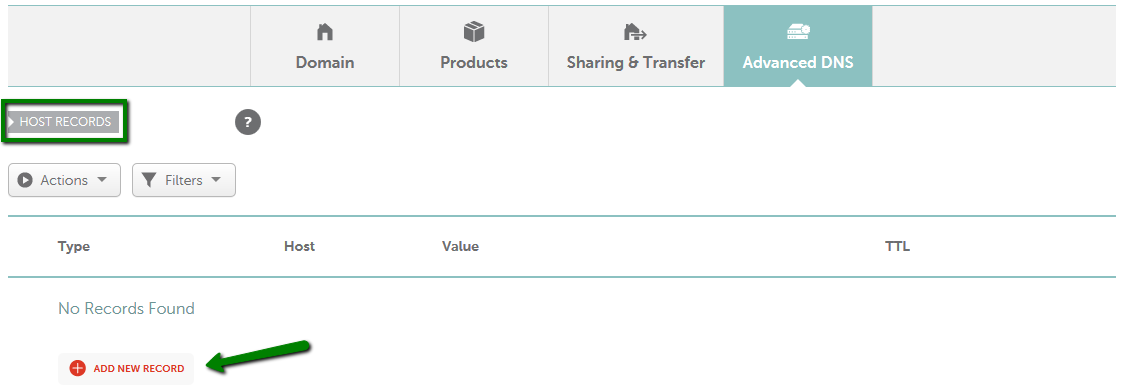
First things first, you need to locate the DNS settings in your Namecheap account. Log in and head over to your dashboard. Look for the “Domain List” on the left sidebar. Click on it, and you’ll see a list of your domains. Identify the domain where you want to add your subdomain and click on the “Manage” button next to it. Once you’re in the management area, find the tab labeled “Advanced DNS.” This is where the magic happens. ###Add New Subdomain Record
Now that you’ve found the DNS settings, it’s time to add your new subdomain record. Scroll down to the “Host Records” section. You’ll see various records listed here. To add a new one, click on the “Add New Record” button. A dropdown will appear with options like A Record, CNAME Record, etc. Choose the type of record you need. For most subdomains, a CNAME record is ideal. Enter your subdomain name in the “Host” field. For example, if you want to create “blog.yourdomain.com,” just type “blog.” In the “Target” field, input the destination URL or IP address. This tells the internet where to direct traffic for your subdomain. Once done, don’t forget to save! Creating subdomains might initially seem daunting, but once you’ve navigated through the process, it’s empowering. Have you ever felt that rush when something just works? That’s what awaits you here. Take the plunge and explore the endless possibilities a subdomain can offer for your website.Testing The Subdomain
Creating a subdomain in Namecheap is straightforward. Access your Namecheap account and navigate to the “Domain List. ” Select “Manage” next to your domain, then find the “Advanced DNS” tab to add a subdomain.
Testing the subdomain is a crucial step in ensuring everything works correctly. This process confirms that your newly created subdomain is properly set up. It helps in identifying any potential issues early on. By testing, you ensure a smooth user experience and maintain your website’s credibility.Verify Dns Propagation
After creating a subdomain, the DNS changes need to propagate. This process can take up to 48 hours. To verify, use online DNS lookup tools. These tools help in checking if the DNS records have updated globally. Sometimes, it may update faster for some regions. Patience is key during this waiting period.Access Subdomain Url
Once DNS has propagated, try accessing the subdomain URL. Open a web browser and type in the subdomain’s address. Check if the page loads as expected. If it doesn’t, recheck DNS settings in Namecheap. Ensure that the records are entered correctly. Sometimes, clearing your browser cache can help resolve loading issues.Common Issues And Troubleshooting
Creating a subdomain in Namecheap can sometimes be tricky. Users often face issues like DNS propagation delays or incorrect settings. Troubleshooting involves checking DNS records and ensuring the subdomain is correctly pointed to the server.
Creating a subdomain in Namecheap can be a straightforward process. However, like any technical task, it sometimes comes with its own set of challenges. Common issues can frustrate even the most seasoned users, but understanding these problems can save you time and effort. Troubleshooting these issues becomes easier when you know what to look for and how to fix it. Let’s dive into some typical problems and their solutions.Dns Propagation Delays
You’ve set up your subdomain, but it’s not showing up immediately? This can be due to DNS propagation delays, which is a common issue. DNS changes can take up to 48 hours to propagate across the internet. This delay can feel like forever when you’re eager to see your new subdomain in action. During this time, your DNS settings are updating across various servers worldwide. If you’re impatient like I was during my first setup, you’ll find yourself hitting refresh repeatedly. But remember, patience is key here. To check if DNS propagation is complete, you can use online tools like “whatsmydns.net”. These tools show you if the DNS changes have been updated globally. If the delays persist beyond 48 hours, it’s time to look deeper into potential misconfigurations.Incorrect Record Setup
Another frequent issue is setting up incorrect DNS records. It’s easy to make mistakes here, especially if you’re new to managing domains. A common error is entering the wrong IP address or forgetting to set the correct record type, like CNAME or A record. Imagine the frustration of setting everything up only to discover your subdomain leads nowhere. I once spent hours wondering why my subdomain wasn’t working, only to find I’d used an incorrect IP address. Always double-check your entries for typos and ensure the correct record type is selected. If your subdomain still doesn’t work, revisit your DNS settings in Namecheap. Look for errors or missing entries. Use Namecheap’s support resources or community forums if you’re stuck. Other users might have faced similar issues and can offer valuable insights. Have you ever been stuck on a technical issue, only to solve it with the help of a community? It’s a relief, isn’t it? Addressing these common issues can make creating a subdomain in Namecheap a smoother experience. Understanding what might go wrong and having the tools to troubleshoot can save you time and frustration.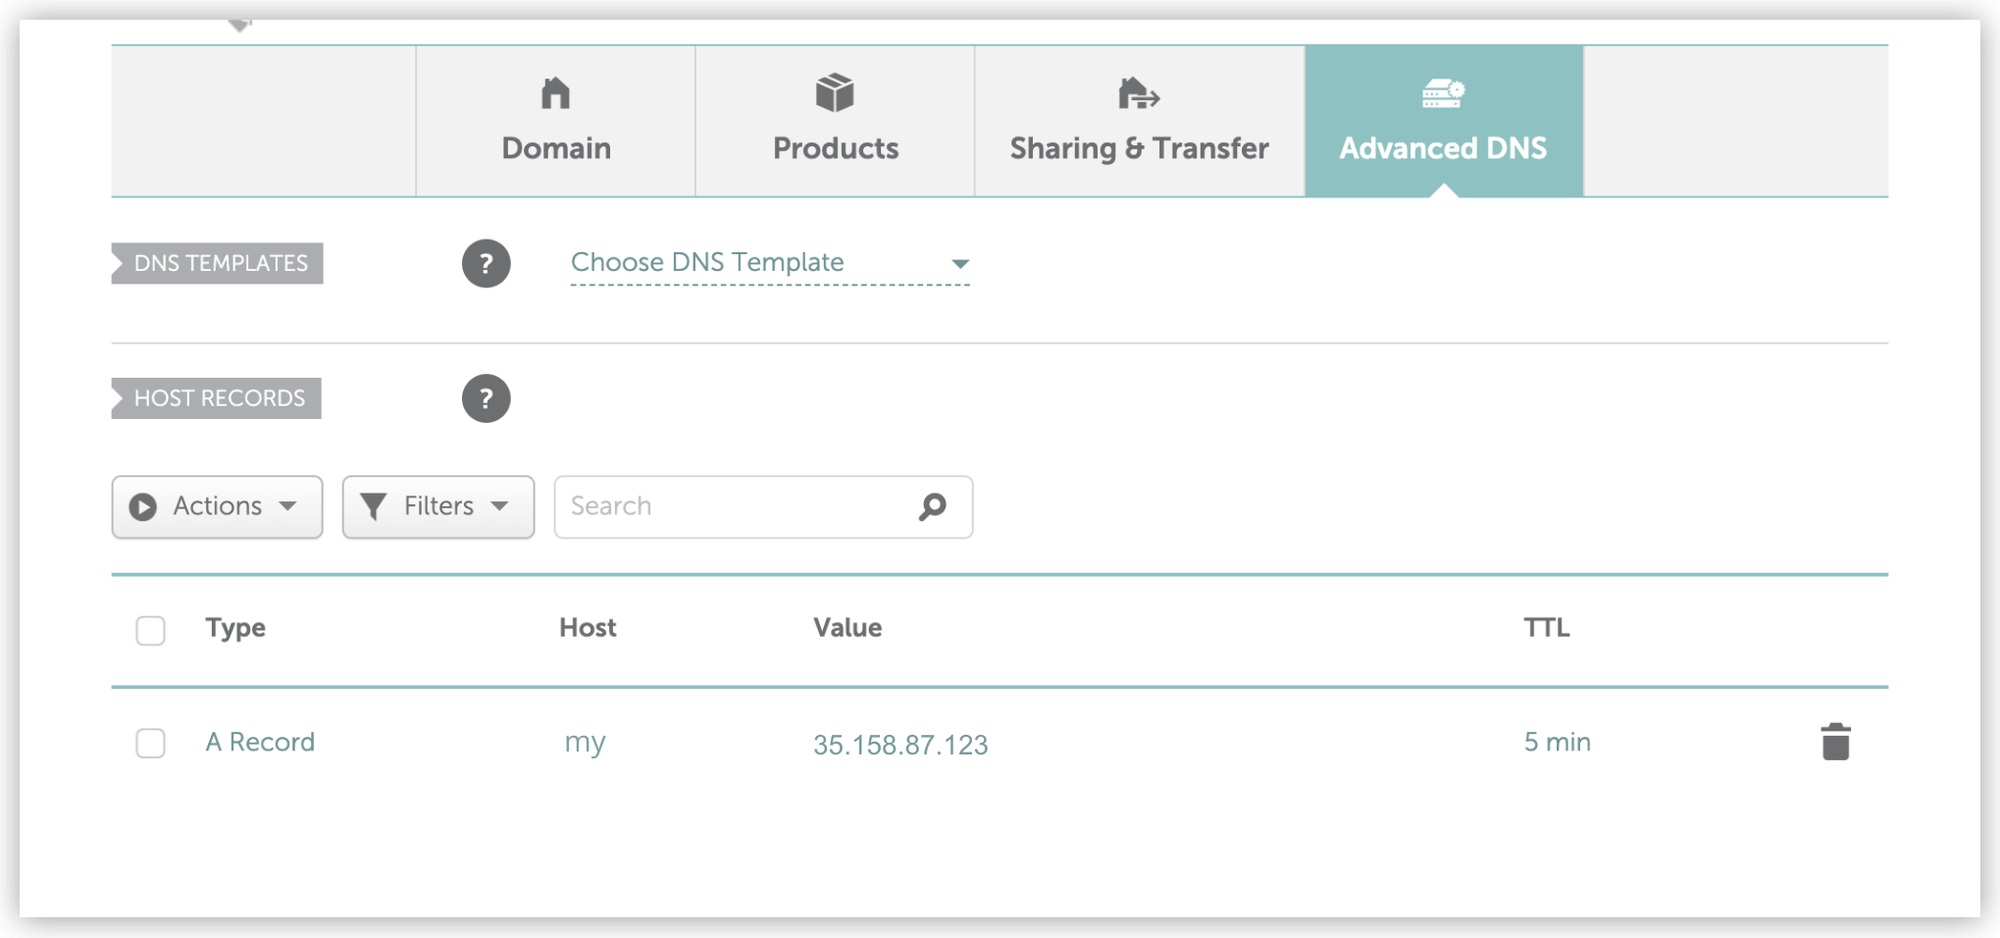
Credit: docs.softr.io
Frequently Asked Questions
How To Create A Sub Domain On Namecheap?
Log into your Namecheap account. Go to “Domain List” and click “Manage” next to your domain. Select the “Advanced DNS” tab, scroll to “Subdomains”, and click “Add Subdomain”. Enter your desired subdomain and save the changes.
How To Create A Sub Domain?
Log in to your hosting account. Navigate to the domain section. Select “Create Subdomain. ” Enter the desired name. Choose the domain to attach. Confirm and save changes. Your subdomain is ready for use.
Is Creating Subdomains Free?
Creating subdomains is usually free, depending on your hosting provider’s package. Most hosting plans include subdomains at no extra charge. Always check your hosting plan details for specifics. You can create subdomains through your hosting account’s control panel easily.
How To Create An Addon Domain In Namecheap?
Log into your Namecheap account. Navigate to cPanel and click “Domains. ” Select “Addon Domains” and enter the new domain name. Fill in the required details, then click “Add Domain. ” The addon domain will be created, allowing you to host multiple sites under one account.
Conclusion
Creating a subdomain in Namecheap is simple. Follow each step carefully. First, log into your account. Next, navigate to your domain list. Click “Manage” on your chosen domain. Find the “Advanced DNS” tab. Click on “Add New Record. ” Choose “Subdomain” as your record type.
Enter your subdomain name. Save changes. That’s it! Subdomains help organize your website. They enhance user experience. Now, you can manage different sections easily. Practice makes perfect, so try creating one today. Keep learning. Keep exploring. Your website will thank you.


