
Are you ready to get your website online but unsure how to connect your domain with your hosting? This step is crucial because it makes your website visible to the world.
Without proper configuration, your visitors won’t find your site, no matter how great your content is. Don’t worry—this guide will walk you through the process in simple, clear steps. By the end, you’ll have the confidence to link your domain and hosting smoothly, unlocking your website’s full potential.
Keep reading to make sure your online presence is set up the right way!

Credit: travarsa.com
Choosing The Right Domain
Choosing the right domain is a key step in setting up your website. Your domain name is your web address and identity online. It should be simple, easy to remember, and related to your business or topic. A good domain helps visitors find you quickly and builds trust.
Think about your audience and what they might type to find your site. A clear and concise domain name makes a big difference in attracting visitors. Avoid long or complicated words. Short names work better on mobile devices and are easier to share.
Selecting A Domain Name
Pick a name that matches your brand or content. Use keywords that describe your services or products. Keep it short, around 6 to 14 characters. Avoid numbers and hyphens as they confuse people. Choose a name that sounds good when spoken aloud.
Checking Domain Availability
Check if your chosen name is free using domain search tools. Many websites offer this service for free. If your name is taken, try slight variations or different extensions like .net or .co. Avoid names too similar to popular brands to prevent legal issues.
Registering Your Domain
After finding an available domain, register it through a trusted registrar. Use your real contact information to avoid problems later. Choose registration periods carefully; longer terms often save money. Protect your domain privacy if the registrar offers it to keep your details safe.
Credit: firebase.google.com
Picking A Hosting Provider
Choosing the right hosting provider is a key step in setting up your website. Your hosting service stores your website files and makes them accessible online. A good host improves your site’s speed and uptime. It also offers support and security for your data. Take time to select a provider that fits your needs and budget.
Types Of Hosting Services
Shared hosting means your site shares a server with others. It is cheaper but slower. VPS hosting offers more power and control. Your site has its own space on the server. Dedicated hosting gives you a whole server. It is best for large sites with high traffic. Cloud hosting uses many servers to host your site. It is flexible and reliable.
Factors To Consider
Check the hosting provider’s uptime guarantee. At least 99.9% uptime is good. Look for fast server speeds to keep visitors happy. Support should be available 24/7. Easy-to-use control panels help manage your site. Security features like SSL and backups protect your data. Also, compare prices and plans carefully.
Setting Up Your Hosting Account
First, choose a hosting plan that matches your needs. Create an account with the hosting provider. Enter your personal and payment details. After payment, you get access to the hosting dashboard. Use it to manage your files and settings. Follow the provider’s instructions to connect your domain. This step makes your website live on the internet.
Connecting Domain To Hosting
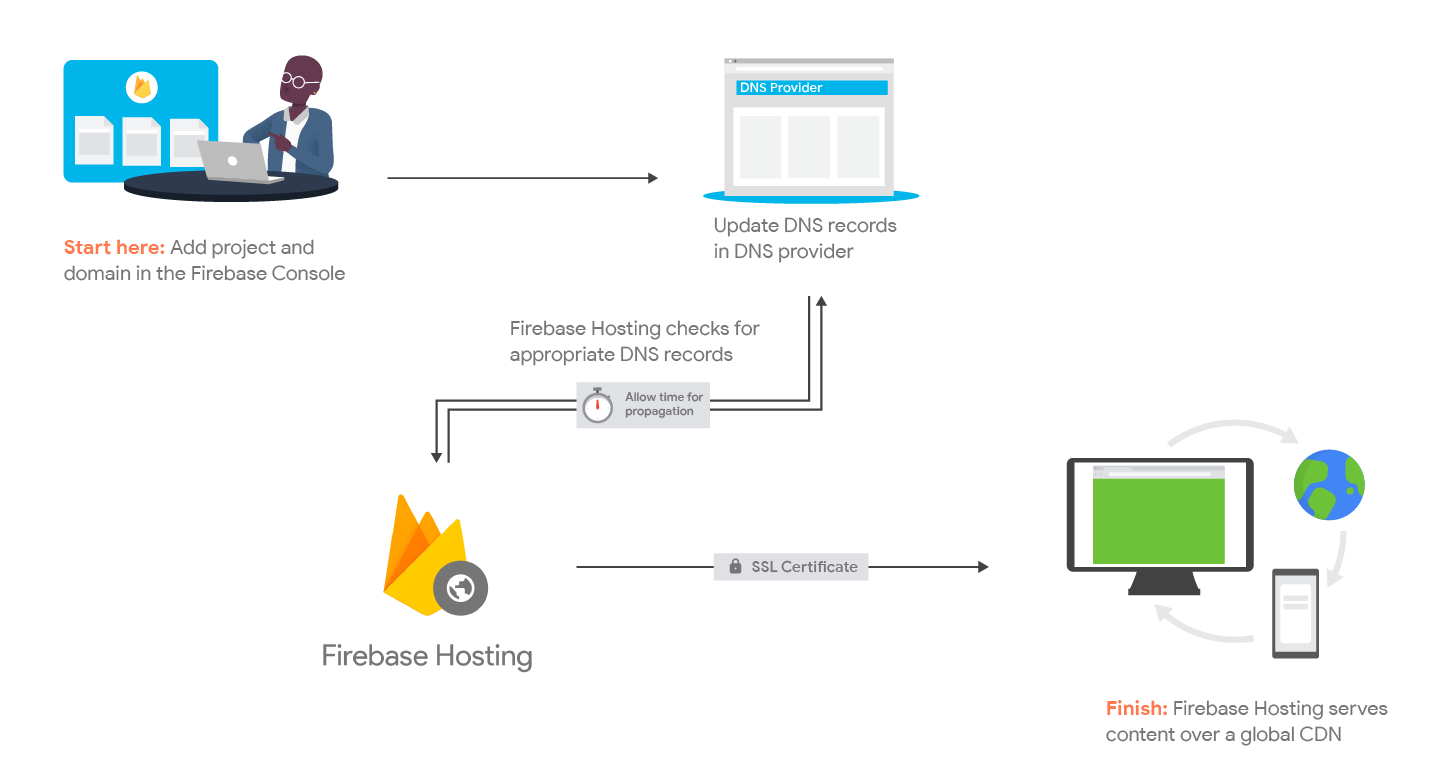
Connecting your domain to hosting is a key step in making your website live. This process links your domain name to the server where your website files are stored. Without this connection, visitors cannot reach your site by typing your domain name. The process involves changing your domain’s nameserver settings to point to your hosting provider. This section will guide you through each step clearly and simply.
Finding Nameserver Information
Start by getting your hosting provider’s nameserver details. These usually look like ns1.example.com and ns2.example.com. You can find this information in your hosting account dashboard or welcome email. If unsure, contact your hosting support for help. Write down these nameservers carefully to avoid mistakes.
Updating Domain Nameservers
Next, log in to your domain registrar account. Find the domain management or DNS settings area. Look for the option to change nameservers. Replace the current nameservers with the ones from your hosting provider. Save the changes. This step points your domain to your hosting server.
Waiting For Dns Propagation
After updating nameservers, changes take time to spread across the internet. This process is called DNS propagation. It can take from a few minutes to 48 hours. During this time, your website may appear offline or show the old site. Be patient and check your site periodically. Once propagation finishes, your domain will fully connect to your hosting.
Credit: knowledge.hubspot.com
Setting Up Dns Records
Setting up DNS records is a key step to connect your domain with your hosting. These records tell the internet where to find your website and email services. Proper setup ensures visitors reach your site quickly and your emails work without problems.
DNS records can seem complex, but breaking them down helps. You will learn about the most common types of DNS records and how to configure them correctly.
Understanding Dns Records
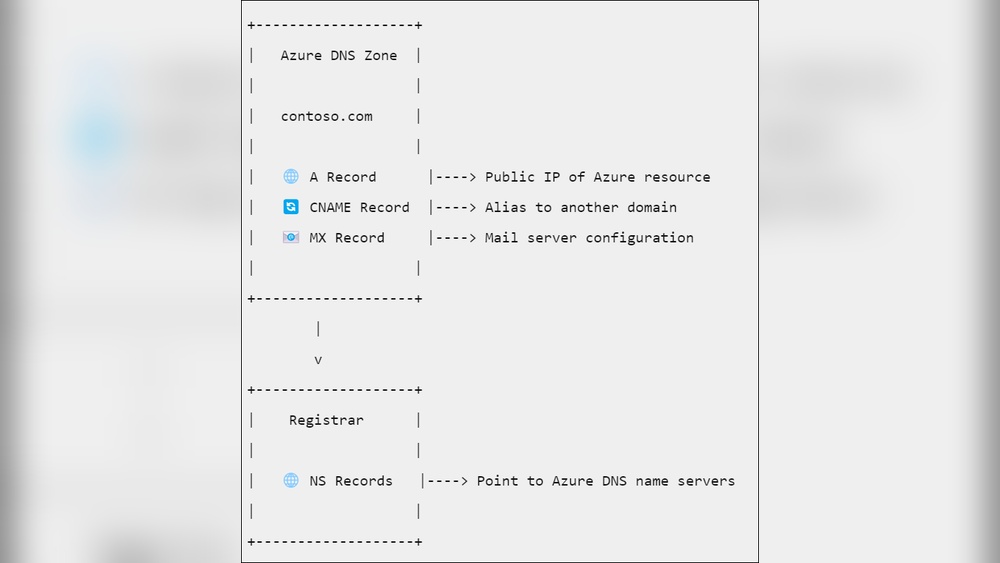
DNS records are instructions for the internet. They link your domain name to specific servers. These records include A, CNAME, and MX types. Each type has a unique role in directing traffic. A records point to your website’s IP address. CNAME records alias one domain name to another. MX records handle email delivery for your domain.
Configuring A And Cname Records
A records connect your domain to the hosting server’s IP address. Enter the IP address provided by your host. This record ensures your website loads properly. CNAME records create aliases for your domain. Use them to point subdomains like www to your main domain. Set the CNAME value to your root domain or another domain.
Adding Mx Records For Email
MX records direct email to your mail servers. Your hosting or email provider gives you the right values. Add these MX records in your DNS settings. Make sure to set the priority as instructed. Correct MX records ensure your email sends and receives without errors.
Uploading Website Files
Uploading website files is a key step in making your site visible online. This process moves your site data from your computer to your hosting server. Proper uploading ensures your website loads correctly for visitors. There are two main ways to upload files: using FTP clients or the hosting file manager. Each method has its own benefits and suits different user needs.
Using Ftp Clients
FTP clients are software that help transfer files between your computer and hosting server. Popular FTP clients include FileZilla and Cyberduck. To use an FTP client, enter your hosting server details like hostname, username, and password.
After connecting, locate the root folder, often named “public_html” or “www.” Upload your website files into this folder. FTP clients show file transfer progress, making it easy to track uploads. This method works well for large websites and bulk file transfers.
Using Hosting File Manager
Most hosting providers offer a file manager in their control panel. This tool lets you upload files through your web browser without extra software. Open the file manager and go to the root directory.
Use the upload option to select files from your computer. The file manager may allow drag-and-drop uploads. This method suits small websites or quick changes. It is simple and user-friendly for beginners.
Checking Website Live Status
After uploading, check if your website is live. Open your web browser and enter your domain name. Your site should load without errors. If the site does not appear, clear your browser cache and try again.
Use online tools like “Down For Everyone Or Just Me” to verify site status. Confirming your site is live helps ensure visitors can access it smoothly. Troubleshoot any issues by reviewing file paths and upload locations.
Testing And Troubleshooting
Testing and troubleshooting your domain connection is a key step after configuring your domain with hosting. This ensures your website loads correctly and is accessible to visitors. Problems may arise during setup, but most can be identified and fixed with simple checks.
Careful testing saves time and avoids frustration. It also confirms that your domain points to the right hosting server. Let’s explore how to verify your domain connection, identify common issues, and use online tools to diagnose problems.
Verifying Domain Connection
Start by checking if your domain points to the correct hosting server. Use a browser to enter your domain name and see if your website loads. It may take some time for changes to appear due to DNS propagation.
Another way is to use the command prompt or terminal. Type “ping yourdomain.com” to see if the domain resolves to your hosting IP address. This confirms the connection between your domain and hosting.
Common Issues And Fixes
Incorrect DNS settings cause most domain connection problems. Check that your nameservers match those provided by your hosting company. Update any wrong entries in your domain registrar’s dashboard.
Propagation delays can make your site temporarily unreachable. Wait up to 48 hours for DNS changes to spread worldwide. Clear your browser cache to avoid loading old site versions.
SSL certificate errors also block access. Ensure you install or activate SSL on your hosting panel. This protects your site and improves trust with visitors.
Using Online Tools For Diagnosis
Several free tools help diagnose domain and hosting issues. Use DNS checker websites to view your domain’s DNS records globally. This reveals if changes have propagated fully.
Website uptime checkers monitor your site’s availability from different locations. They alert you if your server is down or unreachable.
SSL checkers verify your certificate status and highlight security problems. These tools guide you to fix errors quickly and keep your site secure.
Frequently Asked Questions
What Is The First Step To Configure Domain With Hosting?
The first step is to purchase a domain and hosting plan. Next, access your hosting control panel to link the domain. This setup allows your website to be accessible via your domain name.
How Do I Point My Domain To Hosting Server?
You need to update your domain’s DNS settings. Replace the default nameservers with those provided by your hosting provider. This connects your domain to your hosting server effectively.
Can I Use An Existing Domain With New Hosting?
Yes, you can use an existing domain with new hosting. Simply change the domain’s nameservers to those of your new host. This process directs your domain traffic to the new hosting server.
How Long Does Domain And Hosting Configuration Take?
Domain and hosting configuration usually takes a few hours. DNS propagation can take up to 48 hours worldwide. During this time, your website may not be immediately accessible.
Conclusion
Configuring your domain with hosting is simple with clear steps. Start by linking your domain to the hosting server. Update the DNS settings carefully to avoid errors. Wait for changes to take effect, which may take some time. Test your website to ensure it loads correctly.
This process helps your site become accessible online. Keep your login details safe for future changes. Follow these steps, and your site will be live soon. Easy, quick, and effective setup leads to a smooth online presence.


