
Are you ready to make your website live but unsure how to connect your domain with your hosting server? You’re in the right place.
Linking your domain to your hosting is a crucial step that brings your online presence to life. Without this connection, your website can’t be found by visitors. Don’t worry if it sounds complicated — this guide will walk you through every step in a simple, clear way.
By the end, you’ll confidently connect your domain and hosting server, opening the door for your website to shine. Keep reading to unlock the secret to getting your site online fast and hassle-free!
Credit: www.namecheap.com
Choosing The Right Domain
Choosing the right domain is the first step in building your online presence. It creates your website’s identity and helps visitors find you. A good domain name is easy to remember and matches your brand well. This section guides you through selecting, checking, and registering your domain.
Selecting A Domain Name
Pick a name that is short and clear. Avoid using complex words or long phrases. Use keywords related to your business or topic. This helps search engines understand your site. Try to keep the name unique and easy to spell. Stay away from numbers and hyphens to reduce confusion.
Checking Domain Availability
Check if your chosen domain name is free to use. Many websites allow you to search domain availability instantly. If the name is taken, try small changes or different extensions. Extensions like .com, .net, or .org are popular. Choose one that fits your website’s purpose best.
Registering Your Domain
After confirming availability, register your domain through a trusted registrar. Provide your contact details and choose a registration period. Protect your privacy by enabling domain privacy options. Complete the payment process to secure your domain. Keep your registration details updated to avoid losing control.

Credit: www.youtube.com
Picking A Hosting Provider
Choosing the right hosting provider is a key step in connecting your domain to a server. The hosting provider stores your website files and makes them accessible online. A good host ensures your site loads fast and stays online. Understanding different hosting types and plans helps you pick the best option. The signup process usually is simple and quick.
Types Of Hosting Services
Shared hosting is the most common and affordable option. Multiple websites share one server. It suits small sites with low traffic. VPS hosting gives you more control and resources. It splits a server into virtual servers. Good for medium-sized sites with growing traffic. Dedicated hosting means renting an entire server. It offers full control and high performance. Best for large websites with heavy traffic. Cloud hosting uses many servers to host sites. It is scalable and reliable. Great for sites needing flexible resources.
Comparing Hosting Plans
Look at storage space and bandwidth limits first. Storage is the space for your website files. Bandwidth is the amount of data your site sends to visitors. Check uptime guarantees to ensure your site stays live. Customer support availability is important too. Some plans include free SSL certificates for security. Consider backup options to protect your data. Price matters, but do not choose only by cost. Balance features and budget for the best value.
Signing Up For Hosting
Visit the hosting provider’s website. Choose the plan that fits your needs. Create an account by providing your details. Enter payment information to complete the purchase. After signup, you will get access to a control panel. Use it to manage your server and connect your domain. The provider often offers step-by-step guides to help. Keep your login information safe for future use.
Accessing Domain Control Panel
Accessing the domain control panel is the first step to connect your domain with your hosting server. This panel lets you manage your domain settings. You can update where your domain points to by changing DNS records. Understanding how to reach and use this control panel is essential for website setup.
Logging Into Your Domain Registrar
Start by visiting the website of your domain registrar. This is the company where you bought your domain name. Enter your username and password to log in. If you forget your login details, use the password recovery option. Once logged in, you gain full control over your domain settings.
Navigating To Dns Settings
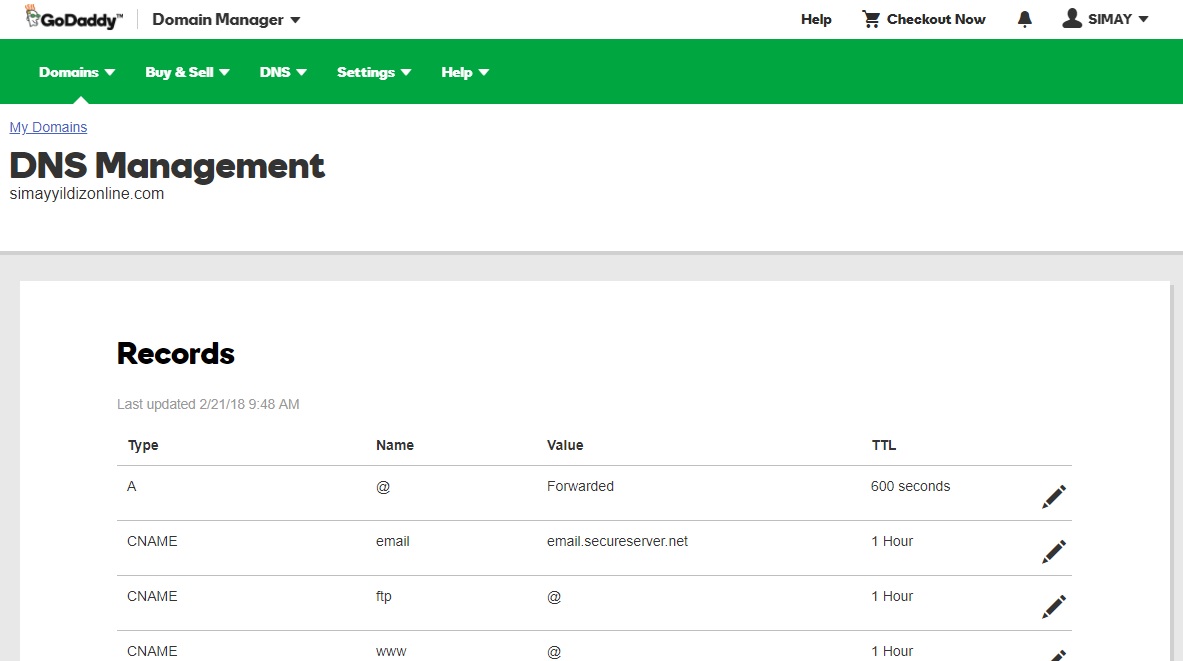
After logging in, find the domain management area. Look for a section named “DNS Settings” or “Name Server Management.” This area controls where your domain points online. Click on it to view or edit your domain’s DNS records. These records must be set correctly for your website to work.
Connecting Domain To Hosting
Connecting your domain to your hosting server is a vital step to make your website live. This process links your website address to the server where your site files are stored. It allows visitors to access your site by typing your domain name in their browser.
The process may seem technical, but it is simple if you follow the right steps. You need to update your domain’s settings to point to your hosting provider. This guide will help you connect your domain to your hosting effectively.
Finding Hosting Nameservers
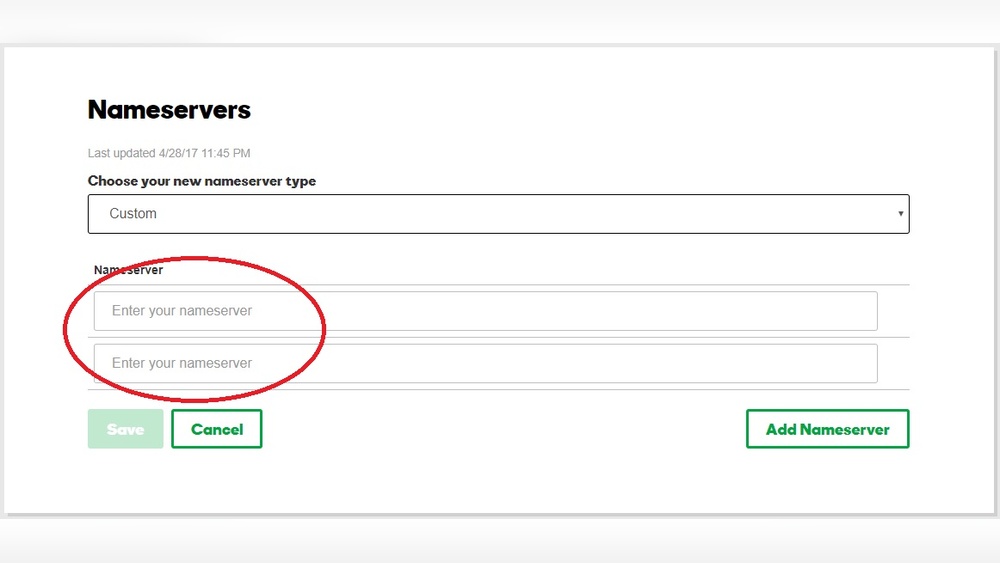
Nameservers tell the internet where to find your website. Your hosting provider gives you these nameservers. They usually look like ns1.example.com and ns2.example.com. Check your hosting control panel or welcome email for these details. Keep them ready before updating your domain.
Updating Dns Records
Go to your domain registrar’s website and log in. Find the DNS or nameserver settings for your domain. Replace the old nameservers with the new ones from your hosting provider. Enter the exact nameserver addresses to avoid errors. Save your changes after updating.
Saving And Propagating Changes
After saving, the changes take time to spread across the internet. This period is called propagation. It can take from a few minutes to 48 hours. During this time, your website may not be visible everywhere. Be patient and check your site after some time.
Verifying The Connection
After connecting your domain to the hosting server, checking the connection is key. This step confirms your website will load correctly. It also helps spot any setup errors early. Verifying the connection saves time and avoids future problems.
Using Online Dns Checkers
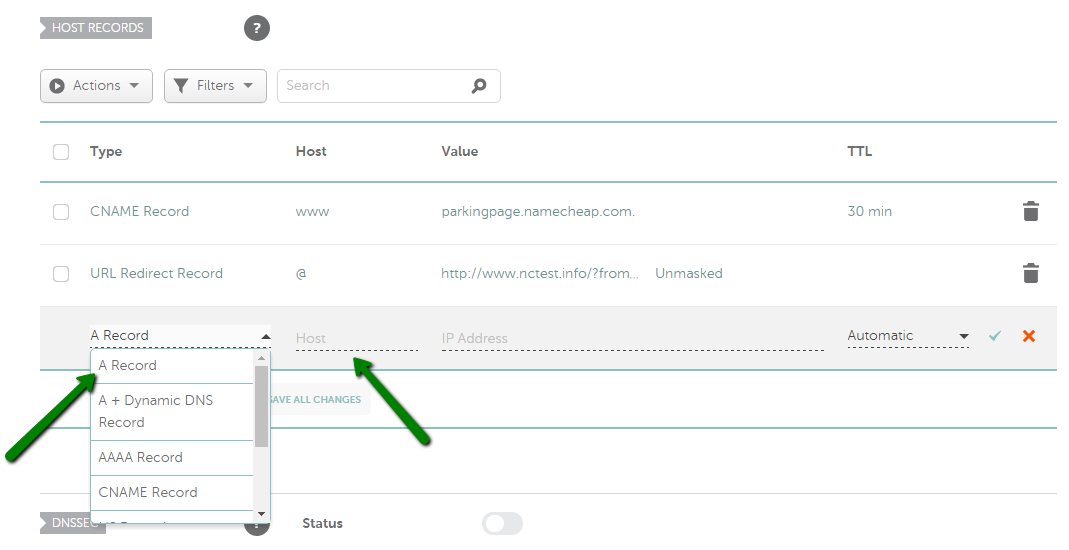
Online DNS checkers show if your domain points to the right server. These tools check DNS records like A, CNAME, and NS. Enter your domain name and wait for results. The results tell if the domain matches your hosting IP. Use popular DNS checkers for accurate info.
This method is quick and does not need technical skills. It helps confirm that DNS changes have spread across the internet. This spreading process is called propagation and may take time. Check multiple times to be sure.
Troubleshooting Common Issues
Sometimes the domain does not connect as expected. Common issues include wrong DNS settings or slow propagation. Double-check your DNS records in your domain registrar’s panel. Make sure the IP address matches your hosting server.
Clear your browser cache or try another device to avoid local errors. If problems persist, contact your hosting support for help. Patience is important, as DNS changes can take up to 48 hours. Keep verifying during this period.
Credit: www.godaddy.com
Configuring Hosting Settings
Configuring hosting settings is a vital step in connecting your domain to the hosting server. It ensures your website files are correctly placed and your site is secure. Proper setup helps your site run smoothly and keeps visitors safe. Follow these steps to manage your hosting settings effectively.
Setting Up Your Website Files
Start by uploading your website files to the server. Use an FTP client or the hosting control panel to move files. Place them in the public_html or www folder. This folder is where the server looks for your website content. Check that your homepage file is named correctly, usually index.html or index.php. Organize files neatly for easier management later.
Enabling Ssl For Security
SSL protects your website by encrypting data between the server and visitors. Many hosts offer free SSL certificates through Let’s Encrypt. Activate SSL in your hosting dashboard. After enabling, update your site URL to use https:// instead of http://. This small step builds trust with visitors and improves your search ranking.
Frequently Asked Questions
What Is The First Step To Connect A Domain With Hosting?
The first step is to access your domain registrar’s control panel. Then, find the DNS settings to update the nameservers provided by your hosting provider.
How Long Does Domain Propagation Take After Connecting?
Domain propagation usually takes 24 to 48 hours. This delay allows DNS changes to update across all global servers.
Can I Connect A Domain To Hosting Without Changing Nameservers?
Yes, you can use DNS records like A or CNAME to point your domain. However, changing nameservers is more common and easier for full control.
What Information Do I Need To Connect Domain With Hosting?
You need your hosting provider’s nameserver addresses or DNS records. Also, access to your domain registrar account is essential to make changes.
Conclusion
Connecting your domain with a hosting server is simple when you follow the steps. It helps your website become visible on the internet. Double-check your settings to avoid common errors. Wait a little for changes to take effect. You can always reach out to support if stuck.
This process builds the foundation for your website’s success. Start today and see your website live soon.


