
Have you just purchased a domain from Namecheap and are now wondering how to connect it to your Namecheap hosting? You’re in the right place.
Navigating the technical aspects of website setup can be daunting, but it doesn’t have to be. Imagine having your website up and running smoothly with just a few simple steps. This article will guide you, step-by-step, through the process of connecting your Namecheap domain to your hosting account effortlessly.
Whether you’re a seasoned webmaster or a complete beginner, you’ll find this guide easy to follow. By the end, you’ll have your website live and ready to welcome visitors. Let’s dive in and turn that domain name into a functional website without any hassle.
Credit: www.namecheap.com
Domain And Hosting Basics
Connecting your Namecheap domain to Namecheap hosting might seem daunting, but understanding the basics makes it easier. Your domain is your unique address on the internet, while hosting is where your website lives. Both are crucial for building a successful online presence. Once you grasp these concepts, the process of connecting them becomes straightforward.
Understanding Domain Names
Domain names are essentially your website’s online identity. They are the web addresses people type into their browsers to reach your site. Think of it like the street address for your home. Just like you wouldn’t want a confusing address, your domain name should be simple and memorable.
Domains consist of two main parts: the name itself and the extension (like .com, .net, .org). Selecting a domain name is an important decision. It should represent your brand or purpose clearly. Consider your audience—what will they remember easily?
Did you know you can customize your domain’s DNS settings? This feature allows you to control various aspects of your domain, such as email forwarding and subdomain creation. It’s like having a toolkit to fine-tune your web presence.
Types Of Web Hosting
Web hosting is where your website’s files are stored, enabling it to be accessed on the internet. There are different types of web hosting, and each serves a different purpose. Choosing the right hosting type is crucial for your site’s performance.
Shared hosting is popular for beginners because it’s affordable and easy to manage. Your website shares server resources with others, making it a cost-effective choice. Is your site small or just starting? Shared hosting might be your best bet.
VPS hosting offers more control and resources than shared hosting. It’s like having your own slice of a server. If your site is growing or needs more power, VPS hosting can provide the necessary boost.
Dedicated hosting gives you an entire server to yourself. It’s ideal for large businesses or high-traffic sites that require maximum performance and security. Do you have a big vision for your website? Dedicated hosting could be the answer.
Finally, there’s cloud hosting, which uses multiple servers to balance your site’s load and maximize uptime. It’s scalable and flexible, making it a great choice for unpredictable traffic patterns. Is your business expanding rapidly? Cloud hosting might be your solution.
Have you considered which hosting type aligns with your needs? Understanding these options empowers you to make informed decisions for your website’s future.
Preparing For Connection
Connecting your Namecheap domain to Namecheap hosting involves a few steps. Before diving in, make sure you’re ready for the process. Proper preparation makes the connection smoother and hassle-free. Below, we guide you through the initial preparation steps.
Accessing Namecheap Account
First, log into your Namecheap account. This is where you’ll manage your domain and hosting. Use your email and password to access the dashboard. Once logged in, you can see all your services. Familiarize yourself with the interface. This will help you navigate easily.
Gathering Necessary Information
Next, gather all required details. You’ll need your domain name and hosting credentials. Check your Namecheap emails for this information. Also, note your hosting server details. You can find these in your hosting dashboard. Write down your DNS settings. This information is crucial for a smooth connection.
Configuring Domain Settings
Configuring domain settings is a crucial step in connecting your Namecheap domain to Namecheap hosting. This process involves adjusting several key settings. These settings ensure your domain points correctly to your hosting account. This step is essential for making your website accessible online. Let’s explore how to configure these settings effectively.
Updating Dns Records
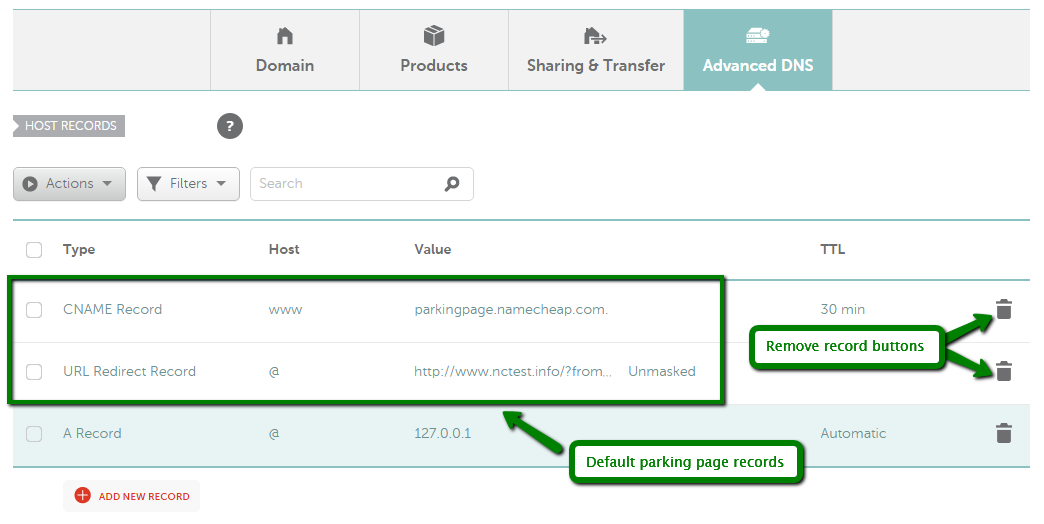
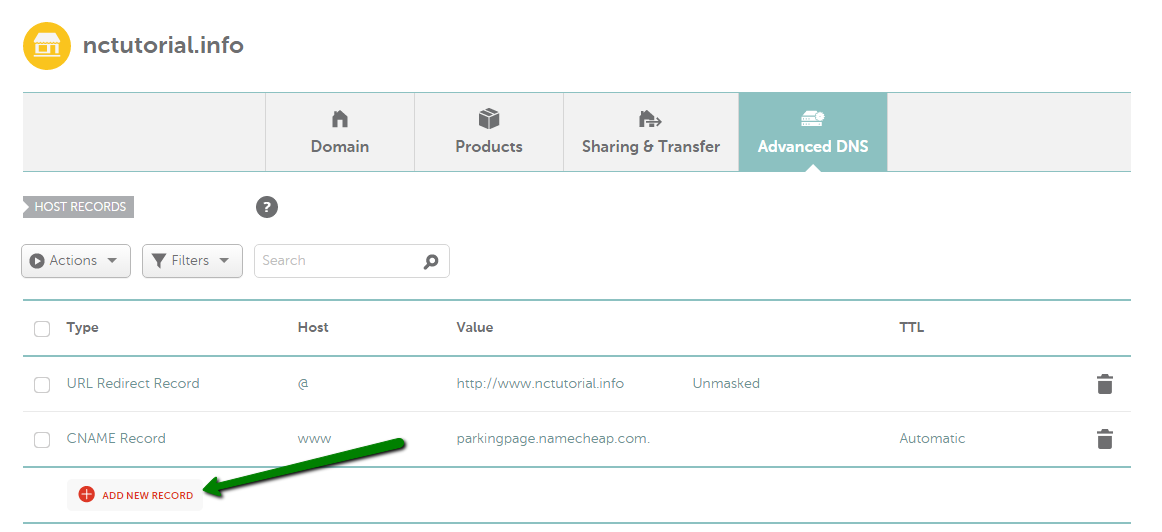
First, log into your Namecheap account. Navigate to the “Domain List” section. Select the domain you wish to connect. Click on the “Manage” button. Find the “Advanced DNS” tab. Here, you can update your DNS records. Ensure the “A Record” points to your hosting server’s IP address. Update the “CNAME Record” if necessary. These records link your domain to your website.
Setting Custom Name Servers
Access the “Domain List” in your account. Choose the domain you are configuring. Click on “Manage” to enter the settings. Locate the “Name Servers” section. Select “Custom DNS” from the dropdown menu. Enter the name servers provided by your hosting account. Save the changes once done. This step connects your domain to the Namecheap hosting servers.
Credit: documentation.unbounce.com
Linking Domain To Hosting
Connecting a Namecheap domain to Namecheap hosting involves simple steps. Access your Namecheap account, navigate to the Domain List, and select your domain. Then, modify the DNS settings by choosing the Namecheap BasicDNS option to link it to your hosting service.
Linking your Namecheap domain to your hosting plan is essential. It ensures your website is accessible online. This process might seem technical. But with a few steps, you can easily connect them. Let’s dive into how to link your domain to hosting.Using Namecheap Dashboard
First, log in to your Namecheap account. Navigate to the dashboard. Here, you’ll see a list of your domains. Find the domain you want to connect. Click on “Manage” next to it. This will open the domain management page. Look for the “Nameservers” section. Select “Namecheap Web Hosting DNS” from the dropdown menu. Save your changes. This links your domain to Namecheap hosting.Verifying Connection
After updating the nameservers, it’s time to verify. This step ensures everything is set up correctly. Wait for a few minutes. Changes might take some time to propagate. You can use online tools to check. Simply enter your domain name. These tools show if your domain is pointing to Namecheap hosting. If everything looks good, your domain is now connected. If not, recheck your settings. Make sure you saved your changes. This straightforward process connects your domain and hosting. Now, your website is ready for visitors.Troubleshooting Common Issues
Connecting a Namecheap domain to Namecheap hosting involves adjusting DNS settings. Start by accessing your Namecheap account, then locate your domain list. Update the domain’s DNS settings to point to Namecheap hosting servers. This ensures your website is visible online.
Troubleshooting common issues when connecting your Namecheap domain to Namecheap hosting can feel like navigating a maze. It’s not uncommon to encounter roadblocks that seem perplexing at first. But with a bit of guidance, you can unravel the mysteries of DNS propagation delays and connection errors.Resolving Dns Propagation Delays
One of the frequent challenges is DNS propagation delays. You might wonder why your website isn’t live immediately after updating your DNS settings. This delay happens because it takes time for DNS records to update across the internet. Typically, DNS changes can take up to 48 hours to fully propagate. However, you can speed things up by clearing your browser’s cache or using a different DNS server like Google’s Public DNS. Have you ever been stuck waiting, only to realize a simple refresh could solve it? Remember, patience is key here. Constantly checking doesn’t speed things up, but understanding the process helps ease the wait.Addressing Connection Errors
Encountering connection errors can be frustrating. These errors often occur when your domain isn’t properly pointing to your hosting account. Double-check your DNS settings to ensure your domain’s nameservers match those provided by Namecheap. If you see errors like “Server not found,” it might be due to incorrect IP addresses. Make sure the A records in your DNS settings reflect the correct IP address of your hosting server. Is your website still not loading? Consider reaching out to Namecheap’s support. They offer a wealth of knowledge and can provide the reassurance you need. Have you ever hesitated to ask for help, only to realize it saves time in the long run? Successfully connecting your domain to hosting is a triumph that makes the effort worthwhile. With these troubleshooting tips, you’re well on your way to resolving common issues effectively.Additional Tips
For a smooth connection between your Namecheap domain and hosting, ensure DNS settings are correct. Double-check your server names and IP addresses. This helps in avoiding potential issues and keeps your website accessible to visitors.
Connecting your Namecheap domain to your Namecheap hosting is a straightforward process. However, to ensure everything runs smoothly, there are some additional tips you should keep in mind. These tips not only help maintain your domain’s health but also unlock advanced features that can enhance your website’s performance and security. Let’s dive into these essential tips to optimize your Namecheap experience. ###Maintaining Domain Health
Keeping your domain healthy is crucial for its longevity and performance. Regularly check your domain’s expiration date. Set reminders to renew it on time to avoid any interruptions. Protect your domain with WhoisGuard. This feature masks your personal information in the public Whois database, safeguarding your privacy. Ensure your domain’s DNS settings are correct. Incorrect DNS settings can lead to downtime. Use Namecheap’s DNS checker tool to quickly verify and fix any issues. ###Exploring Advanced Features
Namecheap offers a suite of advanced features worth exploring. Have you considered enabling two-factor authentication? It adds an extra layer of security to your account. Utilize Namecheap’s free website builder if you aren’t a coding expert. It’s user-friendly and can get your site up and running quickly. Lastly, explore the SSL certificates Namecheap offers. They encrypt the data transferred between your website and its visitors, enhancing trust and security. Incorporating these tips can significantly improve your domain and hosting experience. Which advanced feature will you try first? Making small improvements today can lead to significant benefits for your website in the future.
Credit: help.shopify.com
Frequently Asked Questions
How To Connect Domain To Hosting In Namecheap?
Log into your Namecheap account. Go to the “Domain List” and click “Manage” next to your domain. Under the “Nameservers” section, select “Custom DNS” and enter your hosting provider’s nameservers. Save the changes, and allow 24-48 hours for DNS propagation.
How To Connect Domain And Hosting?
To connect a domain and hosting, update the domain’s DNS settings with your hosting provider’s nameservers. Log into your domain registrar’s account, find the DNS settings, and input the nameservers provided by your host. Save changes, and your domain will point to your hosting account.
How Do I Add An Existing Domain To Namecheap Hosting?
Log into your Namecheap account. Navigate to your hosting dashboard. Click “Manage” next to your hosting plan. Select “Add Domain” and enter your existing domain name. Follow the prompts to complete the setup. Ensure your domain’s nameservers point to Namecheap to activate hosting.
Does Namecheap Domain Come With Hosting?
Namecheap domains do not come with hosting. You need to purchase hosting separately. They offer various hosting plans to meet your needs.
Conclusion
Connecting your Namecheap domain to hosting is simple and straightforward. Follow each step carefully. Check your settings to ensure everything is correct. This process helps your website go live. Easy for beginners and non-techies. Troubleshooting tips are available in case of issues.
Remember, patience is key. With practice, you’ll get better. Your online presence is now in your hands. Enjoy your new website. Keep learning and exploring more about hosting and domains. Feel free to seek help if needed. Happy hosting!


