Are you considering a change in your web hosting service? Maybe Namecheap isn’t fitting your needs anymore, or you’ve found a better deal elsewhere.
Whatever your reason, knowing how to cancel your Namecheap hosting account smoothly can save you time and hassle. You might worry about losing data or facing unexpected charges, but don’t stress. This guide will walk you through every step, ensuring you can make the transition without any headaches.
Discover the simple process that puts control back in your hands, so you can focus on what matters most—your website. Ready to make your move? Let’s dive in and get started.
Accessing Your Namecheap Account
Navigating your Namecheap account allows easy hosting cancellation. Log in, select “Hosting List,” and find your plan. Choose “Manage,” then click “Cancel Service” to complete the process.
Accessing your Namecheap account is the first step in canceling your hosting service. This might sound straightforward, but it’s essential to navigate the process with ease and confidence. Have you ever found yourself fumbling around a website, unsure of where to click next? Accessing your account shouldn’t be one of those experiences. Here’s how you can make sure you’re on the right path without the hassle.Logging Into Your Dashboard
Begin by visiting the Namecheap website. Look for the “Sign In” button located at the top right corner of the page. Enter your username and password to access your dashboard. Once logged in, take a moment to familiarize yourself with the layout. The dashboard is your control center for managing all things related to your Namecheap services.Navigating The Account Panel
After logging in, you’ll find the account panel on the left side of the screen. This panel is your gateway to all your services, including hosting. Click on “Hosting List” to view your active hosting plans. If you’re like me, you might find it helpful to double-check the details before making any changes.Locating The Service You Wish To Cancel
Look through the list of hosting services. Identify the specific plan you want to cancel. Pay attention to the plan details to avoid any confusion. Hover over the plan name and click on the “Manage” button. This will open up a detailed view of your hosting plan, allowing you to proceed with cancellation.Checking For Important Information
Before proceeding, ensure you have all necessary information regarding your hosting plan. Are there any upcoming payments or renewal dates you should be aware of? Understanding these details can prevent unexpected charges. You can also verify if there are any penalties for early cancellation.Preparing For The Next Steps
Once you have accessed and reviewed your account, you’re ready to proceed with the cancellation. Do you feel confident about the steps ahead? If there’s anything unclear, Namecheap offers customer support to help guide you. It’s always better to ask than to assume. Navigating through your Namecheap account is straightforward. By following these steps, you can manage your services with ease. Have you ever felt overwhelmed by online processes? Remember, taking it one step at a time can make all the difference.
Credit: www.youtube.com
Navigating To Hosting Services
Canceling Namecheap hosting is simple. Log into your account, navigate to the hosting section, and select the cancel option. Follow the instructions, and confirm your cancellation.
Navigating through Namecheap’s interface to cancel your hosting can seem daunting at first. But fear not, it’s simpler than you might think. A few clicks, and you’ll be on your way to managing your hosting services effectively. ###Access Your Namecheap Account
Start by logging into your Namecheap account. Once inside, you’ll find your dashboard presenting a variety of options. Look for the “Account” tab in the top-right corner to get started. ###Find The Dashboard
Head straight to your dashboard where all your services are listed. This is your control center for managing everything you’ve purchased from Namecheap. You’ll see a list of domains, hosting, and additional services you own. ###Navigate To Hosting Services
In the dashboard, spot the “Hosting List” tab. This section contains all your hosting services. By clicking on it, you’ll access the details of your current hosting packages. ###Identify The Hosting Package To Cancel
Scroll through the list to find the specific hosting package you want to cancel. Make sure you’ve selected the right one, as multiple packages might be active. Double-checking here can save you from accidentally canceling the wrong service. ###Check Remaining Term Details
Once you’ve identified the package, check the remaining term details. This will inform you how much time is left before your hosting renews. It’s crucial to know this to avoid unexpected charges. ###Consider Backup Options
Before proceeding with cancellation, think about backing up your data. If you have important files or websites hosted, ensure you have copies. This step is vital to prevent any data loss after cancellation. ###Proceed To Cancel
Finally, you’re ready to cancel. Look for the “Manage” button next to your hosting package. Within this section, you’ll find the option to cancel your hosting service. Follow the prompts, and you’ll be done in no time. Navigating through these steps ensures you have full control over your hosting services. Are there other Namecheap features you’ve found tricky to handle? Share your thoughts and experiences in the comments below!Completing The Cancellation Process
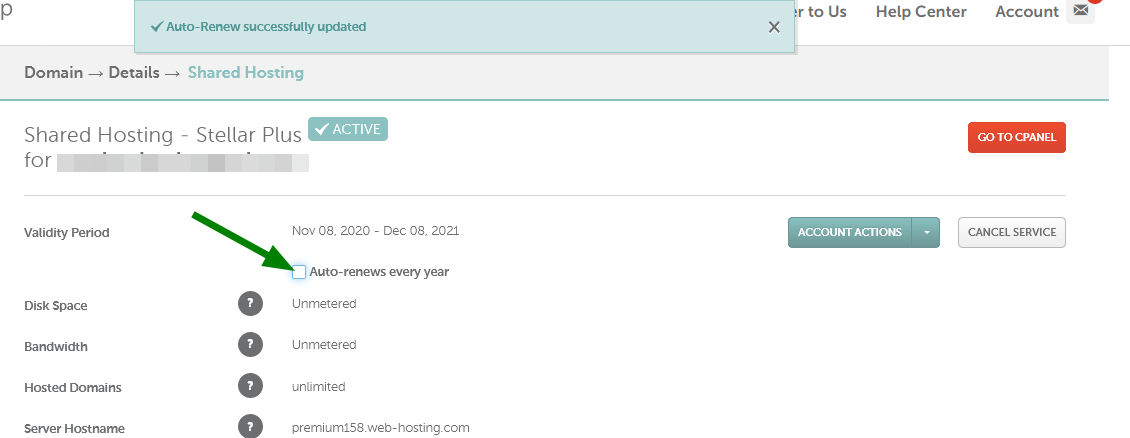
Canceling Namecheap hosting is simple. First, log into your account. Next, navigate to the hosting dashboard. Then, select the hosting plan you wish to cancel. Follow the prompts to complete the cancellation process. Finally, confirm your decision to terminate the service.
Completing the cancellation process with Namecheap hosting might feel like a daunting task, but it doesn’t have to be. It’s all about understanding the steps and taking action with confidence. Let’s break down the process so you can move forward smoothly.Understand The Cancellation Policy
Before diving into the cancellation, ensure you know Namecheap’s policies. Some services might have a money-back guarantee. Checking the terms can help you know what to expect.Access Your Account Dashboard
Log into your Namecheap account to get started. Your dashboard is your control center for managing services. Navigate to the hosting section to find the service you want to cancel.Select The Service To Cancel
Identify the hosting service you need to cancel. Be precise in your selection to avoid any accidental disruptions. Think of it as tidying up your online toolbox—remove only what you no longer use.Initiate The Cancellation
Once you’ve selected the right service, look for the cancellation option. Usually, this is straightforward—click and confirm your choice. Consider how freeing it feels to declutter your digital space.Confirm Your Decision
Namecheap will likely ask for confirmation before processing the cancellation. Double-check your decision before proceeding. Ask yourself if you’re ready to let go of this service.Receive Confirmation Email
After confirming, keep an eye on your inbox for a confirmation email. This email serves as proof that your cancellation request has been processed. It’s like receiving a receipt for your digital housekeeping.Verify Billing Adjustments
Check your billing statement to ensure no further charges are applied. This step ensures that everything is squared away financially. It’s about being proactive and ensuring your peace of mind.Explore Alternative Options
Consider what you want next in your hosting journey. Are there other services that better fit your needs? Sometimes, cancellation is a step towards something even better. Completing these steps can feel empowering. Have you ever felt that sense of relief after tidying up a space in your life? That’s what this process can do for your digital world. Take each step confidently and know that you’re making room for what truly matters.
Credit: www.youtube.com
Credit: www.namecheap.com
Frequently Asked Questions
How Do I Cancel My Namecheap Subscription?
Log into your Namecheap account. Go to the “Dashboard”. Select “Subscriptions”. Click “Manage” next to the subscription. Choose “Cancel” and confirm.
Can I Cancel My Hosting?
Yes, you can cancel your hosting plan. Check your hosting provider’s cancellation policy for specific steps and conditions. Contact customer support for assistance. They will guide you through the process efficiently. Ensure you back up your data before proceeding with cancellation.
What Happens To My Domain If I Cancel Hosting?
Canceling hosting does not affect your domain ownership. Ensure your domain is registered separately to retain it. Transfer it to another registrar if needed. Keep domain registration active by renewing it before expiration.
What Happens When Namecheap Hosting Expires?
Namecheap hosting expiration leads to website suspension. Renew promptly to restore services and avoid data loss. Access to emails and domains may also be affected. Regular reminders via email inform you before expiry, ensuring you stay updated.
Conclusion
Canceling Namecheap hosting is simple with the right steps. Start by logging into your account. Navigate to the hosting section. Select the service you wish to cancel. Follow the prompts carefully. Confirm your cancellation request. Check your email for confirmation.
This process ensures a smooth transition. Always back up important data first. Consider reaching out to support for assistance if needed. Understanding these steps saves time and effort. Don’t hesitate to seek help if issues arise. With patience, you can easily manage your hosting needs.