Have you ever felt overwhelmed by the technical jargon surrounding website management? You’re not alone.
When it comes to adding a subdomain with Namecheap, it might seem like you’re diving into a sea of complexity. But guess what? It’s easier than you think, and we’re here to guide you through it step by step. Imagine having a streamlined process at your fingertips, allowing you to expand your online presence effortlessly.
This article is crafted with you in mind, ensuring you gain the confidence and skills needed to master this task. Get ready to discover how simple it can be to elevate your website, just by adding a subdomain. Your journey to a more dynamic web presence starts here.
Credit: www.namecheap.com
Setting Up Your Namecheap Account
Creating a subdomain on Namecheap is simple. First, log in and access your Domain List. Find the domain you want to modify, then select ‘Manage’. Under the ‘Advanced DNS’ tab, add your subdomain by choosing ‘Add New Record’. Fill in the details and save your changes.
Setting up your Namecheap account is the first step towards managing your domain effectively. If you’re new to Namecheap, don’t worry—it’s a straightforward process. You might even find it surprisingly intuitive, much like setting up a new smartphone. Let’s dive into the essentials of getting your account ready for adding a subdomain. ###Creating Your Namecheap Account
To start, head over to Namecheap’s website. Look for the “Sign Up” button, usually located at the top right corner. Click on it and fill in your details, such as your name, email, and password. Don’t forget to use an email you check frequently. This is crucial for receiving important updates about your domain. Once you’ve submitted your information, check your email for a verification link. Click it to confirm your account creation. ###Verifying Your Email
Verification is a simple but vital step. Without verifying your email, you won’t be able to fully utilize your Namecheap account features. Imagine missing out on a great domain deal simply because your account isn’t verified! Once you receive the verification email, click the link, and you’re all set. ###Exploring Your Dashboard
After logging in, take a moment to explore your dashboard. Here, you’ll find essential tools for managing your domains, including options for DNS settings and SSL certificates. It’s similar to browsing through a new app—everything might look a bit overwhelming at first, but soon you’ll get the hang of it. Familiarize yourself with the layout, as you’ll be returning to this space often. ###Understanding User Preferences
Your preferences are where you can tailor the account settings to suit your needs. For example, you can set up two-factor authentication for added security. Isn’t it reassuring to know that your domain is safe from unauthorized access? Make these adjustments to ensure your account reflects your priorities. ###Setting Up Payment Methods
Adding a payment method is crucial for purchasing domains or renewing them automatically. Whether you prefer using a credit card or PayPal, Namecheap offers flexible options. Imagine the ease of having your domain renew automatically without the hassle of manual payments. Navigate to the billing section and add your preferred payment method to avoid future hiccups. ###Navigating Support And Resources
Namecheap provides excellent support through its knowledge base and live chat. Whenever you face an issue or have a question, these resources are your lifeline. Think of it as having a helpful friend ready to assist you whenever needed. Bookmark the support page—it’s better to have it and not need it, than need it and not have it! ###Preparing For Subdomain Setup
With your account ready, you’re now equipped to add a subdomain. Have you thought about how a subdomain could enhance your website’s functionality? Perhaps you want a separate blog section or a dedicated space for customer service. With your Namecheap account all set, you’re one step closer to making that happen.Creating A Subdomain
Creating a subdomain can enhance your website’s organization and functionality. Subdomains help categorize content, separate blogs, or even host a different website section. They act as extensions of your main domain, allowing for better management. Let’s explore how to create a subdomain with Namecheap.
Accessing Your Namecheap Account
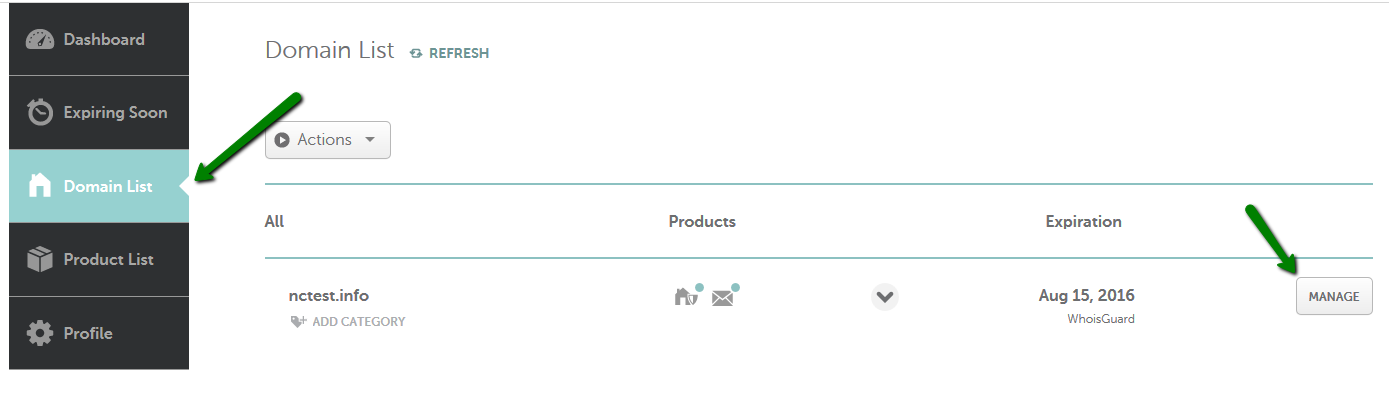
First, log in to your Namecheap account. Use your credentials to access your dashboard. Navigate to the ‘Domain List’ section. This is where you manage all your domains.
Selecting The Domain
Find the domain where you want to add a subdomain. Click on ‘Manage’ next to the chosen domain. This will take you to the domain management page.
Navigating To Advanced Dns Settings
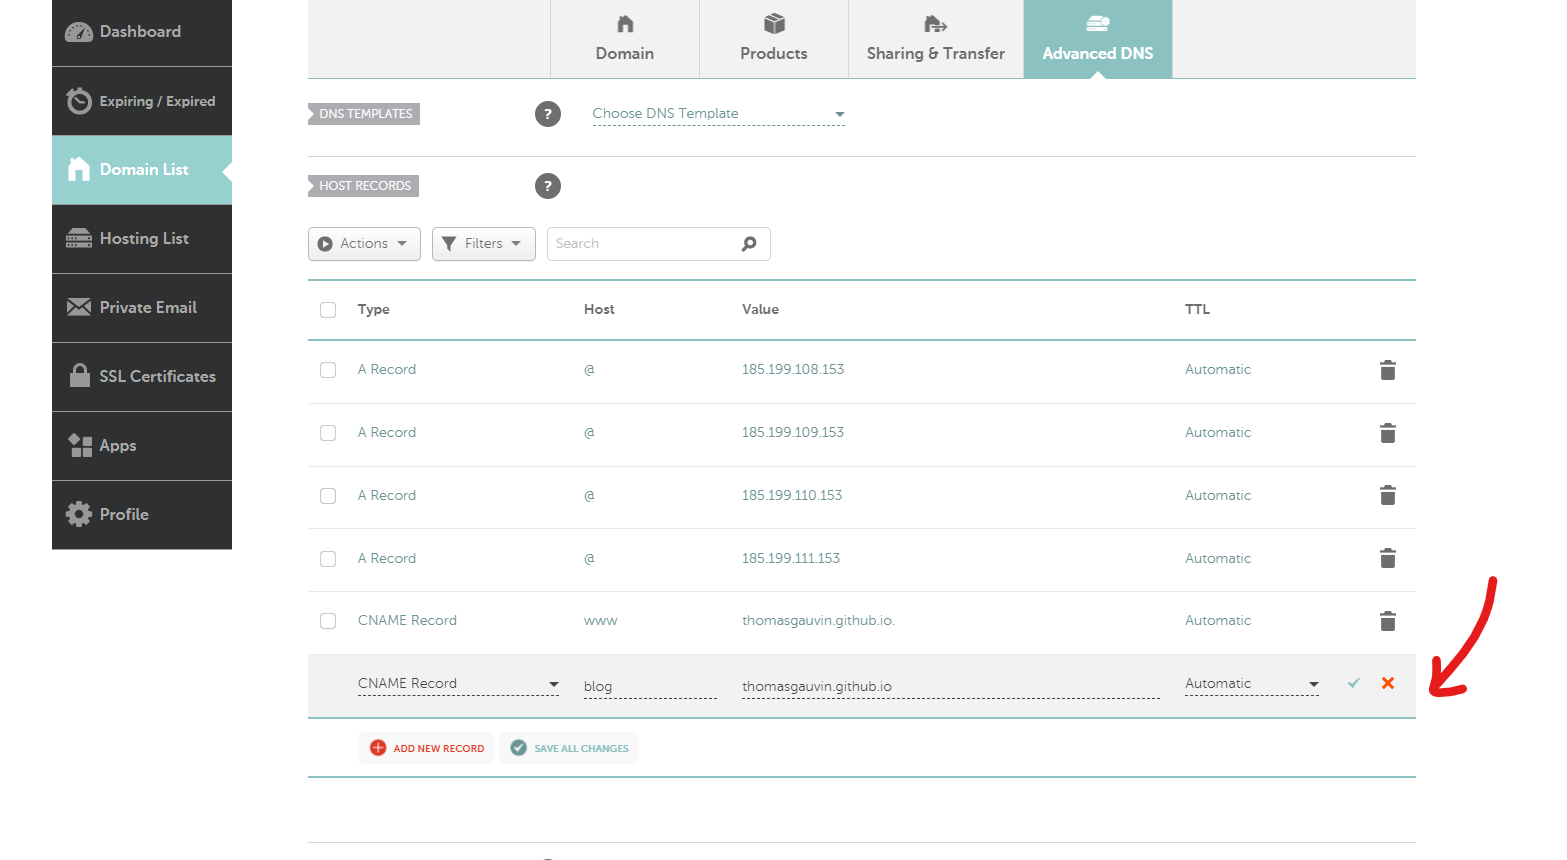
In the domain management page, locate the ‘Advanced DNS’ tab. Click on it to access the DNS settings. This area allows you to modify DNS records.
Adding A New Subdomain
Scroll down to the ‘Host Records’ section. Click ‘Add New Record’. Choose ‘CNAME Record’ or ‘A Record’ based on your needs.
Configuring The Subdomain Record
Enter your desired subdomain name. Fill in the ‘Value’ field with the target destination. Specify the TTL (Time to Live) for the record.
Saving Your Changes
Once all fields are filled, click the green checkmark. This saves your subdomain configuration. Allow some time for DNS propagation.
Verifying The Subdomain
After saving, verify your subdomain. Enter the subdomain URL in your browser. Ensure it directs to the correct destination.
Configuring Dns Settings
Adding a subdomain in Namecheap requires configuring DNS settings. First, log into your Namecheap account. Then, navigate to the domain list and select ‘Manage’. Under the ‘Advanced DNS’ tab, add a new record with your desired subdomain. Save changes to complete the setup.
Configuring DNS settings is like laying the foundation for your subdomain. It’s where you set the rules for how internet traffic reaches your new subdomain. You might be wondering if it’s complicated or time-consuming. Surprisingly, it’s quite straightforward, especially with Namecheap. Let’s dive in and make this process crystal clear.Understanding Dns Basics
DNS, or Domain Name System, is the internet’s address book. It translates human-friendly domain names into IP addresses that computers understand. This step is crucial for ensuring your subdomain points to the right location. Have you ever tried to visit a website and ended up somewhere unexpected? That’s often a DNS issue. By configuring DNS settings correctly, you ensure your subdomain reaches the intended destination.Accessing Your Namecheap Account
First things first, log into your Namecheap account. If you’re like me, you might have a dozen browser tabs open. But trust me, focusing on this task will save you headaches later. Navigate to the ‘Domain List’ section in your dashboard. This is where all the magic happens. It’s like standing at the gate of a bustling city; everything you need is right here.Choosing Your Domain
Select the domain you want to add a subdomain to. Clicking on the ‘Manage’ button brings you into a realm of possibilities. It’s like choosing a book from a library—each domain has its own story to tell. Once you’re inside, look for the ‘Advanced DNS’ tab. This is your toolkit for customizing DNS settings.Adding Your Subdomain
Now, click ‘Add New Record’. Here, you’ll select ‘A Record’ from the dropdown menu. This tells Namecheap where your subdomain should point. Enter the subdomain name and its corresponding IP address. It’s similar to giving directions to your friend—clear and precise.Setting Ttl Values
TTL stands for Time To Live, and it dictates how long a DNS record is cached. While default values work for most, adjusting TTL can improve how quickly changes take effect. Have you ever refreshed a page and wondered why updates aren’t visible? Tweaking TTL can help speed things up.Saving Your Changes
Finally, hit ‘Save Changes’. This step locks in your settings, making your subdomain ready for the world to see. Just like hitting ‘send’ on an email, there’s a sense of accomplishment. Are you ready to see your subdomain in action? Give it a few minutes to propagate across the internet. Soon, your new subdomain will be live and accessible, all thanks to a few simple steps in Namecheap.Credit: help.mailgun.com
Credit: thomasgauvin.com
Frequently Asked Questions
How Do I Add A Subdomain In Namecheap?
Log into your Namecheap account. Go to “Domain List” and click “Manage” next to your domain. Select “Advanced DNS. ” Click “Add New Record,” choose “CNAME Record,” and enter the subdomain details. Save the changes to complete.
Is A Subdomain Bad For Seo?
Subdomains aren’t bad for SEO, but they can complicate it. Search engines treat subdomains as separate entities. Ensure proper optimization and linking between subdomains and the main site to maintain authority. Properly managed, subdomains can benefit your SEO strategy.
How To Connect A Subdomain To Hosting?
Access your hosting control panel and locate the DNS settings. Create a new A or CNAME record. Point the subdomain to your hosting server’s IP address. Save changes and allow time for DNS propagation. Your subdomain should now be connected to your hosting.
How Do I Point A Subdomain To Another Domain?
To point a subdomain to another domain, update the DNS settings. Create a CNAME record for the subdomain. Set the target to the desired domain’s URL. Save changes and allow DNS propagation. This process typically takes a few hours.
Conclusion
Adding a subdomain on Namecheap is simple and straightforward. Start by logging into your account. Then, access your domain list. Click on “Manage” next to your domain. You will find the option to create a subdomain. Follow the prompts. Your subdomain will be ready in minutes.
This process helps organize your website better. Perfect for blogs, shops, or forums. No technical expertise needed. Just follow the steps. Enhance your online presence with ease. Enjoy the new possibilities a subdomain offers. Keep exploring and expanding your website.
It’s that easy!